Newer games are getting bigger in size. On top of that, the game data and files are also starting to consume a notable amount of disk space. So, it’s not a surprise if your hard disk is running out of memory. However, no matter which game launcher you prefer to use, there is always a way to transfer your game to another disk drive.
SSDs have grown to have a larger disk space over the past few years. And, considering its significantly faster data transfer speed than HDD, transferring games to an SSD drive is a boon. Not only will you be able to experience the game with a shorter loading time, but you’ll also notice that the game is a lot smoother than it used to be.
So, this guide aims to help you transfer your games from an HDD to an SSD, either by using your launcher’s built-in features or by working around the matter. Now, let’s move straight to the point.
Why Transfer Games to an SSD?
- An SSD provides you with a smoother gaming experience
- You’ll experience fewer game shutters
- With a faster data transfer rate, SSD allows a game to load quicker
- With no moving parts, you’ll hear less noise while playing a game saved on an SSD
- SSD draws less power and hence, a lower CPU temperature
How to Transfer Games From HDD to SSD
Transferring games from an HDD to an SSD is a pretty straightforward approach. As previously mentioned, most game launchers provide you with a specific feature to do so, however for some, we might have to be a little creative and look for workarounds.
Listed below are the exact steps you can take to transfer games to an SSD using some of the most popular game clients.
Steam
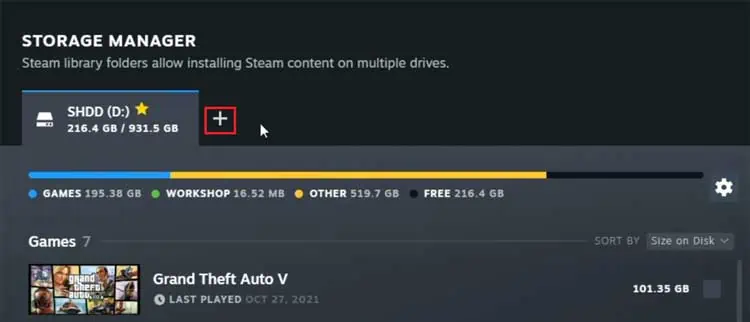
To put it in brief, you have to create a new library folder in the SSD drive and move the installed game to this folder directly through the Steam application. The steps below explain how to transfer steam games to an SSD.
- Open the Steam app.
- Hover towards the top left corner and click on Steam.
- Go to Settings.
- Click on Downloads.
- Now, select Steam Library Folders.
- Click the + button that’s beside one of your disk drives.

- Select a path on the SSD drive you want to move your games to and click on Add.
- Now, go back to the Steam Library Folders window.
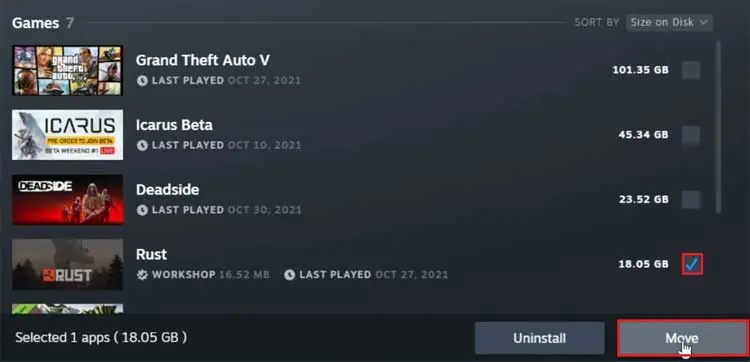
- From the original steam library drive, select the game you want to transfer.
- Click on Move.

- Select the SSD drive where you previously created a steam library folder.
- Finally, Move your game.
If you had already created a new library folder on your SSD, you can move your games directly from the library. So, for this,
- Open the Steam app.
- From the left panel, right-click on the game you’d like to transfer.
- Select Properties.
- Click on Local Files.
- Now, Move install folder.
- Select the SSD drive from the dropdown box and click on Move.
Epic Games
The Epic games launcher does not provide users with a built-in way to move your installed game to another location. However, that doesn’t mean we cannot transfer games to an SSD. Using a workaround, we can trick the launcher itself to move your game folder. So, for this,
- First of all, go to your epic game’s installation location and copy the game folder to your SSD drive.
By default, the installation directory isC:\Program Files\Epic Games. - Now, Open the Epic Game Launcher.
- Go to the Library.
- Click on the three dots that are beside the game you want to transfer and select Uninstall.

- Once the uninstallation process is complete, go back to Library.
- Install this same game by selecting the SSD drive as your installation directory.

- Once 1-2% of the game is downloaded, click on the three dots that are beside the game and select Cancel Install.
- Now, go to the installation directory on your SSD drive and copy the game folder from step 1 to this location.
- Click Replace if prompted.
Origin
A newer update of Origin seems to have removed the previous built-it feature to move your game. So again, we have to rely on a workaround to move your game to an SSD. Here, you have to change the download location to transfer your games to an SSD. For this,
- First, navigate to your SSD drive and create a new folder, and name it Origin Games.
- Now, open Origin.
- Hover towards the top left corner and click on Origin.
- Select Application Settings.
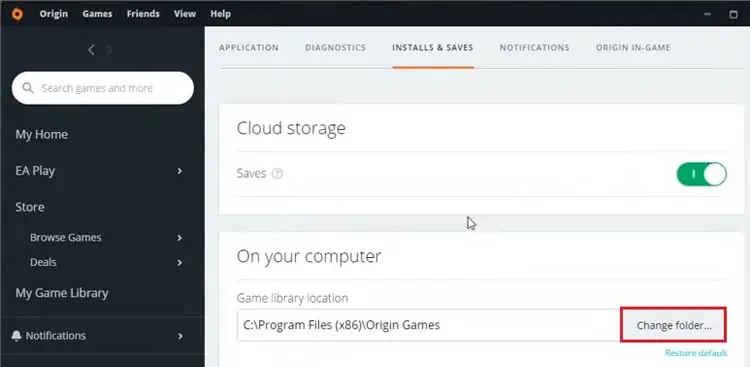
- Go to the Installs & Saves section
- From under the Game library location, click on Change folder.

- Choose Origin Games on the SSD drive and Select Folder.
- Once you change the download location, close Origin.
- Go to the original Origin game installation directory.
The default location is set asC:\Program Files (x86)\Origin Games. - Cut your game folder and paste it on Origin Games of the SSD drive.
- Now, open Origin once again.
- Go to My Game Library.
- Select the game you transferred to the SSD and click on Download.
This step doesn’t download the game but checks the integrity of your game files on the SSD drive. - Once the installation and verification process is complete, you can launch the game directly from your SSD.
Microsoft Store
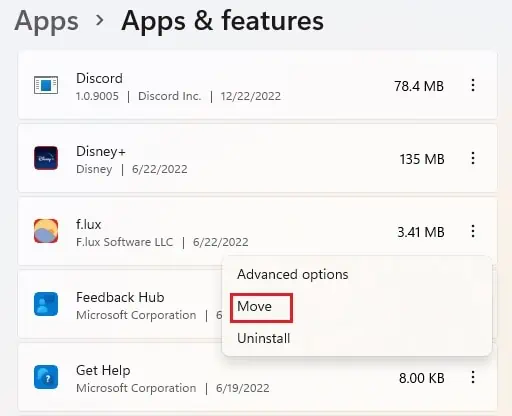
Games downloaded from the Microsoft store are probably the easiest ones to transfer to an SSD. All the processes can be completed directly from the settings app. Here are the steps to do so:
- Press Win + I to open Settings.
- Select Apps from the left panel.
- Click on Apps & features.
- Click on the three dots that are beside the game you want to transfer and select Move.

- From the drop-down menu, select the SSD drive.
- Finally, Move your game.
Battle.net
Battle.net also does not have any built-in feature to move your game to another drive. However, we can direct the game launcher to read and run the game from our desired location. So, to do this,
- Open the Battle.net client.
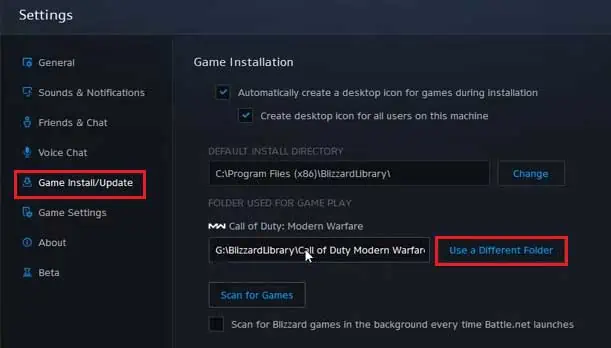
- Click on the blizzard icon on the top left corner and select Settings.
- Go to Game Install/Update.
- Note the folder where your game is installed.
- Go to this folder on your computer, cut the game folder and paste it onto your SSD drive.
- Now, go back to the Battle.net application.
- Navigate back to the Game Install/Update window.
- From under the game you moved, click on Use a Different Folder.

- Select the folder on the SSD drive you moved the game to.
- Finally, hit Done.
Ubisoft UPlay
The UPlay game service has a workaround similar to that of Battle.net. That is, you have to move the entire game folder and redirect the launcher to run the game from a new file path. For this,
- Navigate to the Ubisoft game’s installation directory.
By default, it isC:\Program Files (x86)\Ubisoft\Ubisoft Game Launcher\Games. - Now, cut and paste the game folder to your SSD drive.
- Open UPlay.
- Go to the Games tab.
- Right-click on the game you moved to an SSD and select Uninstall.
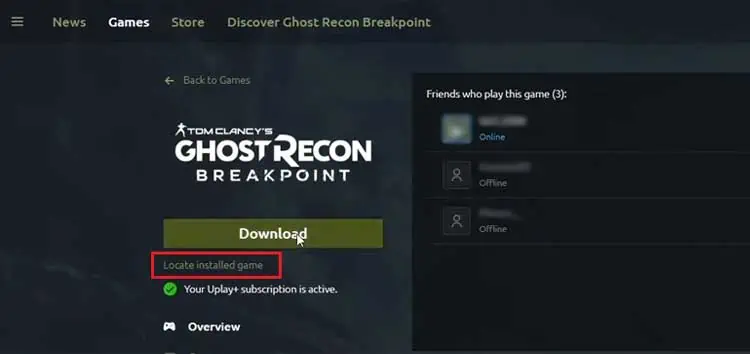
- Once the process is complete, go back to the Games tab on UPlay and click on the game you uninstalled.
- From under the Download button, click on Locate Installed Game.

- Select the game folder you copied to the SSD drive and click OK.
- Once the verification process is complete, you can run the game directly from your SSD.
GOG Galaxy
Similar to the aforementioned workarounds, you can trick the GOG Galaxy launcher to run games from your SSD by copying the game files from the file explorer. So, the steps below show you how to do so:
- Navigate to the GOG game’s installation directory.
By default, it isC:\Program Files (x86)\GOG Galaxy\Games. - Cut and paste the game folder to your SSD drive.
- Now, open GOG Galaxy.
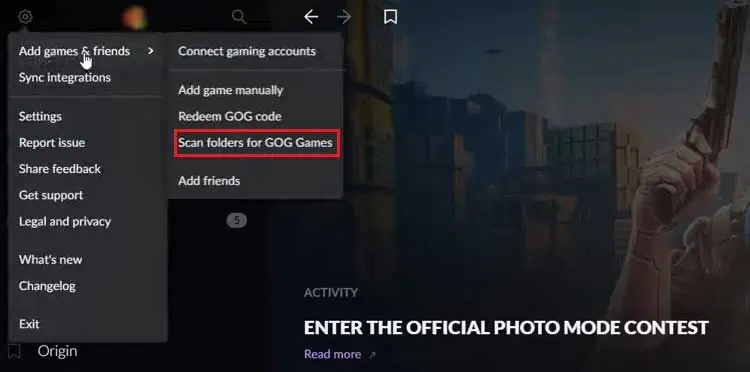
- Click the Gear icon on the top left corner of your screen.
- Select Add games & friends.
- Now, click on Scan folders for GOG Games.

- Choose the game folder you moved to the SSD Drive and click Select Folder.
- Let the validation process complete and then, you can start your game.
Riot Games
The process to transfer a Riot game is a bit more complicated than the ones mentioned above. However, it’s not impossible as the game path can be altered from the JSON file. So, to do this:
- Navigate to your game installation directory, cut the game folder and paste it onto your SSD drive.
- Press Win + R to open the run command box.
- Type and enter
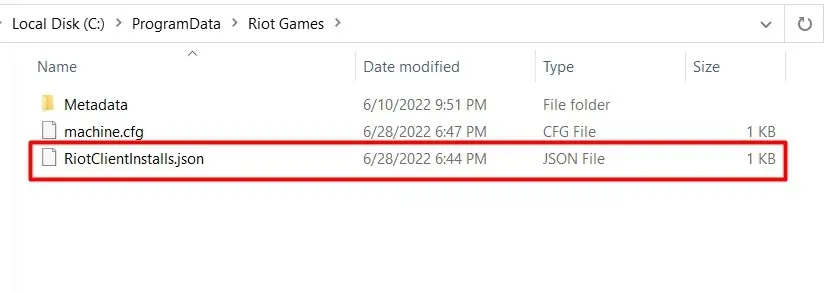
%programdata%. - On a Window that appears, find and open the Riot Games folder.
- Now, right-click
RiotClientInstalls.jsonand open it with Notepad.
- Copy the new game file path from your SSD drive and replace the one on the
associated_clientgame address.
Note that the 1st address of theassociated_clientis the game path and the second address is the Riot client path. You have to replace the game path with your new SSD path. - On the copied file path, replace the backslashes (\) with forward slashes (/).
- Save the notepad file.
- Navigate to the Riot Games folder on
%programdata%. - Open the Metadata folder.
From here onwards, I’ll take Valorant as an example to prevent any kind of confusion. However, similar steps can be followed for other Riot games as well. - Open the
valorant.livefolder. - Now, open
valorant.live.product_settings.yamlwith notepad. - Copy your new game’s file path on the SSD and replace the one on
product_install_full_path.
- Replace the backslashes (\) with forward slashes (/).
- Also, replace the file path on
product_install_rootwith the new root file on your SSD. - Replace the backslashes (\) with forward slashes (/).
- Finally, save and exit the notepad file.
However, if your game source is not from any engines such as origin, steam, etc., you can directly copy the game folder from the installation location and paste it on your SSD drive.
How to Back Up Your Game’s Saved Files?
It’s wise to back up your saved files if you want to protect them from any forms of corruption or deletion. It is also possible to use this saved data if you’d like to get back to your game sometime in the future.
Your game’s saved files are usually located in the AppData folder on your computer. The saved file can be backed up to another disk or to a USB from this location. The steps to back up your saved files are:
- Navigate to This PC on your computer.
- Go to Local Disk (C:).
- Now, select Users.
- Double click on the name of your computer.
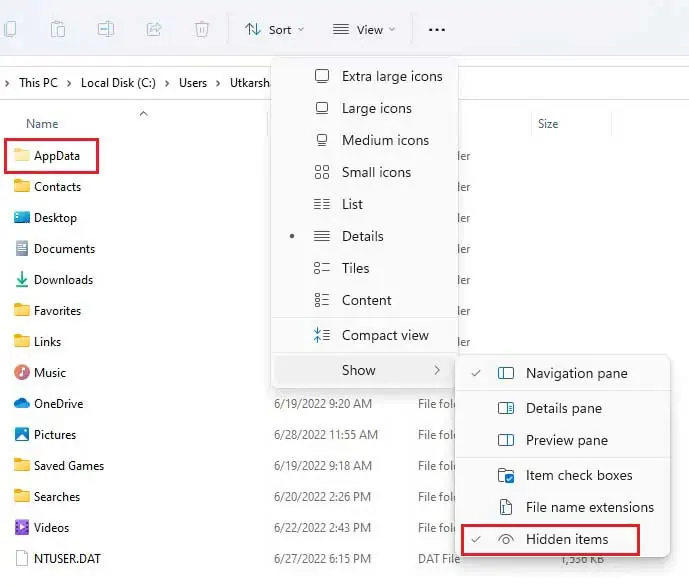
- Now, from the File Explorer’s ribbon menu, click on View.
- Hover towards Show and click Hidden items.

- Go to AppData, find your game’s saved folder, and copy it onto an external drive.
Your AAA game’s saved data are usually found in the Local folder. Any files from your local computer are stored in this folder.
Similarly, smaller-sized game files are stored in the LocalLow folder and online game saved data are usually stored in the Roaming folder. The Roaming folder consists of data that are linked to a particular account in a particular domain.

