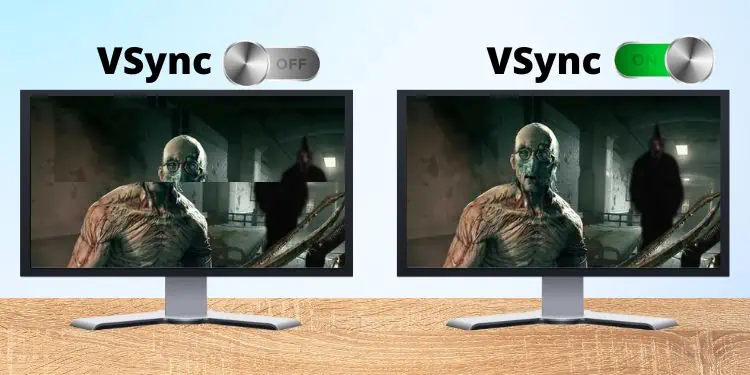
You’ve probably experienced distorted images while playing fast-paced video games. This happens when your monitor’s refresh rate is not in sync with the GPU’s frame rate.
Now, that’s when VSync comes into play, as this technology ensures that your GPU only renders the refresh rate supported by your display. Thus, providing you with a smooth and flicker-free gaming experience.
However, turning on VSync isn’t always useful, as there are cases when your frame rate drops significantly, or you may even face input lags. So, there are times when you need to disable the feature to enjoy the GPU’s maximum performance.
In this article, we will guide you on what Vsync is and when you should use it. Also, you’ll explore how to turn it on or off on various GPU control panels.
What is VSync and What Does it Do?
Sometimes, when playing fast-paced games, there’s a slight change in motion. And if your monitor isn’t capable of supporting the FPS, you’ll likely experience screen tearing and glitchy images.
Let’s say you have a 144 Hz monitor, but your GPU is trying to run a video game at a higher frame rate than your monitor can handle. In such a case, your display can’t render the fast-moving images well, and you’ll notice multiple frames shown at once.
Basically, VSync has been introduced to get rid of this exact problem of screen tearing. Once the feature is turned on, a frame rate cap is set that doesn’t let the GPU exceed the monitor’s highest supported refresh rate.
So, the games will run at the best speed possible when both the GPU’s frame rate and the monitor’s refresh rate sync well. Most importantly, your screen won’t tear, and you won’t notice multiple frames trying to render simultaneously.
Pros and Cons of VSync
Well, there can be both advantages and disadvantages to using VSync. So, before turning it on or off, find out what this feature can and can’t do:
- Fixes screen-tearing
- Available on most GPUs
- Helps you run old or outdated games
- Reduces excessive heating and strains on graphic cards
- Input lag issues
- No additional graphics advantage
- Some fast-paced games might not work as expected
- Can’t take advantage of GPU’s actual performance
Is It Good to Turn VSync Off or On?
Turning VSync on or off completely depends on the situation you’re in. Although enabling the option shouldn’t harm your video games, there can still be a few disadvantages, which we have already discussed earlier.
Nonetheless, we have listed down a few ideas on when you should turn VSync on and when to turn it off.
When to Turn On
Turning on VSync is based on your preference. Basically, if you want to prioritize your monitor’s performance over the GPU, we suggest enabling it.
- If a game outputs a higher frame rate, but your monitor doesn’t support it
- You want to personally reduce the frame rate so that the GPU can adapt to older games
- The graphics card is overheating
When to Turn Off
If you’re happy with how VSync is functioning, turning it off is unnecessary.
- You’re experiencing slow keyboard and mouse input
- Your game’s FPS has gone down all of a sudden
- A game that was rendering well when turned off has stopped doing so when turned on
How Can I Turn Vsync On or Off?
Every GPU has dedicated software that lets you control several graphics-related settings, including Vertical Synchronization. In this section, we have included all the required steps to tweak it on NVIDIA, AMD, and INTEL graphics cards.
In NVIDIA Control Panel
Undoubtedly, NVIDIA produces one of the most popular consumer graphics cards. So, there’s definitely a dedicated setting for VSync in its control panel.
Before moving ahead, ensure the application is installed on your PC. Else, you can directly download the software from the Microsoft Store. Now, follow the below steps to turn this feature on or off on Windows 11:
- On your desktop, right-click anywhere and click on Show more options.
- Next, choose the NVIDIA Control Panel.
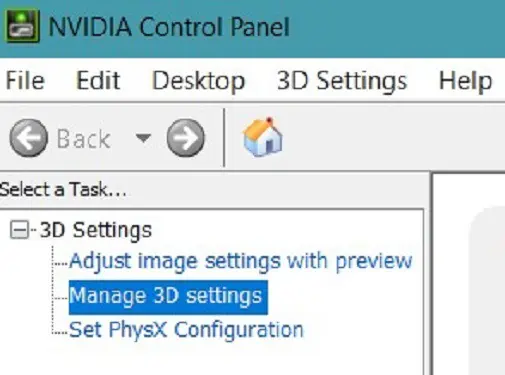
- Once the control panel launches, expand the 3D Settings option from the left panel.
- Here, choose the Manage 3D Settings option.

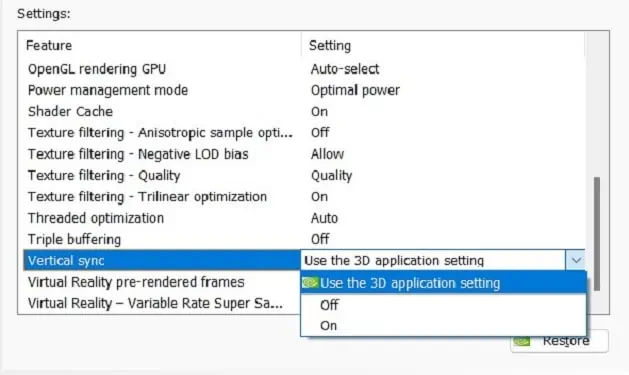
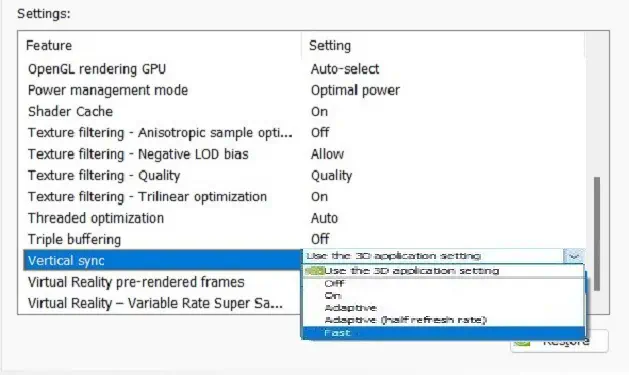
- Now, move to the right window, and under Settings, find Vertical Sync.
- Basically, you’ll have three options – Use the 3D application setting, On, and Off. Choose On to turn on VSync and Off to disable it. On the other hand, selecting the first option will set whatever VSync settings you have applied in a certain game.

- Finally, click on the Apply button.
In AMD Software
While NVIDIA is famous for its dedicated graphics card, AMD is equally popular among integrated GPU users. Like NVIDIA, AMD also has different programs to tweak various settings.
For demonstration purposes, we have used AMD Software: Adrenalin Edition to turn VSync on and off. So, we recommend downloading it first and then moving ahead with the below guide:
- Navigate to desktop and right-click anywhere to select Show more options.
- Then, click on AMD Software: Adrenalin Edition to launch the application.
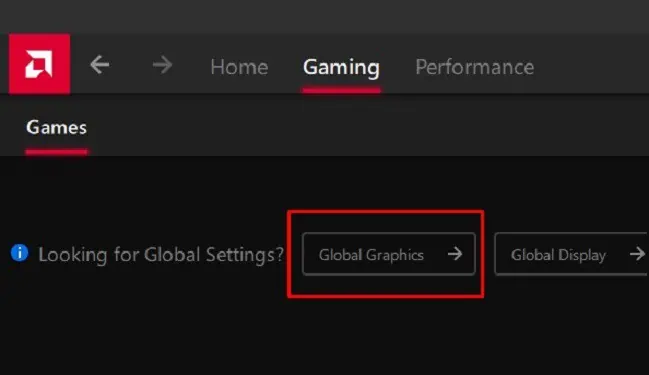
- Once the window opens, go to the Gaming tab from the menu bar.
- Next, choose Global Graphics.

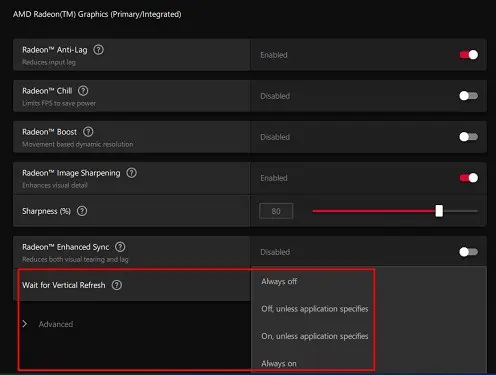
- Scroll down and find the Wait for Vertical Refresh option. Here, expand the drop-down, and you will explore four options – Off, unless the application specifies, On, unless the application specifies, Always On, and Always Off.

In INTEL Graphics Command Center
Unlike NVIDIA and AMD, INTEL manufactures both integrated and dedicated graphics cards. Moreover, they also have a dedicated software called Intel Graphics Command Center to change various display and video settings. Here’s how to turn off VSync or enable it using this application:
- First of all, open Microsoft Store and search for Intel Graphics Command Center and download the program, if not installed.
- Now, launch the program from the Start Menu.
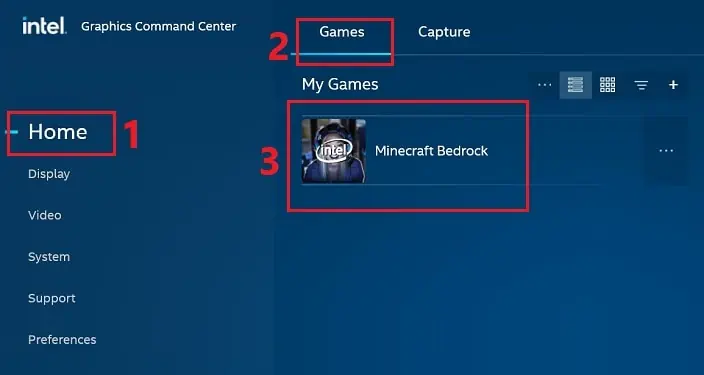
- Then, select the Home panel and go to the Games tab.
- Under My Games, click on the game you wish to apply the changes.

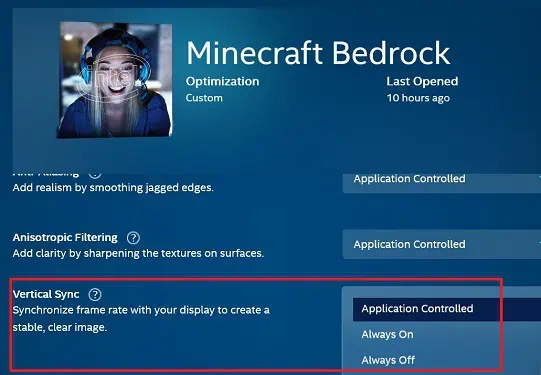
- Scroll down and find Vertical Sync. Here, you can select one of these three options – Application Controlled, Always On, or Always Off.

If you choose the first one, you may need to tweak a few settings inside the game. Else, you can choose either of the last two options to enable or disable VSync.
Note: Like INTEL Graphics Command Center, the INTEL UHD Graphics Control Panel also allows you to turn VSync on or off using similar steps. Unfortunately, it doesn’t work for DirectX* games or similar applications.
Alternatives to VSync
Although VSync is great for eradicating screen tearing, it still faces input lag issues. So, popular GPUs like NVIDIA and AMD have developed some alternative features. In this section, we will discuss those and learn how to enable them.
G-Sync
NVIDIA’s GSync has improved in terms of input lag and stuttering. So, instead of using VSync, some gamers prefer enabling G-Sync directly from the NVIDIA Control Panel:
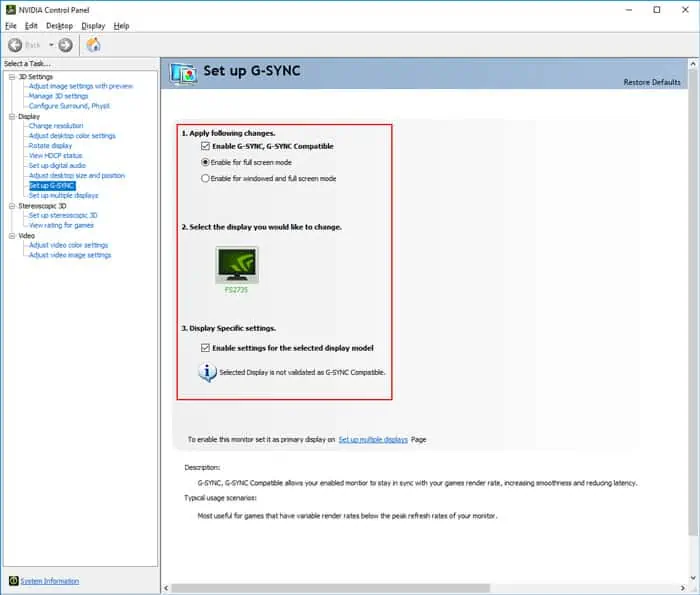
- Once the application is launched, go to Display > Set up G-Sync.
- Under Apply following changes, check the Enable G-Sync/G-Sync Compatible option.
- Then, choose your display and check the Enable settings for the selected display model option.
- Finally, navigate to the Manage 3D option from 3D Settings and choose G-Sync/G-Sync Compatible in the Monitor Technology option.

FreeSync
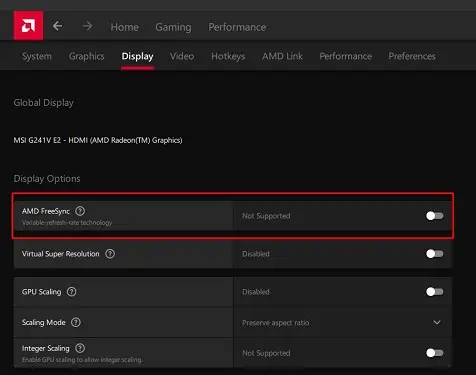
Like NVIDIA, AMD also offers a similar feature called the FreeSync. Basically, it works by offering dynamic refresh rates to solve a video game’s lagging issues. Here’s how you can turn on FreeSync from the AMD Software:
- Once you’ve opened the software, click on the Display tab.
- Under Display Options, toggle on the AMD FreeSync Option.

- If you want to enable the feature for just a particular game, go to the Gaming tab and choose a game. Then, find AMD FreeSync and choose the On option from the drop-down.
Adaptive Sync
The adaptive sync technology offers the smoothest streams with lower latency. Well, the main disadvantage of VSync is that your refresh rate and frame rate both may go down due to input lagging. So, this feature was introduced to solve lagging and avoid screen tearing issues.
If you have an NVIDIA GT 600-series graphics card, you can take advantage of this VSync alternative. Here’s how you can enable Adaptive VSync on NVIDIA Control Panel:
- Once you launch the application, go to 3D Settings > Manage 3D Settings.
- In the Global Settings tab, scroll down and expand the options available on Vertical Sync.
- Then, click on Adaptive and press the Apply button to save the changes.

Fast Sync
If you have a newer version of the NVIDIA graphics card, you may get the option to try out the FastSync option. Basically, the feature maintains the latency and tries to reduce input lag during games. Follow the below guide to enable this feature:
- Navigate to NVIDIA Control Panel > 3D Settings > Manage 3D Settings.
- Then, choose Global Settings, and under Vertical Sync, select the Fast option.

- Click on Apply to save the settings.
Enhanced Sync
Like the Adaptive and Fast Sync options on NVIDIA, AMD Radeon provides a feature to prevent FPS from dropping. However, the option is only available on the latest graphic cards. This is called the Enhanced Sync, and here are the steps involved in turning this feature on:
- Open AMD Software and go to Gaming > Global Graphics.
- Here, find and toggle on the Radeon Enhanced Sync option.

Enabling this option will disable the Wait for Vertical Refresh feature.

