The Windows Defender can do a good job be keeping your data safe from all sorts of foreign threats even without installing any 3rd party anti-virus programs.
While Windows Defender protects your computer from various malicious threats, it could also prevent the computer from running certain programs. Especially the ones created by unknown or lesser-known 3rd parties. In such a case, disabling the Windows Defender is necessary to smoothly run the desired programs.
How to Turn Off Windows Defender
Windows Defender can be easily turned off and it won’t take more than a few minutes. In case the simple methods aren’t working out for you, we’ve listed the more in-depth ways how you can turn off Windows Defender on your computer.
Turn Off Windows Defender on Windows 10 / 11
Turning off the Windows Defender will put your computer at risk if you don’t have any 3rd-party anti-virus program installed on your computer. But, if you do have it, turning off Windows Defender is safe. To turn off the real-time protection of Windows Defender on Windows 10 or 11, perform the following steps:
- Go to Settings.
- Click on Updates & Security.
- Click on Windows Security from the left pane.
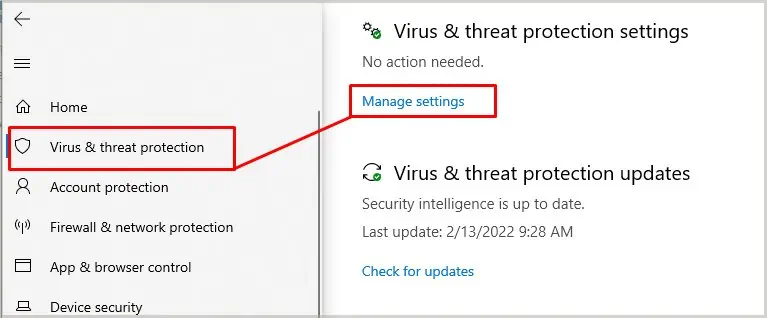
- Click on “Virus & Threat Protection” and choose “Manage Settings” from the menu.

- Switch off the Real-time protection and the Windows Defender will be turned off.

But, upon restarting your computer, Windows Defender would start on its own and will continue to protect the computer from any threats. And in the meantime, if any malicious files are detected, they will be quarantined and the users will have the option to either recover them or remove them permanently.
Turn Off Windows Defender on Windows 7/8
Windows Defender is made available for Windows 7/8 as well and it protects the computer from various malware and Spywares. But if you want to disable Windows Defender on Windows 7, you will have to perform the following steps:
- Press start and click on ‘Control Panel’ from the menu.
- Search for ‘Windows Defender’ and double click on it.
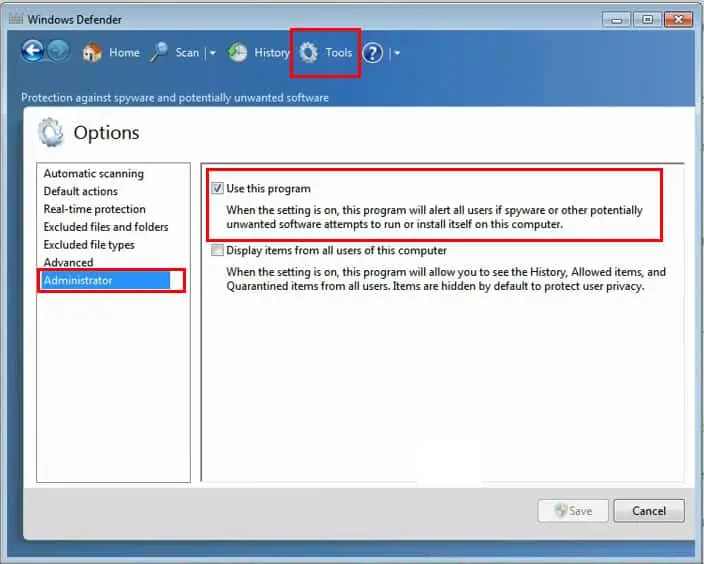
- If the real-time protection is on, click on ‘Tool’ located on the ‘Menu Bar’ on top of the window.
- Click on Options.
- Navigate to the ‘Administrator’ section and uncheck the box that says ‘Use this Program’ and click on save.

Permanently Turn off Windows Defender on Windows
The method discussed above temporarily disables Windows Defender until the computer is restarted, but it is not a long-term solution. If the users want to permanently turn off the Windows Defender on Windows, they will have to disable it through the Registry Editor. To permanently turn off Windows Defender, perform these steps:
- Press ‘Windows + R.’
- Write ‘regedit’ and press Enter.
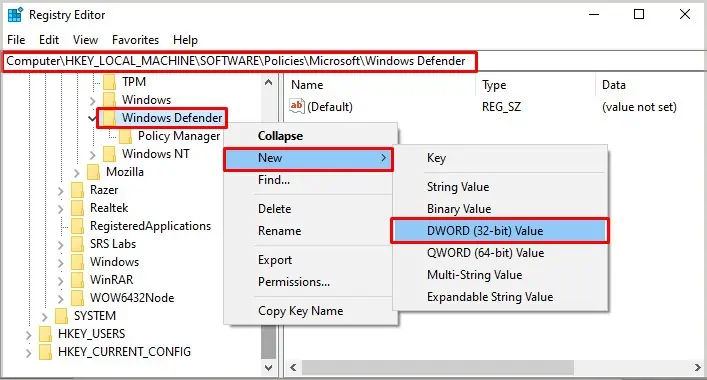
- From the listed folder, navigate to:
HKEY_LOCAL_MACHINE > Software > Policies > Microsoft > Windows Defender - Once you’ve selected the “Windows Defender” folder on the Registry Editor, right-click on the screen and create a “New > DWORD (32-bit) value file.

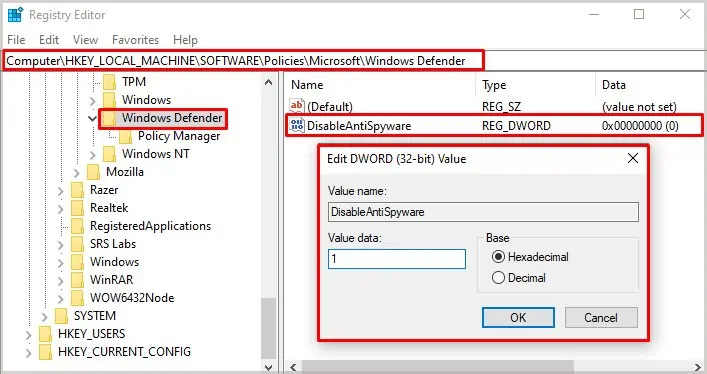
- Name the file “DisableAntiSpyware.”
- Afterward, double-click on the “DisableAntiSpyware” file and set “Value Data to 1.”

- Click ‘Ok’ and reboot the computer.
With this method, you will permanently disable the Windows Defender from your computer. Upon rebooting the computer, the services of Windows Defender will be suspended. Furthermore, if you want to turn on the Windows Defender again, you will have to delete the “DisableAntiSpyware” file from the Registry Editor.
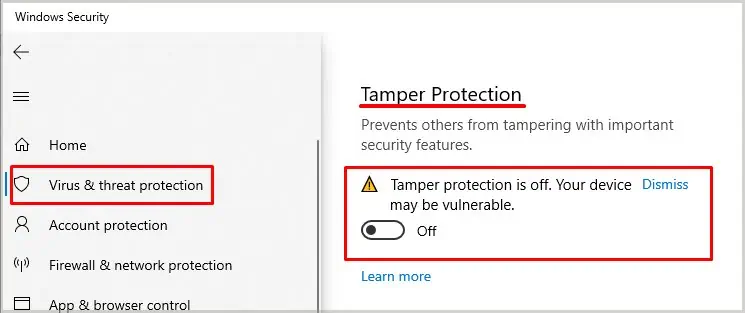
On some computers, users have to disable the “Tamper Protection” to make edits in the Registry Editor. If you can’t seem to create/edit the Windows Defender file in Registry Editor, make sure that the “Tamper Protection” is turned off. To turn off the “Tamper Protection”, perform the following steps:
- Go to Settings.
- Go to “Updates & Security” and navigate to “Virus & threat protection.”
- Scroll down the window and find the section that says “Tamper Protection.”
- Switch off the Tamper Protection.

It is now possible to edit the Registry Editor if you had previously been unable to do so.
Turn Off Windows Defender on Windows Through Group Policy
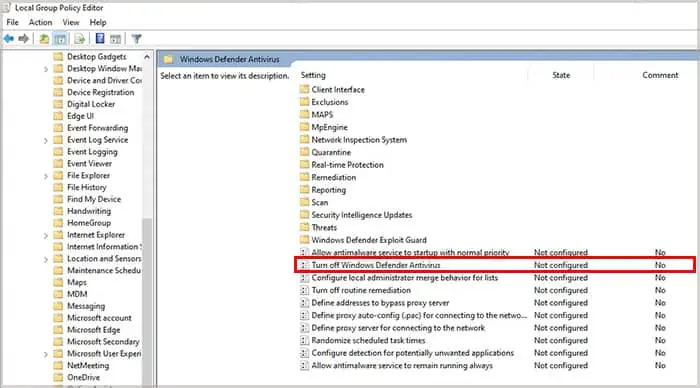
An alternative method that could be used to turn off Windows Defender is by turning it off from the Windows group policy. Using this method would also permanently disable the Windows Defender on your computer. All real-time protection would be turned off and the scheduled scans will also stop running.
To turn off Windows Defender on Windows, perform these steps:
- Press “Windows + R” and type “
gpedit.msc” in the search bar and press Enter. - The window for ‘Local Group Policy Editor’ will appear.
- Afterward, navigate to:
Computer Configuration > Administrative Templates > Windows Components > Windows Defender Antivirus (Windows Defender on Windows 7) - Once you’ve successfully navigated to the “Windows Defender Antivirus” folder, double-click on “Turn off Windows Defender Antivirus.”

- From the window, check the box for ‘Enable’ and click on ‘Apply.’

- Close the window and restart the computer.
Turn Off Windows Defender From Services
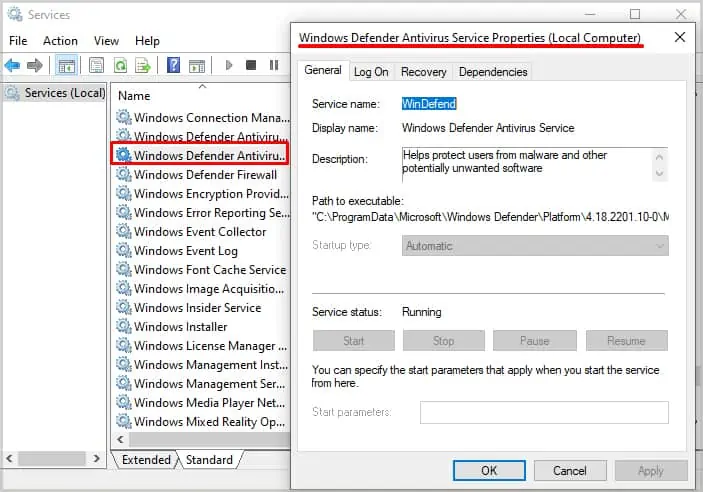
Windows Defender can be turned off from the services section as well. Users can use this option to temporarily or permanently turn off the services of Windows Defender, depending on their preferences. To turn off Windows Defender from the ‘Services’ section, perform the following section:
- Press “Windows + R”
- Type “
services.msc” and press Enter. - From the services section, find and double-click on “Windows Defender.”
- Choose the “Disabled” option from the ‘Startup Type’ menu.
- Click on “Apply.”

- Reboot the computer and check if the service is running or not.
To restart the service of Windows Defender, choose “Automatic (Delayed Start)” from the ‘Startup Type’ menu.
Turn Off Windows Defender Using Windows Powershell
Windows built-in tool Powershell can also be used to turn off Windows Defender. To use this method, follow these instructions:
- Press start and search for “Windows Powershell” and run it as administrator.
- Run this command:
Set-MpPreference -DisableRealtimeMonitoring $true
(Using the command will turn off the real-time protection of Windows Defender and any scheduled scans will also stop.) - And once you’ve decided to turn on the Windows Defender using Windows Powershell, type this command into the Windows Powershell:
Set-MpPreference -DisableRealtimeMonitoring $false
Furthermore, if you completely want to uninstall Windows Defender using the Windows Powershell, you will need to follow these steps:
- Open Windows Powershell with administrator privileges.
- Type and run this command:
Uninstall-WindowsFeature -Name Windows-Defender
Turn Off Windows Defender Using Command Prompt
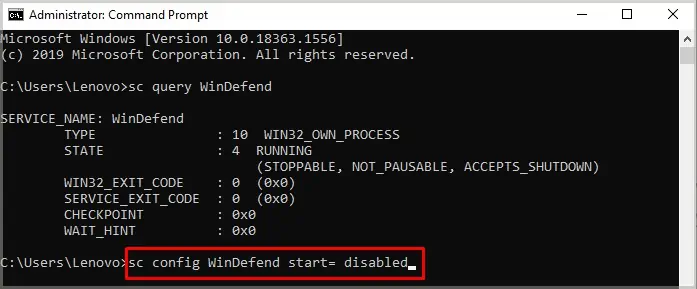
Command Prompt or CMD could also be used to turn off Windows Defender and can also be used to check its real-time status. Aside from disabling Windows Defender, CMD could also disable it permanently as well. To turn off Windows Defender using Command Prompt, perform these steps:
- Press Start and search for ‘CMD’ and run it as administrator.
- Type and run this command:
sc stop WinDefend - To make sure that Windows Defender is stopped, run this command:
sc query WinDefend
The status of Windows Defender will be displayed. If it has stopped working then the status would appear as stopped. Moreover, to permanently turn off Windows Defender using CMD, perform these steps:
- Run this command:
sc config WinDefend start= disabled
- Then this command:
sc stop WinDefend - Reboot the computer.
- Run the query command again to see the status of Windows Defender:
sc query WinDefend


