Many new laptops come with a touch screen feature, but it is still not as convenient as the good old cursor. I, for instance, am so used to using a mouse on my laptop that not having one can seriously hinder my performance.
However, the cursor can sometimes get locked. No matter how much you try, the cursor stays put in a single place. It can be because the device drivers are failing, settings are misconfigured, or someone might’s accidentally disabled it.
In this article, we have covered information on how to unlock the cursor on a laptop.
How to Unlock Cursor on Windows?
There are several methods for unlocking the cursor on your laptop. However, before we begin, ensure that only the cursor is locked and not your whole system.
You can press the windows key to open the start menu and see if it opens. If it does, only your cursor is locked, but if it doesn’t, your whole computer is likely frozen.
Here are some other common methods for unlocking the cursor on Windows.
Enable Touchpad From Function keys
It is very simple to disable the Touchpad from the keyboard, and people usually accidentally press it. The cursor gets locked, and the Touchpad stops working.
You can press the ‘Touchpad disable’ function key to re-enable the Touchpad. The key’s position may vary from laptop to laptop, but it is in one of the 12 function keys. You can usually find it in the F6, F7, or F8 keys. As some laptops may vary, you may also have to press the function key together with the Fn key.
If this method doesn’t work for you, try the other methods on this list.
Enable Touchpad From Settings

You can also disable or enable the Touchpad from settings. Furthermore, if you don’t have a mouse lying around, we have a method to enable Touchpad from settings by only using the keyboard.
Additionally, the Touchpad has to be enabled in both the function key and settings to work. If your Touchpad is disabled from the function key, but the settings show it to be enabled, your Touchpad still won’t work. The disable touchpad function key and the touchpad option in settings are independent.
After trying this method, try enabling Touchpad from the function key.
Here’s how to do it:
Using Mouse and Keyboard
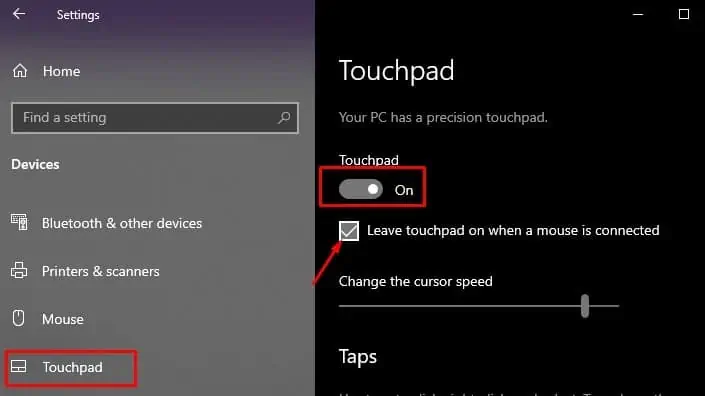
- Open settings and select Devices.
- Select Touchpad from the left sidebar.
- In the right panel, toggle on the Touchpad option.

- Also, select the Leave touchpad on when a mouse is connected option if disabled.
Using Only a Keyboard
- Press Windows key + I to open settings.
- Tap the Tab button and arrow keys to select Devices.
- Press the Tab button and arrow keys again to select Touchpad and press Enter.
- Press Tab to cycle through the options, and press spacebar to toggle off Touchpad.
If the Touchpad option is not present in the left sidebar, your Touchpad driver is probably disabled.
Enable & Update your Touchpad Driver
Your touchpad may also get locked if the touchpad driver is outdated or disabled. An outdated driver can’t perform its functions properly, and a disabled driver fully cuts the communication between the hardware and the system.
Here’s how to update and enable your touchpad driver with and without a mouse:
Using Mouse and Keyboard
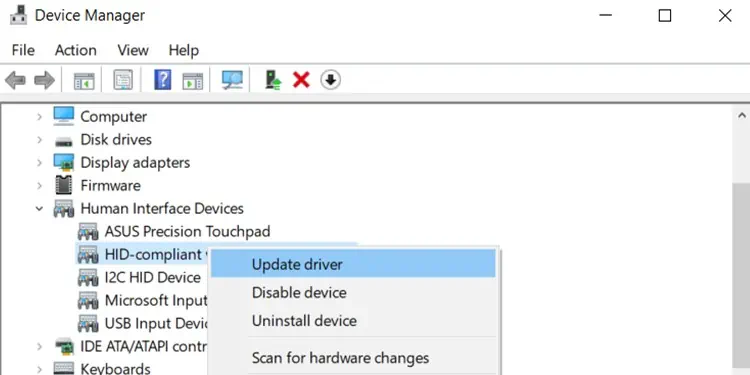
- Press Windows + R key to open the Run box and enter
devmgmt.msc - In Device Manager, double click Human Interface Devices.
- Right-click the HID-compliant touchpad and click Update driver. (If the driver is disabled, also click on Enable driver.)

- Click on Search automatically for drivers, and let the system download the driver.
Using Only a Keyboard
- Press Windows + R key to open the Run box and enter
devmgmt.msc - In Device Manager, press Tab and navigate down to Human Interface Devices with the down arrow key.
- Press on the right arrow key on Human Interface Devices.
- Navigate down to the HID-compliant touch pad and press Enter.
- In the new window, press Tab until the General tab gets highlighted.
- Press the right arrow key and select the Driver tab.
- Use the Tab button to cycle through the options and choose Update Driver. (If the driver is disabled, select Enable driver and press Enter.)
- Click Enter and again press Enter on Search automatically for drivers.
How to Unlock Cursor on Mac?
Unlocking the cursor on Mac is slightly different compared to Windows. While Windows provides several ways to disable your trackpad, Macbooks do not let you disable the trackpad even if you try.
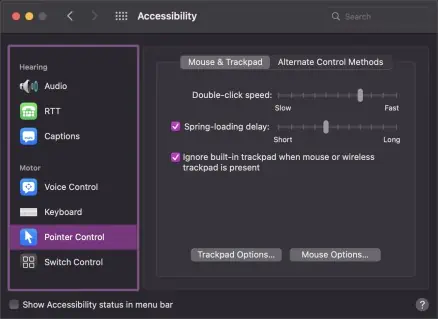
The only option Mac provides for disabling the trackpad is an option called Ignore built-in trackpad when mouse or wireless trackpad is present.
Here’s how to unlock the cursor on Mac.
Use the Force Quit Window
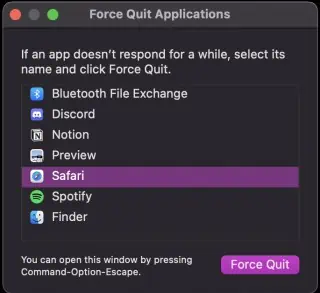
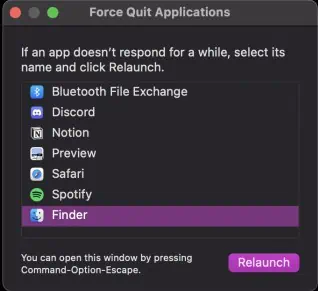
If your cursor freezes after you open an app, you can use the force quit window to end the processes of any application that is interfering with your cursor. You can also relaunch Finder using the force quit window to refresh your graphical user interface.
Here’s how to do it:
- Press Command + Option + Esc to open the Force Quit Window.
- Use the arrow keys to navigate and select the app causing the trouble.
- Press Enter to force quit the application.

- Locate Finder and press Enter to relaunch it.

Enable Trackpad Even When Mouse is Present
Mac has the option of disabling the trackpad when a mouse is present. While this setting is not enabled by default, you can check and see if this setting is enabled.
Here’s how to enable the trackpad even when the mouse is connected to the Mac.
- Select the Apple icon at the top right of the screen and tap on System Preferences.
- Click on Accessibility.
- Choose Pointer Control from the left sidebar.
- Deselect the option Ignore built-in trackpad when mouse or wireless trackpad is present.


