We all want to experience the best possible visual and smooth performance while playing games and other programs. A computer uses a graphics unit to render the images on your screen to provide this adventure.
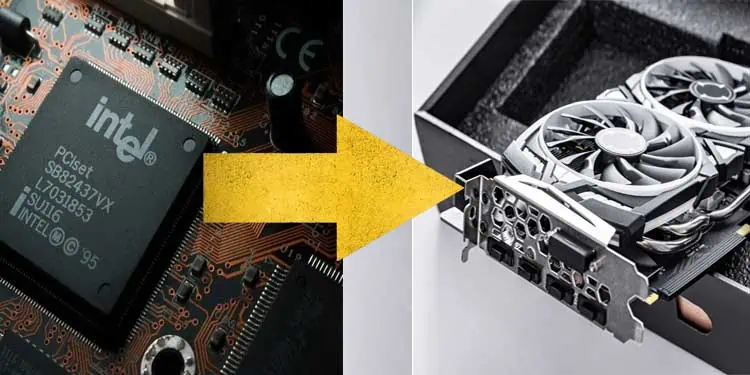
You can find two types of Graphics Processing Units or GPUs in a computer; Integrated GPU and Dedicated GPU. The capability of the Integrated GPU is limited and hence less than most Dedicated GPUs. And this is the reason you see some computers with lower graphical performance.
But, sometimes, even when you have a Dedicated GPU in your computer, your computer might be functioning poorly in terms of graphics. This can happen if your system uses an Integrated graphics unit and has not switched to the Dedicated one. You will have to manually instruct your program or system to use the higher capability graphics card.
In this guide, we are going to illustrate the methods to use the Dedicated GPU instead of an Integrated graphics unit.
Difference Between Dedicated Graphics Card and Integrated Graphics Unit
Every computer needs to process the visuals such as images and videos in the computer for better experience. To do this, it uses two kinds of Graphical Processing Unit whose differences lie in their hardware built and rendering capacity. These are: Integrated GPU and Dedicated GPU.
Let’s talk more about what actually are these units.
Integrated GPU
The Integrated Graphics Processing Unit is directly incorporated within the computer’s CPU. It does not have its own memory unit to dedicate to the programs and games for rendering their visuals. Instead it uses some portion of memory of RAM and does the work.
For instance, if you have a RAM of 8 GB memory space, the Integrated GPU might use 1 or 2 GB of it to run the graphically demanding programs. Hence, If you ran heavy games, you would not have enough RAM as well as GPU memory since both are shared from the same hardware.
Integrated GPU is only used to run less intensive programs due to its lower capability. It would not be feasible for people to get a powerful GPU when they need to run some programs needing little rendering. Hence, the manufacturers provide Integrated GPU so that we could do basic rendering tasks or run low-end games without any difficulties.
However, since the Integrated GPU does not have extra hardware, they take up no additional physical space inside the system. Similarly, they generate less heat needing no extra cooler due to less power usage by them.
Dedicated GPU
Talking about Dedicated Graphics Processing Unit, it is found as separate hardware with its own set of memory, processing unit, and cooling system. It even has its own power source, which is a separate connector present in the PSU for the dedicated GPU.
Hence, it does not affect the RAM or CPU usage and does not cause them to heat up during intensive rendering jobs. Due to a distinct processor and more power usage, the GPU does produce a lot of heat. But it is managed using the casing fan as well as its own set of cooling fans.
A dedicated GPU is much faster due to the availability of a large amount of memory to process the visuals of demanding programs. Hence, these are of major interest to gamers, heavy computing users, and data processors.
Now let’s quickly see the reasons for choosing a Dedicated GPU instead of an Integrated one.
We have summarized their differences in the table below to make it clearer.
| Dedicated GPU | Integrated GPU |
| Has a separate hardware with a processing unit, memory, and cooling system | Embedded onto the Processor |
| Provides much efficient performance | Comparatively low performing |
| Requires high power separately from the PSU | Doesn’t require as much power since it is integrated into the CPU itself |
| Generates a considerable amount of heat | Doesn’t generate much heat |
| Is very power demanding and not battery friendly in laptops | Very much battery friendly as it shares the power from the CPU |
| Suitable for high-end gaming and computing | Suitable only for less demanding applications and processes |
Should You Use Dedicated GPU Instead of Integrated GPU?
You have already known by now that the Dedicated GPU gives far better performance in gaming and heavy work than an Integrated GPU.
Now that we have learned all about these GPUs, let’s see how you can switch to Dedicated Graphics from Integrated GPU.
How To Use Dedicated Graphics Card Instead of Integrated Graphics Unit?

If you have a Dedicated Graphics Unit in your system, then your system is set to select a suitable one depending on the program. The function is automatic and you do not have to worry about it.
But sometimes, the computer might miss to switch to the dedicated graphics and might run your heavy-duty game using the less powerful Integrated Unit. This will definitely impact the performance of your game.
You can easily set the dedicated graphics card to be used for every game of your choice and even for any programs at all. The setting is the same for both AMD and NVIDIA GPUs but you might feel quite a bit of difference in the process. Let’s go through the process of doing it right away for both of them.
Switching to NVIDIA’s Dedicated GPU Instead of Integrated
As we mentioned earlier, your computer automatically selects the NVIDIA GPU if you ran a heavy program. But NVIDIA also provides an option to manually choose its GPU for all your tasks or the one you specify.
Please follow the instructions below to use an NVIDIA GPU.
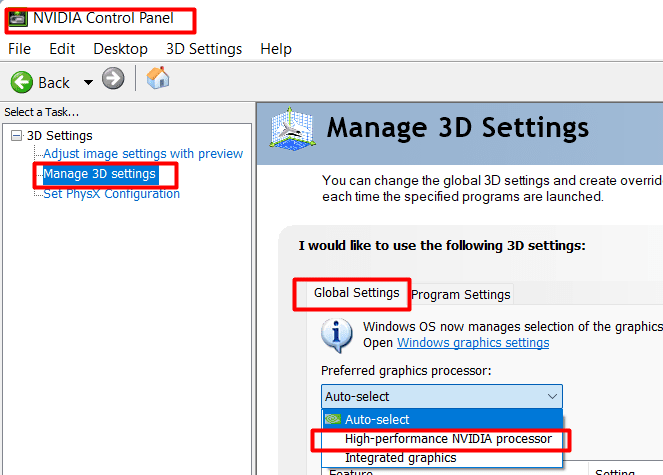
- Right-click on your desktop and select the NVIDIA Control Panel. In Windows 11, you may have to click See More Options in the dialog box appearing on your desktop.
- Click on the Manage 3D Settings option on the left side of the window.
- Under Global Settings at the top, you will find the Preferred Graphics Processor option.
- Choose High-Performance NVIDIA Processor on it.

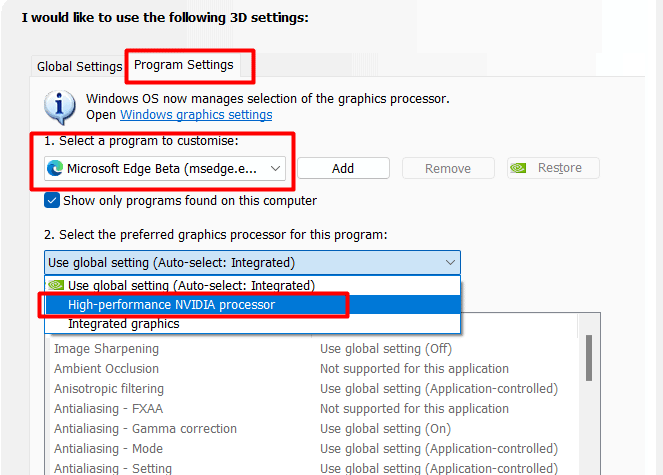
- Now select the Program Settings option next to Global Settings.
- Choose the program or game from the options available.
- Again, select High-Performance NVIDIA Processor in the Preferred Graphics Processor Option for the program.

- Click Apply and save the settings.
Now run the program to see how it performs.
You can also check which GPU the program is using through the use of Task Manager. Let’s look at its process.
- Press Windows + D to minimize the program.
- Press Ctrl + Shift + ESC to open Task Manager.
- Go to the Performance menu.
- On the left, you will find options named GPU 0 and GPU 1 with the name of the graphics they denote.
- You will find the utilization percentage going high for the one being used. After you switched the GPU earlier, it should now show that GPU 1 or NVIDIA GPU is being utilized.

Switching to AMD’s Dedicated Graphics Card Instead of Integrated
You will find similar settings on the AMD GPU’s driver software available on your PC. But the AMD has a lot of features and you might be overwhelmed and confused while looking for the settings.
No worries, you can easily set AMD GPU as your default by following these steps for both earlier and newer AMD’s software.
For older AMD Radeon Settings Software,
- If you have an earlier Software, right-click on your desktop and select AMD Radeon Settings.
- Choose the System menu in the window and click on the Switchable Graphics option at the right end.

- Select the Running Application option and click on Installed Profiled Applications to show all installed applications.
- Click on the program of your choice and select High Performance.

For new AMD Radeon Software: Adrenaline Edition,
- Right-Click on the desktop and select AMD Radeon Software. You will have to click Show More Options in Windows 11.
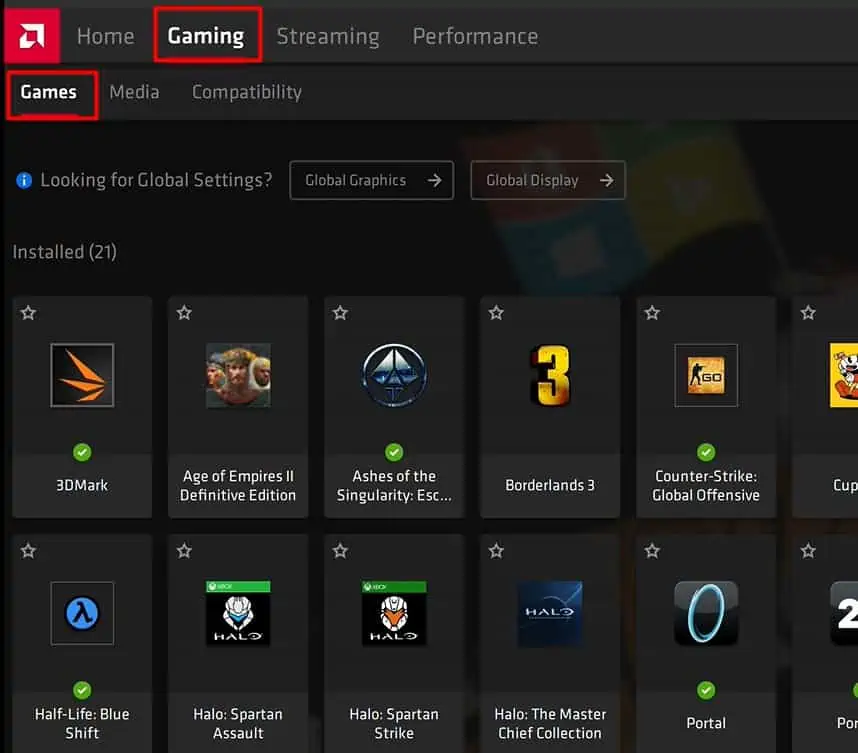
- Select Gaming at the top of the AMD software window.

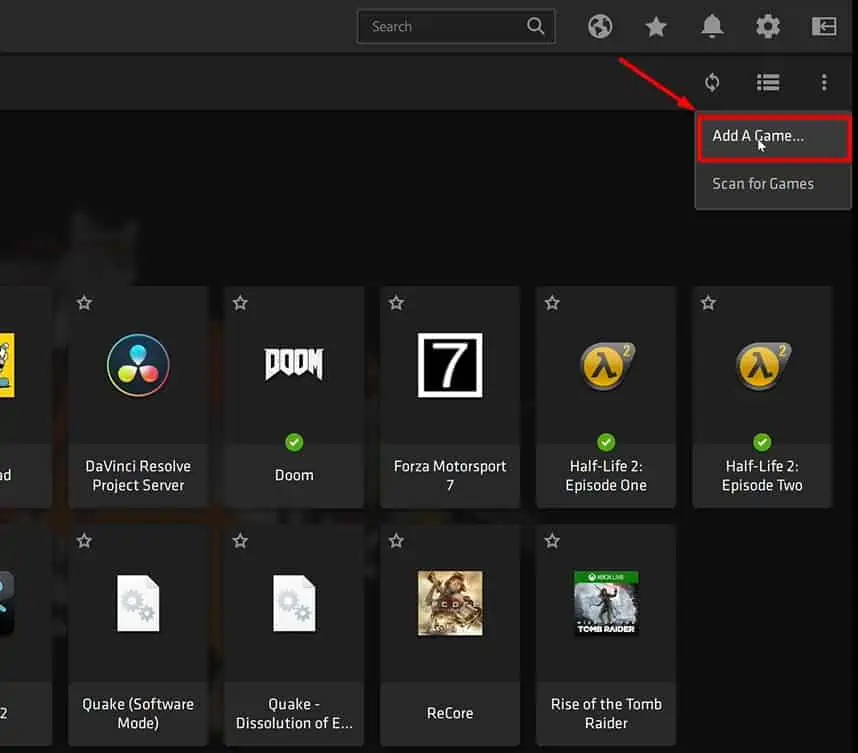
- Click on the menu or three dots and select Add a Game.

- Choose the game you would like to add and Click Open.
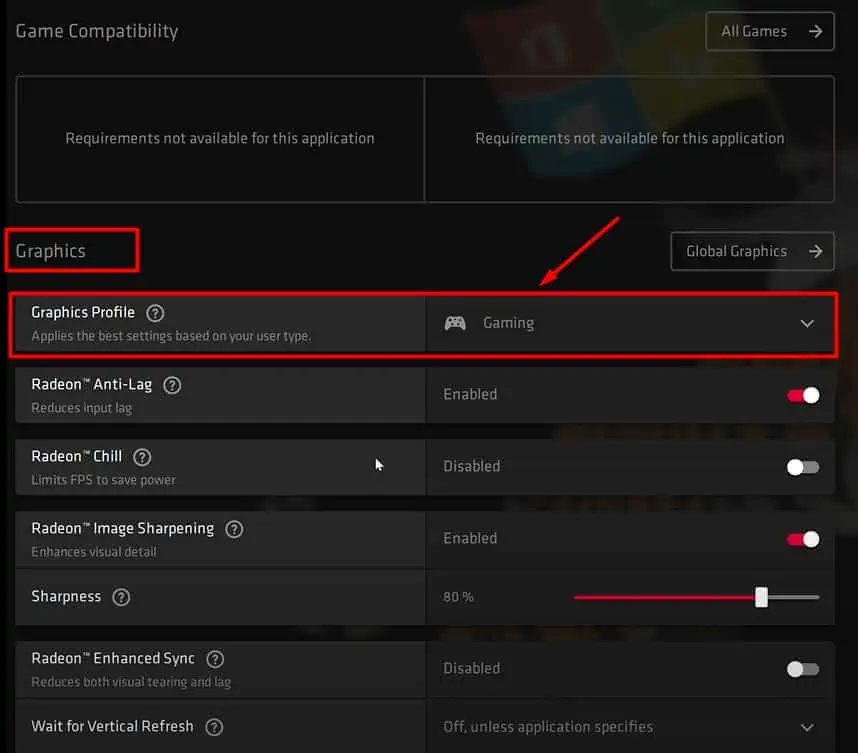
- Under the Graphics section of the opened window, select Gaming in the Graphics Profile.

See if your game uses the AMD GPU to operate.
Switching to Dedicated GPU Without the GPU Software
Sometimes, the software provided by the GPU manufacturer to change settings might not work. It might have been corrupted or your system may be facing some glitches. In such a case, you would have the option to change the setting for the individual program in Window’s display settings.
Let’s get into it and learn how to do it right now.
- Press Windows + ‘X’ and select Settings on it.
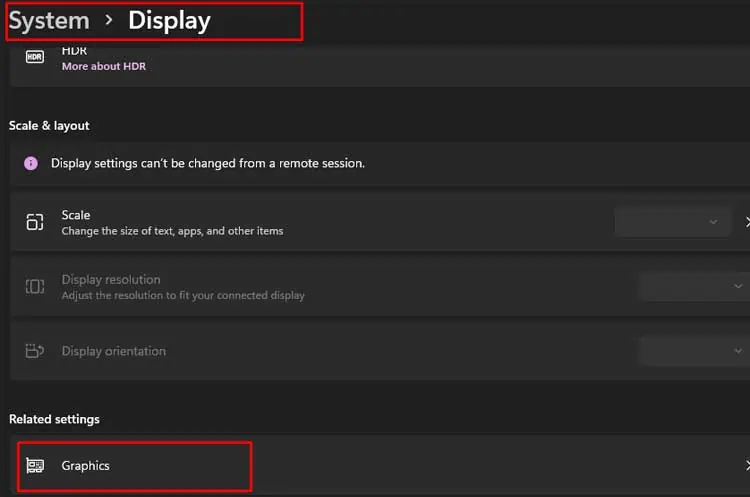
- Go to the Display menu and find the Graphics option in it.

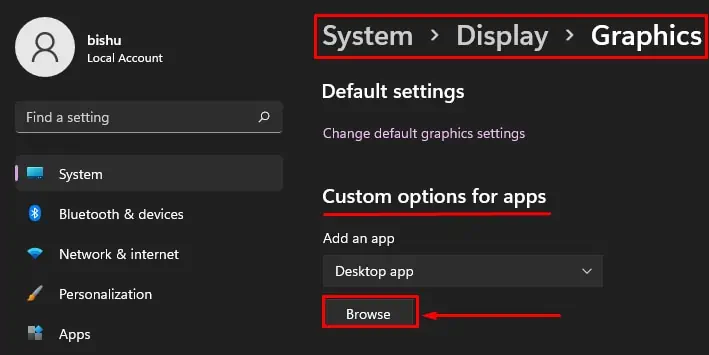
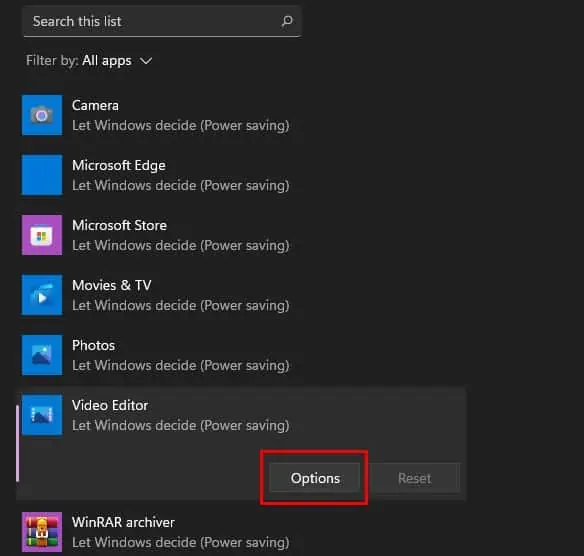
- Under Custom options for Apps, browse and select the program you would like to switch the graphics for.

- You will find the program on the list below. Click on the program and choose Options.

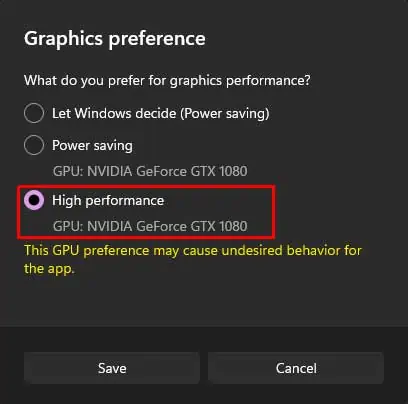
- Select High Performance. You can see the name of the graphics card used under the option.

- Do this for all the programs of your choice.
Run the program to enjoy the best performance with your dedicated GPU.
Frequently Asked Questions
Will a Graphics Processing Unit Overheat?
Your GPU carries all the heavy program and visual rendering functions on its back. This will definitely cause it to consume more power and hence start producing a lot of heat. Most of the time, the cooling system provided to it optimizes the thermal increment.
However, sometimes, due to some external reasons such as lack of proper airflow, faulty cooling fan, or malfunction in the circuit can cause the GPU to overheat.
Do a GPU Improves The Performance of My Computer?
A GPU’s main function is to operate demanding programs. It does this by using its separate memory and processing unit. This takes the load off your CPU significantly and the CPU does not have to worry about operating those programs. It will also reduce the heating of the CPU.
Hence, the CPU can perform its regular computing tasks more smoothly thus improving the performance of your computer.

