Many users close their laptop’s lid to pause their work. By default, your Windows 11 PC goes to sleep mode after closing the lid. But you may need to keep the laptop open if you are listening to music or want to keep the second screen on.
It’s very easy to change the lid close action settings. There are many methods but they all take less than a minute to execute. You can also change the setting for plugged-in or on battery power modes separately.
How To Keep Laptop On When Lid is Closed
There are many ways to keep the laptop on with a closed lid, but they have different precedence. So pick any one you prefer after going through the methods below.
Through Power Options
Using the Power Options is the usual way to change any power configurations. You can set your laptop to be on with a closed lid for all or a specific power plan.
For All Power Plans:
Here are the steps to set to keep the laptop on when you close the lid:
- Press Win + R keys to open Run.
- Enter
powercfg.cplto load Power Options. - Click Choose what closing the lid does.
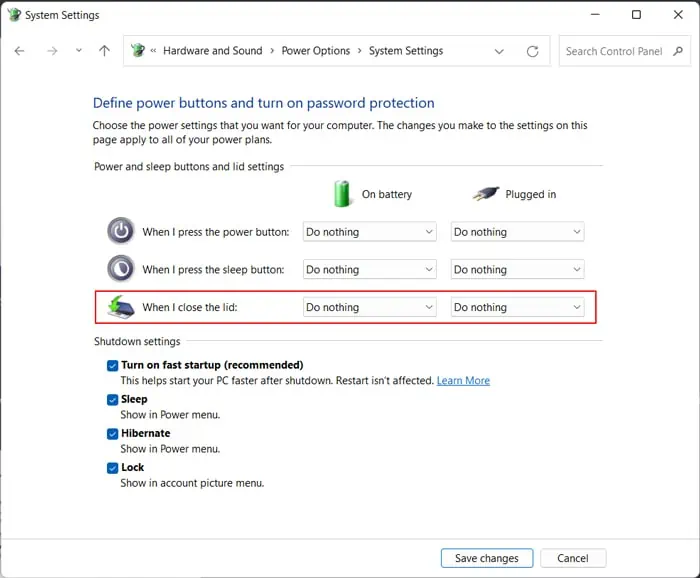
- Set the drop-down boxes next to When I close the lid to Do nothing.

- Hit Save Changes.
For Specific Power Plan
The necessary steps for this process are as follows:
- Open Power Options.
- Select Change plan settings for your power plan.
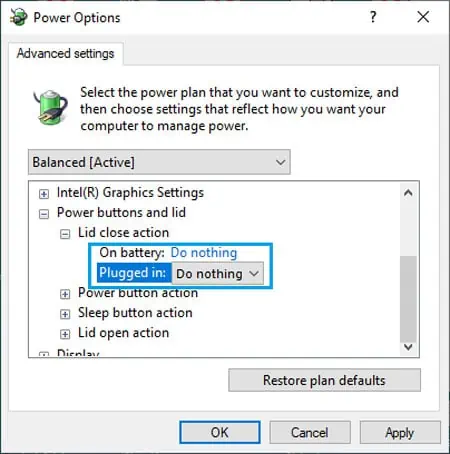
- Click Change advanced power settings.
- Expand Power buttons and lid > Lid close action.
- Set the drop-down boxes for On battery and Plugged in to Do nothing.

- Hit Apply and Ok.
If you don’t find the Power buttons and lid option, open the elevated Command Prompt and enter the following command:
REG ADD HKLM\SYSTEM\CurrentControlSet\Control\Power\PowerSettings\4f971e89-eebd-4455-a8de-9e59040e7347ca83367-6e45-459f-a27b-476b1d01c936 /v Attributes /t REG_DWORD /d 2 /fUsing Group Policy Editor
You can also change the lid close action by altering the relevant policy settings. Such policies have higher precedence over the Power Options settings and apply to all Power plans.
- Launch Run.
- Enter
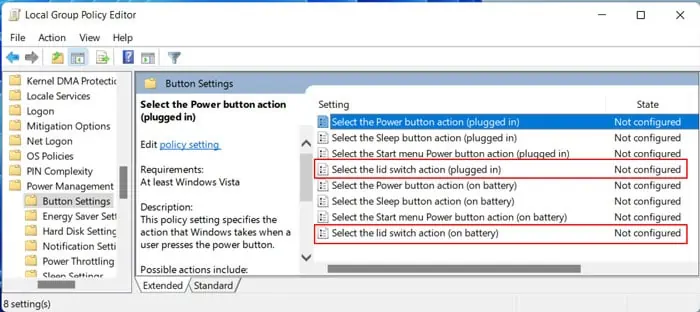
gpedit.mscto open the Local Group Policy Editor. - Go to Computer Configuration > Administrative Templates > System > Power Management > Button Settings.
- Double-click on Select the lid switch action (plugged in).

- Tick Enabled and set Lid Switch Action to Take no action.
- Hit Apply and Ok.
- Do the same for Select the lid switch action (on battery).
With Registry Editor
Another way to set the lid close action to do nothing is to change in its registry configuration. You can do so by using the Registry Editor. This method also takes precedence over the Power Options settings or the CLI. But if you change the Group Policy after tweaking your registry entries, the group policy will overwrite the entries after a reboot.
First, make a backup of your registry to account for undesirable issues. Then, follow the instructions below:
- Open Run and enter
regedit. - Navigate to
Computer\HKEY_LOCAL_MACHINE\SOFTWARE\Policies\Microsoft\ - Right-click on Microsoft and pick New > Key.
- Set the name to
Power. - Create a new key inside Power and name it as
PowerSettings. - Create a new key
5CA83367-6E45-459F-A27B-476B1D01C936inside PowerSettings and go inside the key. - Right-click on an empty area and choose New > DWORD (32-bit) Value.
- Set its name to
ACSettingIndexand Value data to 0. Double-click on it to change the data. This setting applies for lid close action in plugged-in mode. - Create another DWORD value.
- Set its name to
DCSettingIndexand Value data to 0. It This specifies the lid close action on battery.
You don’t need to create the keys and entries if they already exist. If you find it daunting to carry out all these steps, you can create a .reg file and open it to make these changes. To do so,
- Open a text editor like notepad and enter the following:
- Then, save it as
Lid_Nothing.regand double-click on the.regfile to merge the registry script.
Windows Registry Editor Version 5.00
[HKEY_LOCAL_MACHINE\SOFTWARE\Policies\Microsoft\Power\PowerSettings\5CA83367-6E45-459F-A27B-476B1D01C936]
"ACSettingIndex"=dword:00000000
[HKEY_LOCAL_MACHINE\SOFTWARE\Policies\Microsoft\Power\PowerSettings\5CA83367-6E45-459F-A27B-476B1D01C936]
"DCSettingIndex"=dword:00000000Using Command-line Interface
Those familiar with the CLI like Command Prompt or PowerShell might find using such tools more convenient for changing the power settings. The Power Options directly show any changes you make to the power configuration with the CLI.
You can use this method to change the lid close action for the current or any other power plan.
For the Current Power Plan
Here are the necessary steps to keep laptop on even after closing its lid for the current power plan:
- Enter
cmdon Run to open the Command Prompt. You can also enterpowershelland open the Windows PowerShell. - Enter the following commands:
powercfg -setacvalueindex SCHEME_CURRENT 4f971e89-eebd-4455-a8de-9e59040e7347 5ca83367-6e45-459f-a27b-476b1d01c936 0powercfg -setdcvalueindex SCHEME_CURRENT 4f971e89-eebd-4455-a8de-9e59040e7347 5ca83367-6e45-459f-a27b-476b1d01c936 0
For Specific Power Plan
You need to know the GUID of a power plan to change the setting specific to the plan. Follow the steps below to find out the GUID and change the lid close action:
- Open the Command Prompt or Windows PowerShell.
- Enter
powercfg /lto list out all the available power plans. - Note down the GUID number for the plan you want to alter.
- Enter the commands from the above method while replacing
SCHEME_CURRENTwith the GUID number.


