Sometimes, your computer may detect you idle even if you are using the screen. By default, your system keeps track of how long it’s been inactive (i.e no cursor movement or user in AFK mode). If this time exceeds the screen timeout period, the system disables the screen, and you need to press a key or move the mouse to enable it again.
So, if you want to be more efficient in such a scenario, it’s better to stop your display from turning off. There are many ways to do so. Each method provides different options and applicability, so read carefully and pick one that suits your situation the most.
Change Power Settings
The built-in way to keep your screen awake on Windows is by changing the relevant power setting. There are many ways to do so, and you can use any method according to your preference.
Through Windows Settings
- Press Win + I to open Settings.
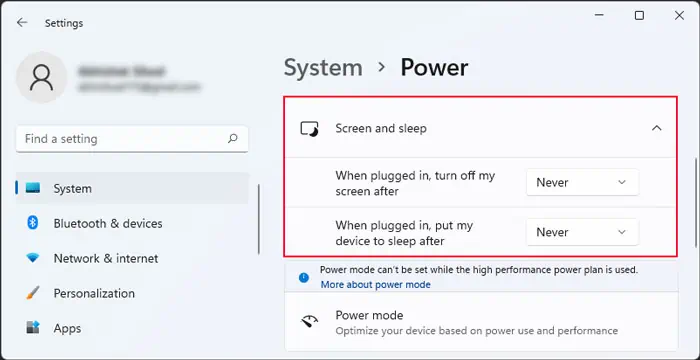
- Go to System > Power & sleep or System > Power > Screen and sleep.
- Set the drop-down boxes under When plugged in, turn off my screen after, and On battery power, turn off my screen after to Never.

- It’s also better to set the Sleep options to Never at the same time.
From Control Panel
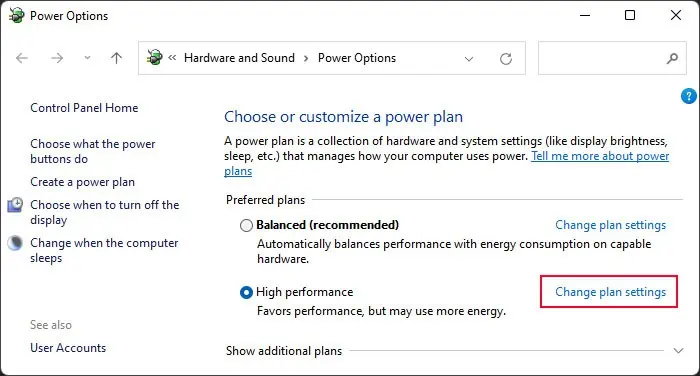
- Press Win + R to open Run.
- Type
powercfg.cpland press Enter to open Control Panel’s Power Options. - Click on Change plan settings next to your preferred plan.

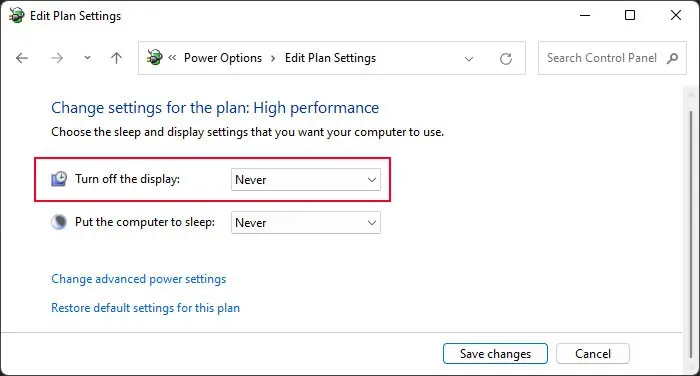
- Set Turn of the display to Never. Do so for both On battery and Plugged in if you use a laptop.
- You can also set Put the computer to sleep to Never similarly.
- Hit Save changes.

Using Command Prompt
- Open Run.
- Type
cmdand press Ctrl + Shift + Enter to open the Elevated Command Prompt. - Enter the commands below:
powercfg -change -monitor-timeout-ac 0powercfg -change -monitor-timeout-dc 0(only applicable on a laptop)
- Similarly, the commands to set the Sleep timeout period to never are:
powercfg /change standby-timeout-ac 0powercfg /change standby-timeout-dc 0
Use PowerToys Awake
If you need to keep your display from going off temporarily, using the above method may not be that convenient. So a better option is to use the PowerToys Awake feature in Microsoft PowerToys, a separate Windows customization utility provided by Microsoft.
- Download Microsoft Powertoys from the Official Website or the Github page.
- Run the installer. After the installation is complete, it will start automatically.
- Click on Show hidden icons (Arrow icon) on the taskbar and select PowerToys Awake (Cup icon).
- Go to Mode and check Keep awake indefinitely or Keep awake temporarily. If you select the latter option, set the time per your requirement.

- Then, click on the PowerToys Awake icon again and select Keep screen on to enable it. You need to execute this step as only enabling the previous option keeps your system awake but won’t do the same for your display.
- If the PowerToys Awake icon is not present,
- Open PowerToys (Preview) by searching it on the search bar (Win + S).
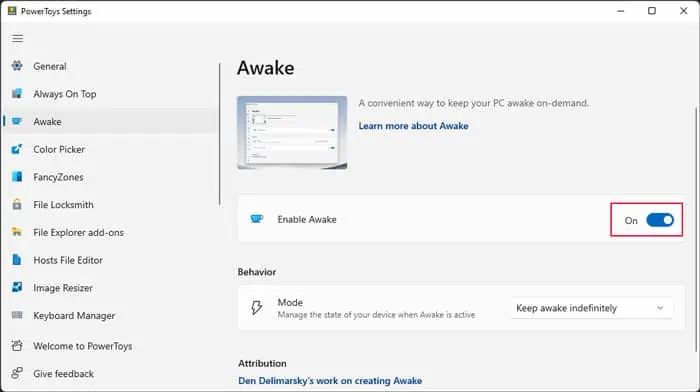
- Go to the Awake tab and toggle on Enable Awake.

You can also set the above options from here.
Disable Corresponding Group Policy
You can also change the screen timeout period or enable/disable this feature from the group policy. The policy overrides the power configuration you set through your Settings or Control Panel. So you may want to use it to prevent someone else from changing the timeout setting through the other methods.
- Open Run.
- Type
gpedit.mscand press Enter to open the Local Group Policy Editor. - Go to Computer Configuration > Administrative Templates > System > Power Management > Video and Display Settings.
- Double-click on Turn off the display (plugged in) to open its Properties.

- Check Enabled, set Turn Off the Display (seconds) to
0, and click OK. - Double-click on Turn off the display (on battery) and do the same.
- Similarly, to disable the sleep timeout,
- Go to Computer Configuration > Administrative Templates > System > Power Management > Sleep Settings
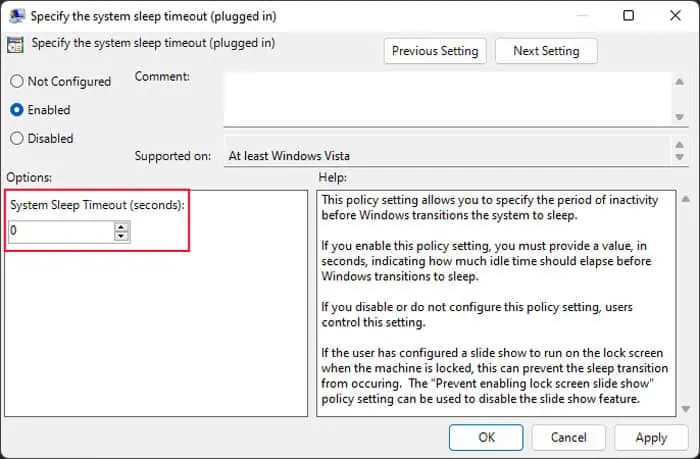
- Double-click on the policies, Specify the system sleep timeout (on battery) and Specify the system sleep timeout (plugged in).
- For both, check Enabled, set System Sleep Timeout (seconds) to
0, and click OK.
Windows Home does not have the Local Group Policy Editor by default. To enable it,
- Open Run.
- Type
cmdand press Ctrl + Shift + Enter to open the Elevated Command Prompt. - Enter the commands below:
FOR %i IN ("%SystemRoot%\servicing\Packages\Microsoft-Windows-GroupPolicy-ClientTools-Package~*.mum") DO (DISM /Online /NoRestart /Add-Package: "%i")FOR %i IN ("%SystemRoot%\servicing\Packages\Microsoft-Windows-GroupPolicy-ClientExtensions-Package~*.mum") DO (DISM /Online /NoRestart /Add-Package: "%i")
Then, follow the above steps to change the screen timeout.
Run Specific Applications
Some applications, such as video players, force your system to keep the screen on while it’s running. This feature is there since users running those apps seldom interact with the computer actively, making it essential for there to be some functionalities to keep the screen awake. You can use such a feature by playing a video or running similar apps while leaving your PC idle.
Some third-party processes that automatically move the mouse cursor at regular intervals are also available on the internet. So, if you run such programs, your system detects mouse movement and thinks the computer is not idle. You simply need to ensure that the time interval between successive cursor movements is under the screen timeout period.
