Virtual Private Networks or VPNs facilitate the transfer of data over the internet safely without disclosing your IP and location. To do this, it uses some kind of security protocol, and Layer 2 Tunneling Protocol or L2TP is one of them.
But sometimes, the VPN connection may not be successful showing an error “The L2TP Connection Attempt Failed Because the Security Layer Encountered a Processing Error”. In the case of many Windows 10 users, there was a faulty update that prevented the VPN connection over L2TP.
However, apart from this, this error is caused if some specific security configurations within the protocol are not enabled, or a few Windows services are not running. So, enabling these services and tweaking the settings does the trick here.
Switch IP address from public to local
Before moving to the fixes, you should first try connecting to the network using the Local IP address instead of the public IP. Similarly, you should also make sure that you have used the correct certificate and preshared key to connect. If you have not set any preshared key, then here is the way to do it.
- Open the Run dialog box by pressing Windows + ‘R’.
- Type
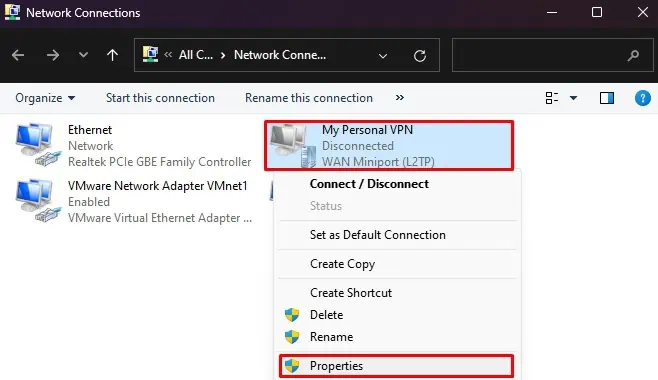
ncpa.cplto open Network Connections. - Right-click on the VPN connection and select Properties.

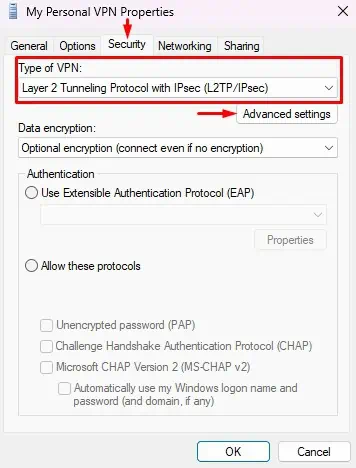
- Go to the Security tab.
- Choosing L2TP/IPSec in the Type of VPN, click Advanced Settings.

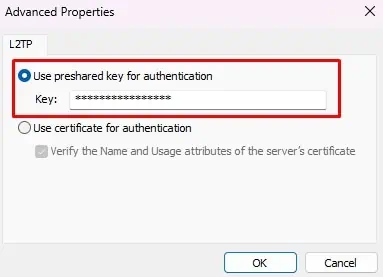
- Set the Preshared Key and click OK.

Use this Preshared key to connect to the network and see if the problem is resolved.
Install a Particular Windows Update
Most of the Windows 10 users experienced this error after installing the update KB5009543. As it is a system update, it gets installed automatically, hence the issue.
However, Microsoft released its fix soon in the next update KB5010793. So, you will have to uninstall the earlier update and install the next Windows update which solves the error.
Uninstalling the Faulty Update
- Press Windows + ‘I’ to open Settings.
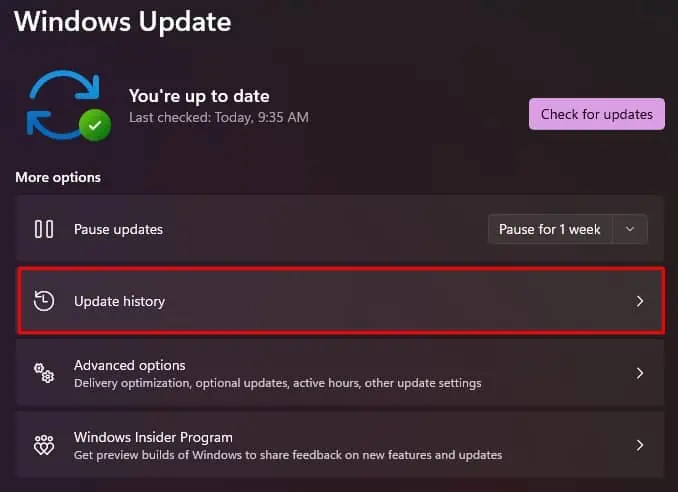
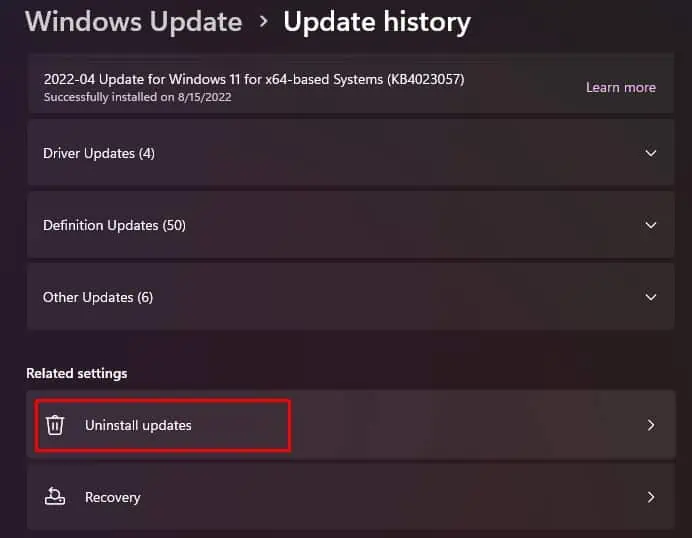
- Go to Windows Update>Update History.

- Click on Uninstall updates.

- Now, find the update KB5009543 and click on Uninstall.
You can also uninstall it using the command prompt.
- Open the Run dialog box.
- Enter
cmdand press Ctrl + Shift + Esc to run Command Prompt as administrator. - Now, type the command
wusa /uninstall /kb:5009543to remove the KB5009543 update.
Preventing the Update From Installing Automatically
Windows will try to download and install the KB5009543 update automatically. And you will again face the issue. So, you should configure the Windows update settings such that it won’t get installed by the system.
- Open the Run dialog box.
- Type
gpedit.mscand hit Enter to open Local Group Policy Editor. - Navigate to Computer Configuration>Administrative Templates>Windows Components>Windows Update>Manage end user experience.
- Double-click on Configure Automatic Updates.

- Set it to Enabled and choose Notify for download and auto install.

- Click OK to save the settings.
You will be notified before downloading and installing any updates now.
Installing the Necessary Update
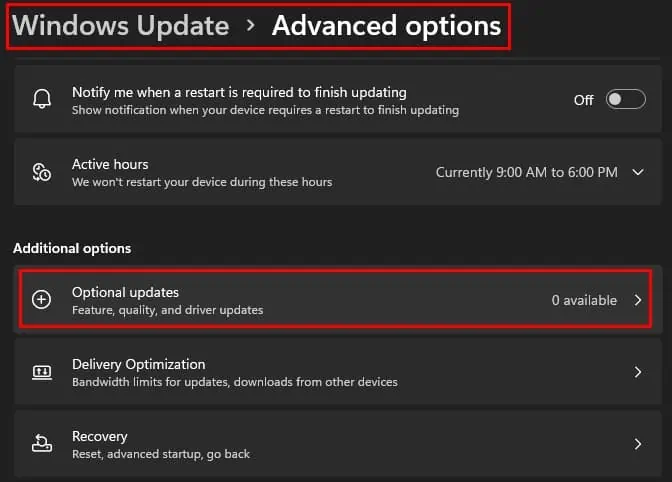
Usually, you can find this update is available as optional in Windows. You may have to install it on your own as well.
- Go to Windows Update.
- Click on Advanced Options and navigate to Optional updates.

- If you find the update KB5010793 there, download and install it.
- But, if it is not available, then download the update manually from Microsoft Catalogue and install it.

See if it solves the issue.
Enable Microsoft CHAP V2 Protocol and LCP Protocol Extensions
Most VPN connections use Microsoft CHAP V2 authentication protocol as well as LCP protocol extensions. LCP protocol helps configure and establish the internet connection as well as test the data links in the Point-to-Point protocol.
So, you need to enable these protocols and extensions in your system to solve the issue.
- Open Network Connections.
- Right-click on the connection having issues and select Properties.
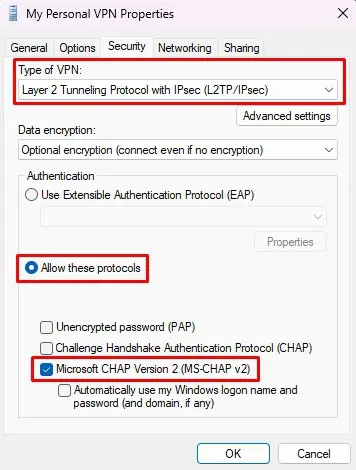
- Navigate to the Security tab.
- Choose Layer 2 Tunneling Protocol with IPsec (L2TP/IPsec) as the Type of VPN.
- Check the Allow these protocols radio.
- Select Microsoft CHAP Version 2 (MS-CHAP v2) and click OK.

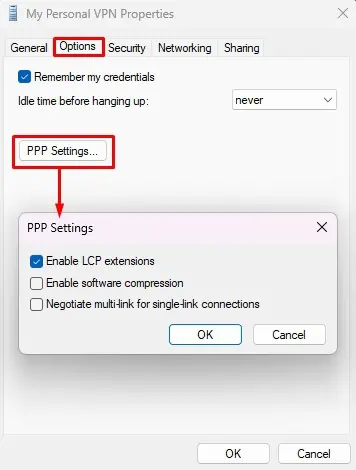
- Similarly, navigate to the Options tab and click on PPP Settings.
- Select the Enable LCP Extensions box and click OK.

- Save the Settings by clicking OK again.
The problem should be solved after installing these network protocols.
Restart IPSec Services
The IPSec services assist in transferring the data packets safely over the internet in VPN tunneling. Thus, for a VPN connection to work, your system needs to be running these system services. But sometimes, the mentioned error can still appear even when the services are running. In that case, you will have to restart these services.
- Open the Run dialog box.
- Type
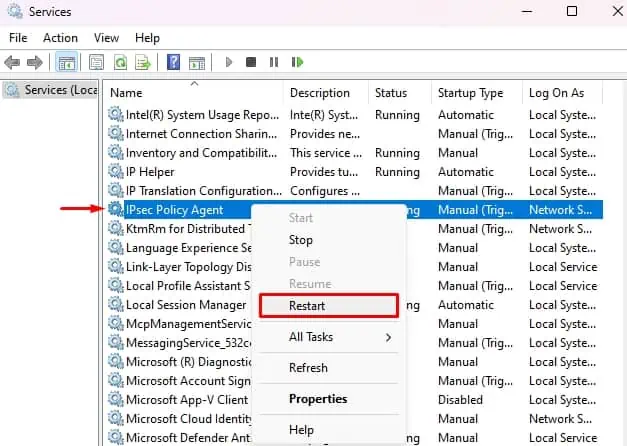
services.mscand hit Enter to open the Services window. - Find IPSec Policy Agent.
- If it is already running, right-click on it and select Restart. If not, click on Start.

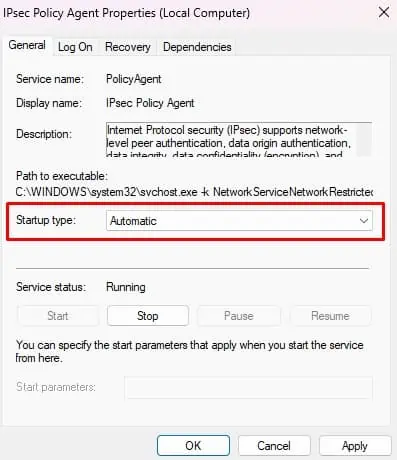
- Double-click on the service.
- Set the Startup type to Automatic and click OK.

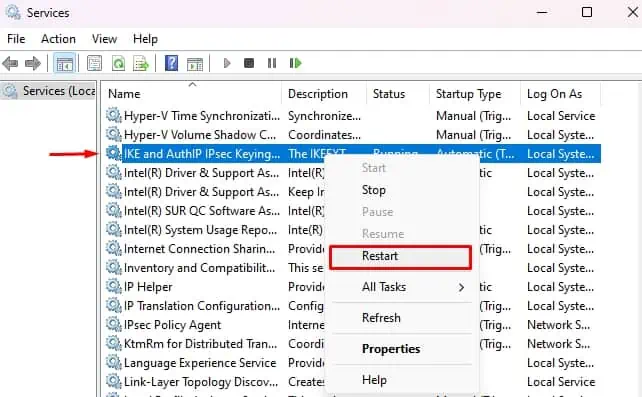
- Do the same for IKE and AuthIP IPsec Keying Modules.

Try connecting with the VPN connection to see if the error persists still.
Check UDP Ports 500 and 4500
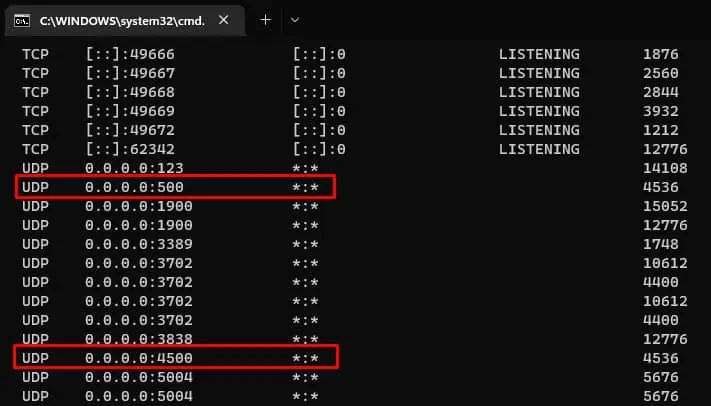
IPSec configuration employs Port 500 and 4500 to facilitate the transfer of data through VPN tunneling. So, if you are trying to establish a VPN connection, then you should allow the traffic to pass through these UDP ports. However, Windows Firewall can sometimes block them, hence the system shows the L2TP Connection Attempt Failed error.
You should enable these ports in Windows Firewall and open them for establishing the connection.
- Open the Run dialog box.
- Type
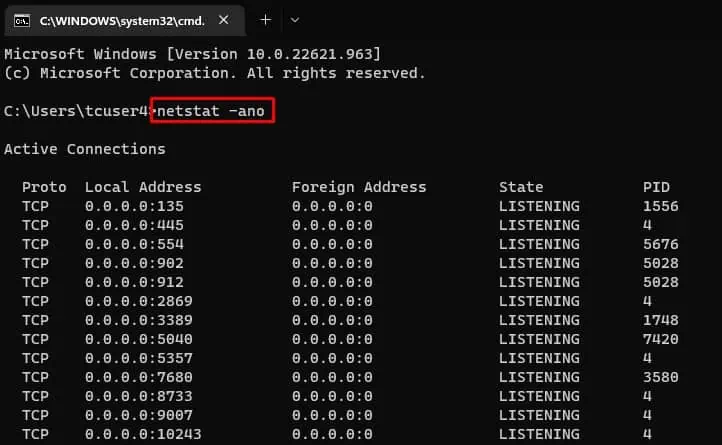
cmdand hit Enter to run Command Prompt. - Enter the command
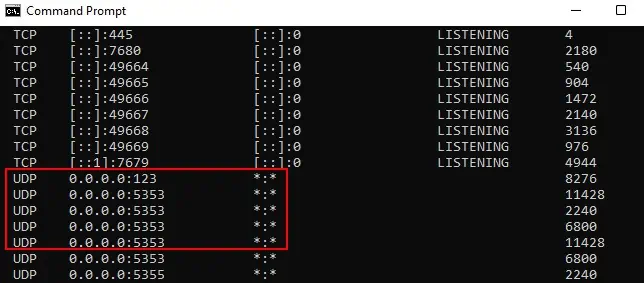
netstat -ano
- Look if the UDP Ports 500 and 4500 are listed there. If it is not listed, then you will have to open the ports from Windows Firewall.

- Enter
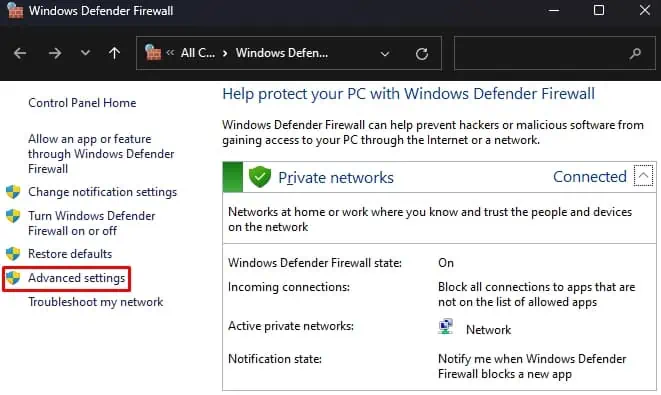
firewall.cplin Run to open Windows Defender Firewall. - Click on Advanced Settings.

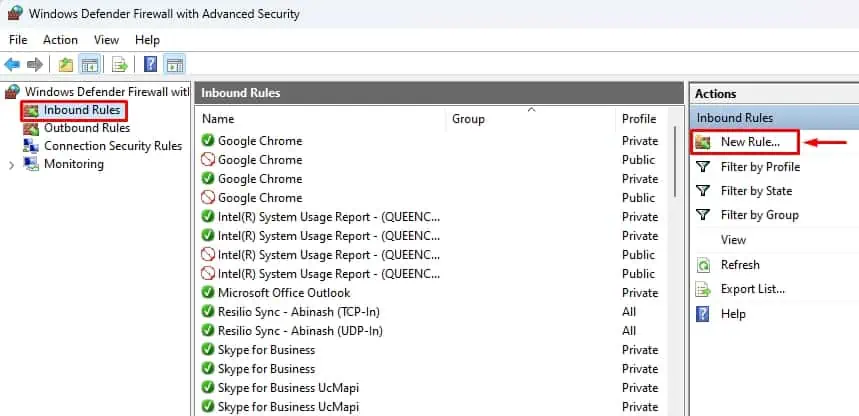
- Go to Inbound Rules and click on New Rule.

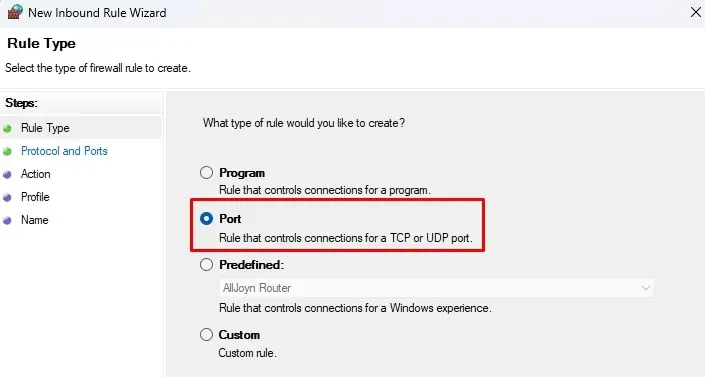
- Choose Port and click Next.

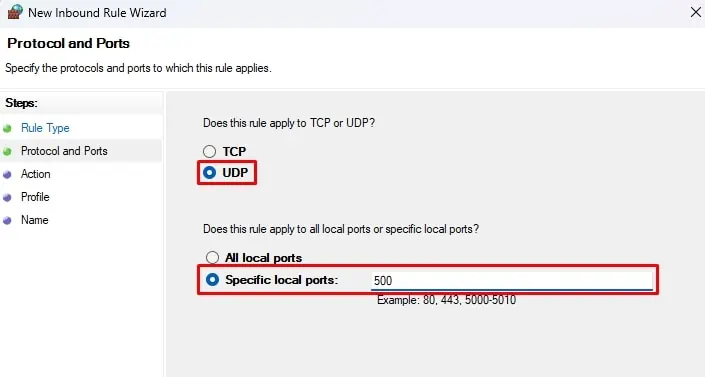
- Select UDP and type 500 on Specific local ports.

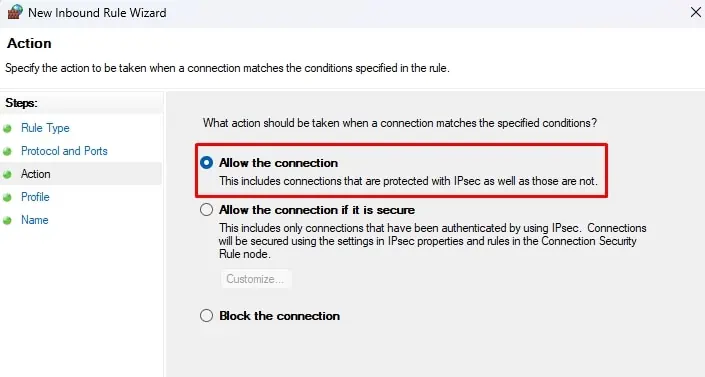
- Choose Allow the Connection and click Next.

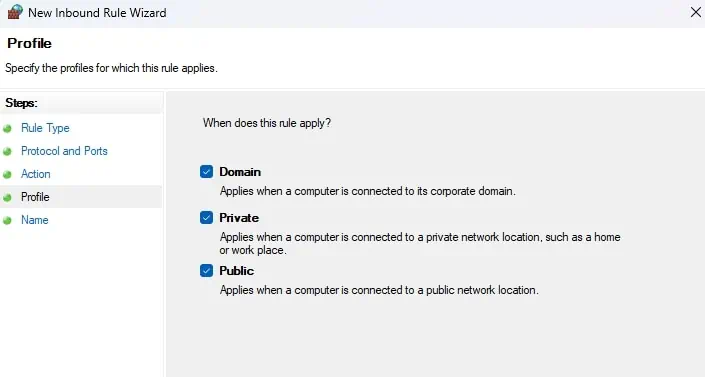
- Select all Domain, Private, and Public options.

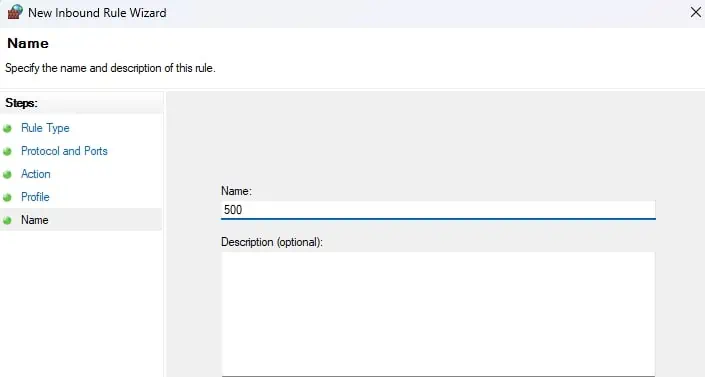
- Type 500 on Name and click Finish.

- Check the port on the command prompt again by following step 3.

- Do the same for UDP 4500 port if it is still not opened.
You should be able to connect through the VPN after opening the ports.
Set a Registry Key
Some of the Windows servers may not be able to connect to a VPN server that is behind a Network Address Translation (NAT) device. Thus, if you trying to establish a connection to such a VPN, then you will have to set a specific registry key in the client’s computer. This key will allow the security protocols to establish a connection between the server behind the NAT device and the client.
- Open the Run dialog box.
- Type
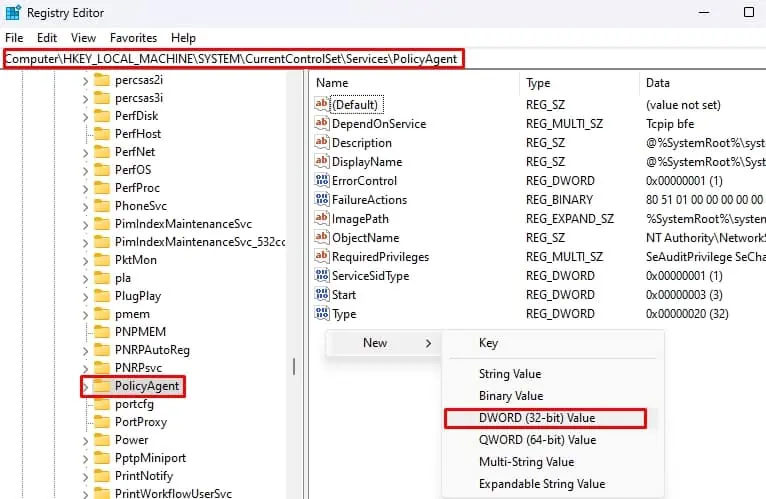
regeditand hit Enter to open Registry Editor. - Navigate to
HKEY_LOCAL_MACHINE\SYSTEM\CurrentControlSet\Services\PolicyAgent. - Right-click on the blank area, click New, and select the DWORD (32-bit) value.

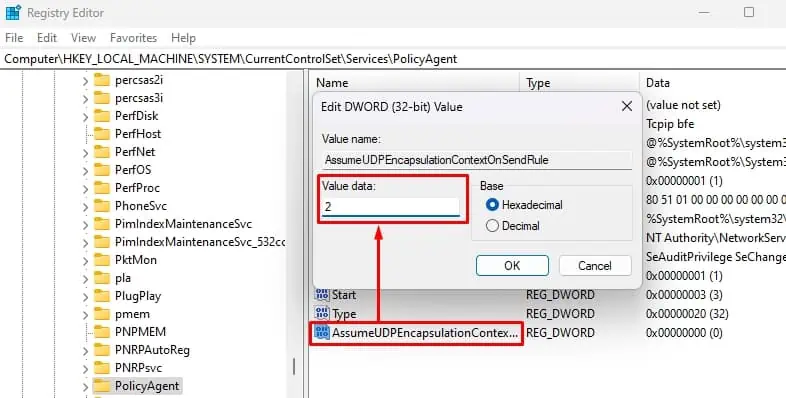
- Enter the name
AssumeUDPEncapsulationContextOnSendRule. - Double-click on the created value and set the Value Data to 2. Here the value 0 means the connection cannot be established, and the value 1 will allow setting the connection to only servers outside NAT but not the client.

- Click OK.
Try establishing the VPN connection again.
Restart the VPN Connection
Sometimes the VPN connection can still use the previous configuration even after you change them. And, the error can appear despite trying the above fixes. Thus, you should try restarting the VPN connection by installing the VPN again or setting it up again from the scratch.
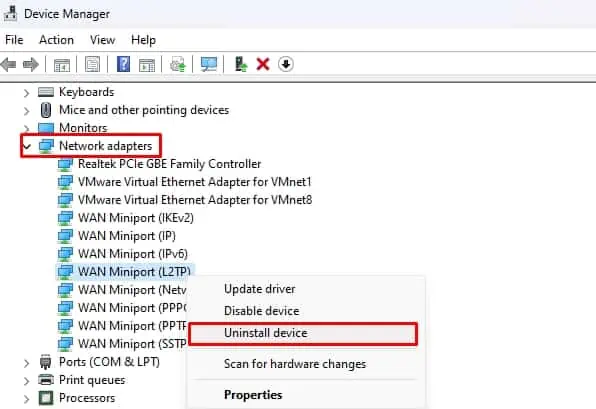
- Press Windows + ‘X’ and select Device Manager.
- Find Network Adapters and expand it.
- Right-click on the VPN adapter and select Uninstall Device.

- Do this for all VPN connections.
- Install or set the new VPN again.


