Laptop keyboards won’t necessarily last forever, but they don’t frequently break with regular use. When yours stops working, it’s probably something you can fix pretty quickly.
Most laptop keyboards are only connected to the laptop itself by a single cable, so as long as you’re comfortable removing a few screws and panels, you can make a lot of changes if necessary.
Why Is My Laptop Keyboard Not Working?
There are a few things that can stop your keyboard from working. It can be something as simple as a toggle being flipped or something as tricky as the keyboard breaking. The problem might also be the settings on your laptop.
When your laptop keyboard stops working, all you can do is take it one step at a time to figure out what the problem is and correct it.
How to Figure Out What’s Wrong With My Keyboard?
To figure out what’s wrong with your laptop keyboard, pinpoint precisely when it isn’t working. If it isn’t working at all, you can focus on problems with the hardware itself. It’s also important to check your settings and make sure they’re correct.
Hooking up a spare keyboard in via USB or Bluetooth can help since doing so will let you know whether the keyboard itself is functional with relatively little difficulty.
You can also try to enter BIOS to see whether the laptop is even registering the hardware. If Windows settings are the issue, you should still be able to enter BIOS.
How to Fix Laptop Keyboard Not Working
Start by examining the keyboard itself. If that appears to be working, try adjusting the settings on your laptop. Finally, focus on potential issues with your laptop’s hardware.
Keyboard Issues
Problems with the keyboard itself include connection problems, power source issues, damaged components, and dirt. You might have a problem with the keyboard if pressing a key feels wrong, only specific keys aren’t responding, or the keyboard is active, but the output doesn’t look right.
Clean the Keyboard
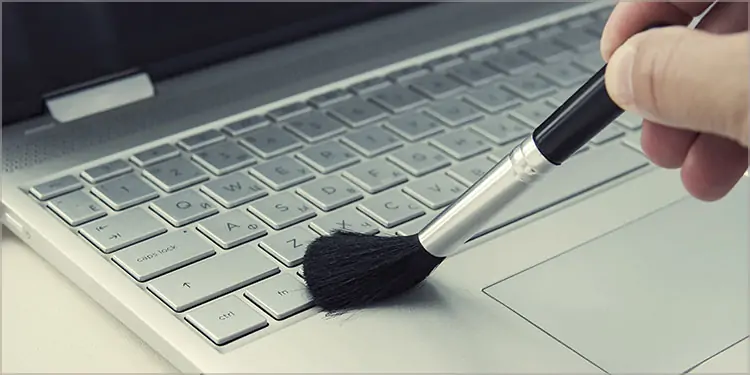
You can always use compressed air and a soft cloth to blow out debris and then wipe down your keyboard. However, a more thorough cleaning might solve problems that a simple wipe down won’t.
Check your manual before removing the keycaps. You can often remove them with the flat end of a screwdriver or even your fingernail.
- Remove the keycaps from the keyboard if your model has removable keycaps.
- Toss the keycaps in a container of warm, soapy water.
- Take a nylon keyboard brush or a clean, dry toothbrush and run it over the surfaces of the keyboard. Make sure to focus on areas with any visible dirt or muck.
- Use compressed air to blow away any dirt in hard-to-reach places. Focus primarily on sites you’re reluctant to clean with your other tools, like connector cables.
- Use the brush one more time to dislodge any debris exposed by the compressed air.
- Use a soft, lint-free cloth dampened with 99 percent isopropyl alcohol to wipe down any areas where dirt was removed.
- Scrub the keycaps with a toothbrush, and then let them dry completely.
- Reassemble the keyboard once everything is dry.
In general, you don’t want to disassemble a laptop keyboard unless you’re very comfortable taking apart your laptop. Unlike standard keyboards, they’re interconnected to the hardware of your machine. You can easily damage your laptop by taking apart the keyboard.
Remember to remove batteries and unplug your laptop before cleaning your keyboard or removing keycaps.
Check Your Connections
Make sure you’ve restarted your laptop. Check to make sure your laptop keyboard is turned on, too. Sometimes the button to keep it active will accidentally slide off without you even realizing it.
Check to ensure the number lock key isn’t restricting what keys are active on your keyboard.
Settings Problems
To address settings problems, identify when the problem is occurring. If it’s only happening in specific applications, those programs might have a problem. If it isn’t working at all, then you need to focus on solutions with Windows itself.
Certain Programs
Check the settings in the programs you’re using. Look to see if they have an option for an input device. If so, make sure your keyboard is selected. Another device like a controller being selected might prevent the keyboard from activating.
Sometimes a problem in a program just stops it from detecting the keyboard. An example of this is gamers who have trouble in World of Warcraft or League of Legends. Every few weeks, their keyboards stop responding in-game. They have to turn off the program and turn it back on to make it start working again.
If the fix is simple, it’s probably a program issue that will be fixed when the company releases a patch. You can always try to validate your files or download a fresh copy of the program in the meantime to see if that fixes it.
Windows Settings
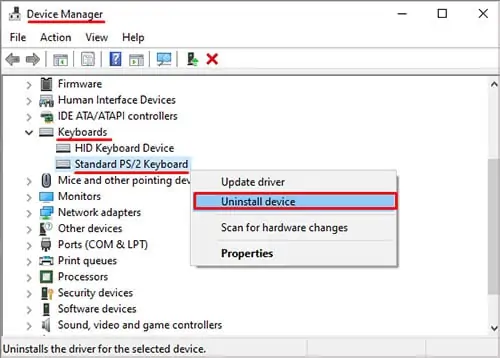
An excellent way to start troubleshooting your Windows settings is to check in the Device Manager to see whether the keyboard is present. If it’s there, try uninstalling it and then restarting your laptop. Windows should reinstall the drivers for the keyboard when it detects it.
- Press Windows key + X.
- Choose Device Manager.
- Expand the Keyboards category.
- Right-click the listing for your keyboard.
- Click Uninstall device.

- Restart your laptop.
You may want to disable the password for your Windows account before doing this so that you don’t have to type it in when you reload.
Getting a driver straight from the manufacturer of your keyboard might also help. Sometimes the drivers Windows uses might not be installed correctly or might not be ideal. Simply search the manufacturer’s site for the correct drivers, download them, and choose “Update driver” after right-clicking the keyboard in Device Manager. You can manually search for what you downloaded to install them.
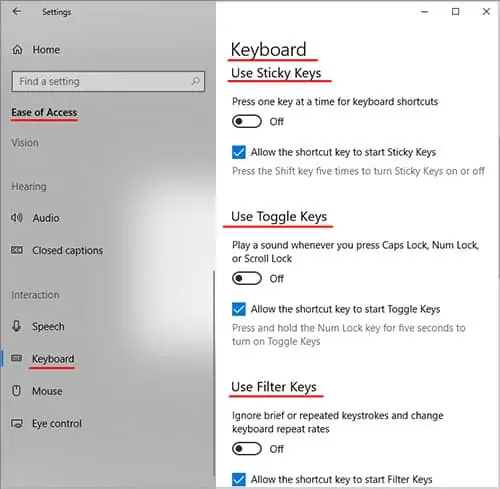
Also, check the settings for your keyboard in Windows.
- Press Windows key + X.
- Choose Settings.
- Click Ease of Access.
- Click Keyboard under the Interaction category in the left-hand menu.
- Make sure the on-screen keyboard is off, turn off Sticky Keys, Toggle Keys, and Filter keys.

- Restart your laptop to see whether the keyboard works now.
You can turn the on-screen keyboard on to use while troubleshooting your keyboard if you prefer.
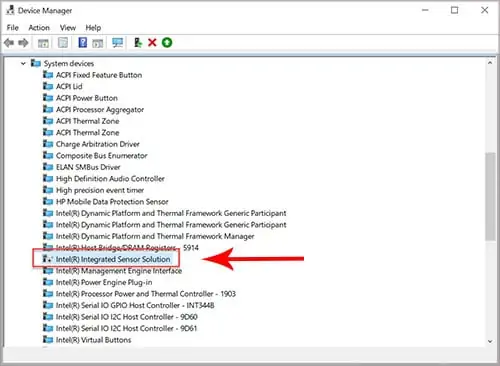
Some users have reported luck fixing their keyboards by disabling the Intel Integrated Sensor Solutions driver.
- Press Windows key + X.
- Choose Device Manager.
- Expand the System Devices category.
- Right-click on Intel Integrated Sensor Solutions.

- Choose Disable.
- Restart your laptop.
If this doesn’t work, enable the driver again. Not all laptops will use this driver, so disregard this step if you can’t find it under System Devices.
You can always roll back the laptop with Windows System Restore. Some people have had to reinstall Windows as well, but it’s unlikely to come to that.
BIOS test
To see whether the keyboard itself is working, try to enter BIOS. If you’re able to, the keyboard is likely active and functioning. Your problem is a setting or toggle. If you can’t enter BIOS, you likely have a problem with your laptop.
Laptop Hardware Trouble
The final thing that might be preventing your keyboard from working is problems with your actual laptop. It simply won’t work if the computer can’t register the connection.
In order to check whether the connection between the keyboard and laptop is active, you’ll have to take apart the laptop and try to plug an extra keyboard in with the same hardware. If that one won’t work, then the connection is faulty.
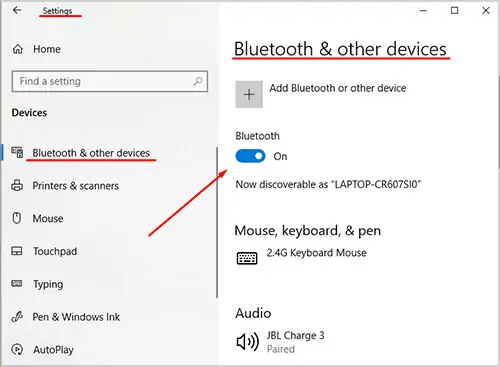
If you’re using your laptop in tablet mode with a Bluetooth keyboard, turning the module off and back on might help you reconnect it.
- Press Windows key + X.
- Choose Settings.
- Click Devices.
- Turn the slider for Bluetooth off.
- Turn the slider for Bluetooth back on.

If that doesn’t work, try enabling and disabling the Bluetooth device in Device Manager if that doesn’t work.
- Press Windows key + X.
- Choose Device Manager.
- Open the Network adapters category.
- Right-click on your Bluetooth device.
- Choose Disable device.

- Right-click your Bluetooth device.
- Choose Enable device.
You can also click Uninstall instead of disabling it. If you do, restart the laptop and wait for Windows to locate the device and install fresh drivers. If it doesn’t, find the drivers on the website of your Bluetooth manufacturer and install them yourself.
Power Reset Your Laptop
Sometimes a hard reset can fix software issues that have no apparent cause.
- Turn off your laptop completely. Sleep mode isn’t sufficient. You need to do a full shutdown.
- Remove any external device from your laptop. Nothing should be plugged into it.
- Unplug the laptop from the wall and remove the battery.
- Press down on the power button. Keep it pressed for 15 seconds.
- Replace the battery.
- Plug in the laptop.
- Power the laptop on again.
Some laptops also have a reset button or pinhole on the bottom of the machine. If you find one, use that as well to make sure everything is well and truly reset.
Check your warranty
Remember that the laptop’s keyboard is covered with most warranties. Any damage, wear and tear, or problems with your keyboard could be covered.
Fixing Individual Laptop Keys
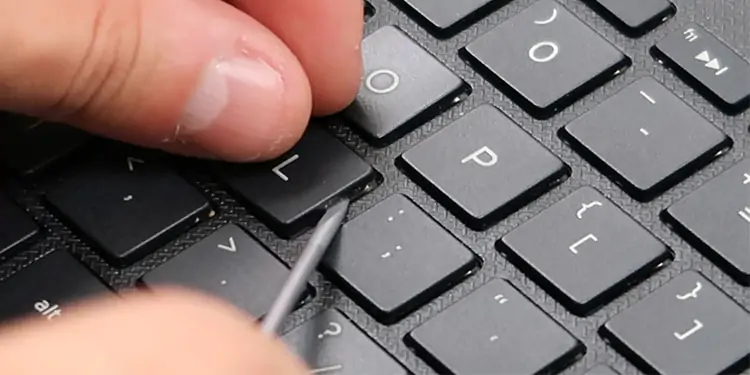
If you’re having problems with a single key, you might not have to replace the entire keyboard. Fixing an individual key isn’t that difficult. Most people with basic hardware skills should be able to do it in just a few minutes.
- Pry the keycap off with a pry tool. It should slide under the key and you can use it as a wedge to pop it off. Don’t force it. Be gentle and slow so that you don’t break it.
- Use the pry tool to release the spring apparatus under the keycap. This is the piece that gives the key mobility. You should slide the tool under and pull it up on each side using light pressure.
- Remove the piece entirely with tweezers. In many models, it will be a round metal or plastic piece.
- Remove the base plate with tweezers. Look for a square frame that goes with the circular piece.
- Fit the two pieces back together, making sure that all areas match. A problem with a single laptop key could be that the piece moved or was mismatched with the corresponding piece. The inner piece should be able to move even when the two are connected for many models.
- Clean the exposed key area with a cloth dampened with 99 percent isopropyl alcohol. Allow it to dry completely.
- Fit the pieces back into place using tweezers and your fingers. You’ll have to snap it back into place around the edges and make sure it’s secure.
- Check to ensure the center piece is still able to move freely.
- Snap the keycap back into place. Test to see whether it’s working normally again.
One of the best things about being able to remove keycaps and repair parts is that it enables you to replace broken parts and clean out any gunk preventing it from performing correctly.
The method will vary a bit depending on the model of the laptop you’re using. Check your model to see what parts you might need, especially if you’re replacing broken parts. Always buy compatible pieces.
How to Replace a Laptop Keyboard
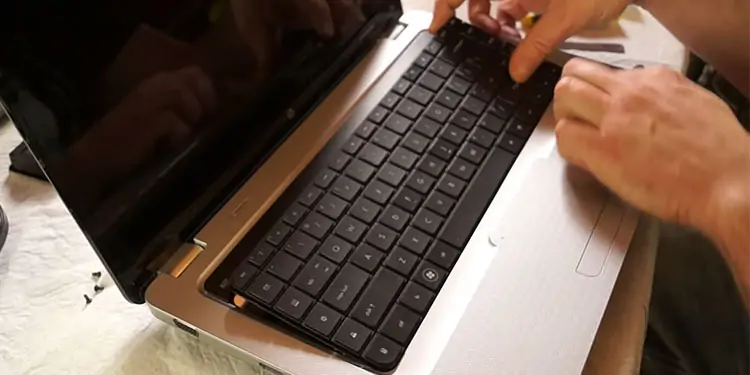
If your keyboard isn’t working at all – whether it’s broken externally or the connections inside are damaged – you can replace it with a compatible keyboard.
- Unplug the laptop and remove the battery. Check for icons in the battery seating area to locate one that looks like a keyboard. If there is a keyboard icon, then a single screw under the cover will let you remove the keyboard. If not, you might have to remove the entire base of the laptop.
- Remove the screw near the keyboard icon and pry up the plastic plate it was holding down.
- Look for another keyboard icon near another screw. If you find one, remove the screw and pull up the panel it was holding.
- Locate the locks around the edges of the keyboard from the top. You’ll see little plastic pieces coming from around the edges are various places.
- Use a thin pry tool to push against the locks. It might take a little pressure at first, but the keyboard should begin to pop out as soon as you remove the first one.
- Pull up the lock on the cable to release it.
- Remove the cable from its port and set the old keyboard aside.
- Use compressed air to clean the surface of the laptop you’ve just exposed.
- Plug the cable from the new keyboard into place. Pull down the bar to lock it in place.
- Place the keyboard into position.
- Press around the edges to lock it in place.
- Replace all the panels and screws you removed.
You should consider testing the new keyboard before you lock it into place and put all the panels back on the laptop. Turn it on and just type in a blank Notepad document to make sure it’s functioning correctly.
Doing this can save you a little time if you need to make adjustments or plug in the keyboard cable again.
Frequently Asked Questions
How Do I Change My Keyboard Back to Normal?
Some people have a Ctrl + Shift hotkey that changes the keyboard layout. If you’re noticing that your keyboard is experiencing difficulties, try pressing Ctrl + Shift again to see whether you can make it work normally again. Some laptop models also have specific keybinds to change functions, so check your manual for that as well.
What Causes Keys to Stop Working on a Laptop?
Keys often stop working when they’re damaged or obstructed. If something gets under the lip of the key, it won’t be able to work smoothly and you might actually feel the obstruction when you press on it. Sometimes the keyboard just experiences a hardware error and fails, too. In that case, the entire thing might need to be replaced.
What Causes the Keyboard to Freeze?
Any number of things can cause the keyboard to freeze. For example, an error in a program you’re using might make the computer lag so that you’re unable to type. Keep an eye on your memory and CPU usage in Task Manager to make sure you have enough resources for the programs you’re running.
