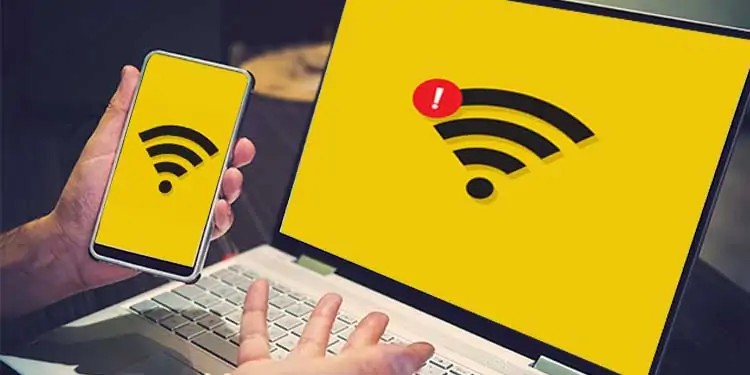
Before you try to figure out why your laptop won’t connect to Wi-Fi, you should restart your router, restart your computer, and try to connect to another network.
Sometimes there’s a problem with the network you always connect to, and if no others are in range, it may seem like a problem with your laptop.
Restarting your router and modem can refresh the connection and reappear. You can also check with your ISP to ensure they aren’t experiencing network issues.
We’ve compiled a list of possible solutions for your laptop network problem. One of these is bound to resolve your issue.
How do I Fix My Laptop Not Connecting to Wi-Fi?
You need to make sure your laptop is updated, you don’t have any file errors, and your settings are correct. While there’s always the chance the Wi-Fi adapter is broken, and in need of repair, it’s better to check everything you can before taking it to a professional technician.
Check if Your Wi-Fi is On
Many laptops have a hotkey that disables and enables Wi-Fi. It’s usually on the top row of function keys, though it will vary depending on the model. Make sure that your Wi-Fi isn’t turned off on the laptop before you begin.
It’s easy to accidentally disable Wi-Fi when all it takes is one accidental button press.
Move Closer to the Access Point:
This is a no-brainer. First, make sure the physical Wi-Fi switch in your laptop is on (It is usually accompanied by an indicator light). If it is, the next thing you should try is moving closer to the router to see if that helps connect your laptop to the Wi-Fi.
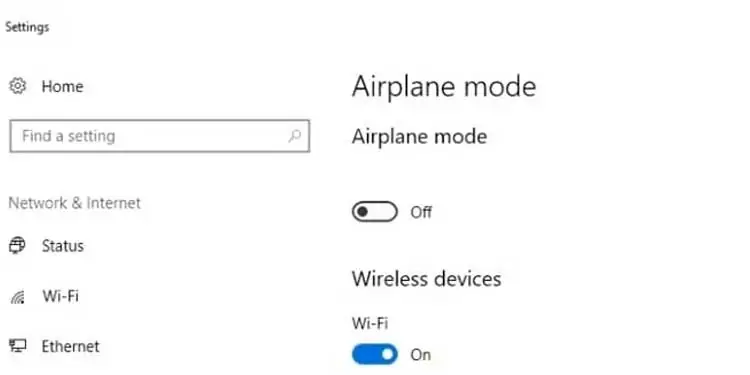
Check to See if the Airplane Mode is Turned Off:
- Go to Start and then Settings.
- Now go to Network & Internet.
- Select Airplane Mode and then see if it is turned off. If not turn it off. This should resolve your connection issues.

Restart Your Modem and Router
This is a solution that works 90% of the time and also what the technical support team at your ISP will tell you to first try when you call them to report the issue.
Why does this work? Well, the same reason your computer starts functioning again when rebooted.
Your modem and router are tiny computers in themselves. Restarting means running a fresh boot and discarding much of what was previously causing the problem. To properly restart these devices, follow these steps:
- Unplug the power cable for the router and modem from the power source. (Some devices have a backup battery, so if the lights are still on after you’ve unplugged these devices, locate and remove the internal battery.)
- Wait at least 30 seconds after you’ve turned your Modem and Router off. (This step is important because like most electronic gadgets, Modems and Routers make use of capacitors. And even though they can’t store a lot of energy, they can store enough to keep a memory chip running for some seconds. Waiting for 30 seconds will drain all capacitors fully and hence clear every bit of memory. This will allow for a clean reboot.)
- Plug the Modem and the Router back to power source in succession. (Wait for the lights in the modem to stop blinking before plugging on the Router).
- Wait for at least a few minutes. Hopefully this should do it.
Run the Troubleshooter
Another way to make sure the settings on Windows are correct is to run the troubleshooter. It automatically looks for issues with the connections to see whether they can be fixed.
- Right-click the Internet icon on your taskbar.
- Click Troubleshoot problems.

- Choose Wi-Fi.
- Click Next.
- Follow the prompts to complete the process.
The prompts and steps will vary depending on the specific issues Windows finds.
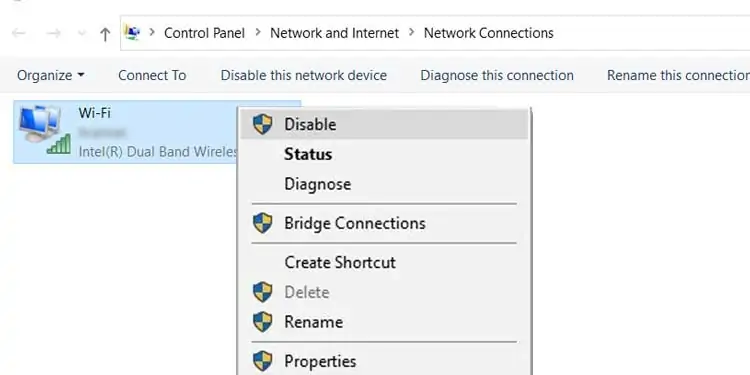
Disable and Then Enable Wireless Connection
- Go to Start and then Settings.
- Now go to Network & Internet.

- Select Wi-Fi and then Change Adapter Settings.
- Right click on your Wireless network and then click Disable.

- Right click on the network again and then click Enable. This could resolve your issue.
Check Your Connection to the Router
Check to see whether your Wi-Fi connection can speak to the router by running a ping test. It lets you know that the two devices are communicating.
- Press Windows key + X.
- Choose Windows Power Shell (Admin).
- Select Yes.
- Type “ipconfig” without quotes and then press Enter.

- Look for the Default Gateway address of the Wireless LAN adapter.
- Type “ping” without quotes and then the Default Gateway address. Press Enter.
Look at the results. If there’s a reply and no data loss, you have a connection with the router. You should focus on solutions that address the modem and Internet connection problems.
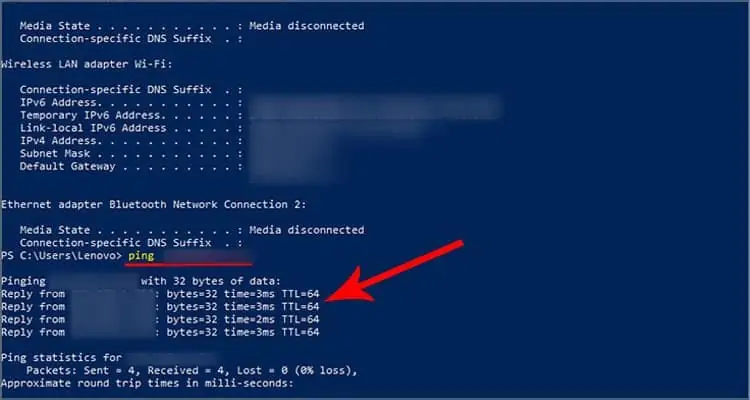
If there’s no reply, then your laptop isn’t connecting to the router at all, and you should prioritize working on the computer and finding what’s preventing it.
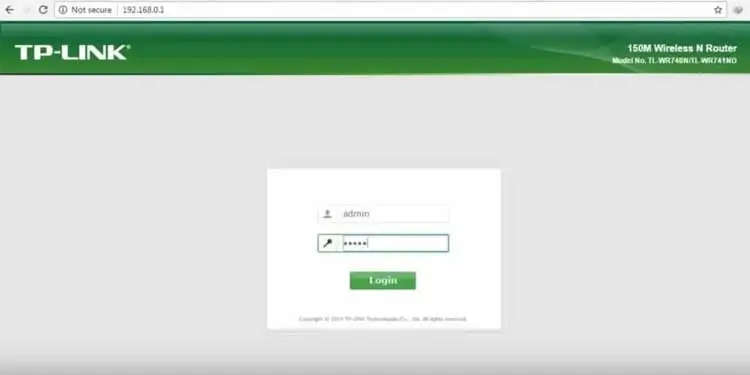
Check if Your Router is Correctly Broadcast Your Wi-Fi Network
- Get an Ethernet cable and use it to connect your PC to the router.
- Open a web browser and in the URL box, type in the IP address of the wireless router. (This is usally 192.168.1.1 or 172.16.0.0. You will find the default IP address for your router in its documentations.)
- You will be prompted to enter the username and password. (If you’re signing in for the first time, you will find the default username and password in the documentations of your router.)

- In the homepage, select Wireless Settings.
- Here check to see if an option that reads something like Wireless SSID Broadcast or Enable SSID Broadcast is turned on. If it isn’t do so. Hit Save and see if this resolves your connection issue.

Check to See if the Source of the Problem is Your ISP or Your Modem
- Go to Start and then in the Search box type “Command”.
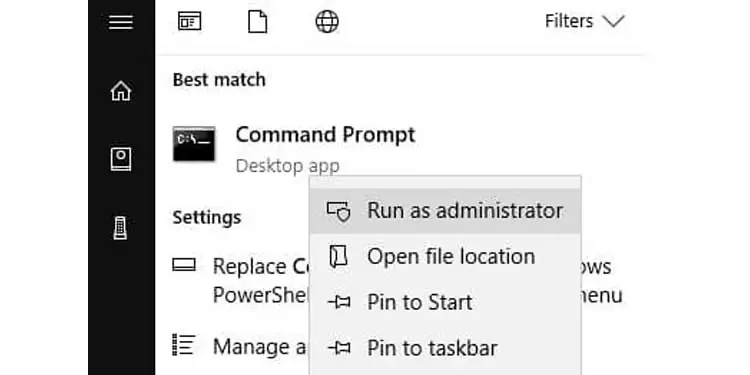
- Right click on Command Prompt and select Run as administrator.Give Necessary Permissions.

- In Command Prompt type:
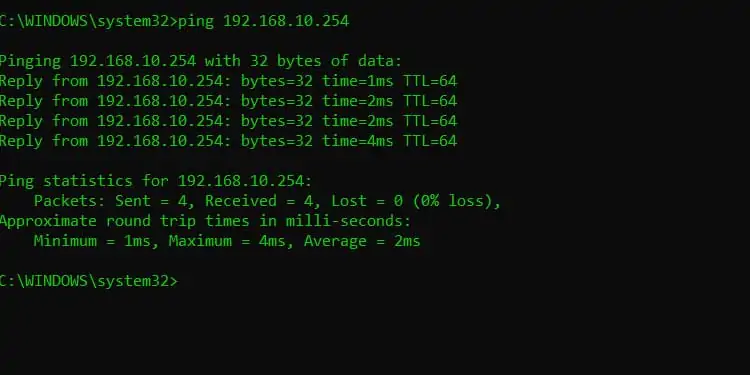
ipconfigand then hit Enter. In the listing that follows, look for Default gateway and note the IP address listed next to it. - Now type: ping followed by your Default Gateway IP Address and then hit Enter. The result should look something like this.

- If you see the results listed above but still can’t connect to the internet, that confirms that the problem lies either on your modem or your Internet Service Provider. You should consider calling your ISP to report the issue.
Disable the 802.1 1n Mode of Your Network Adapter
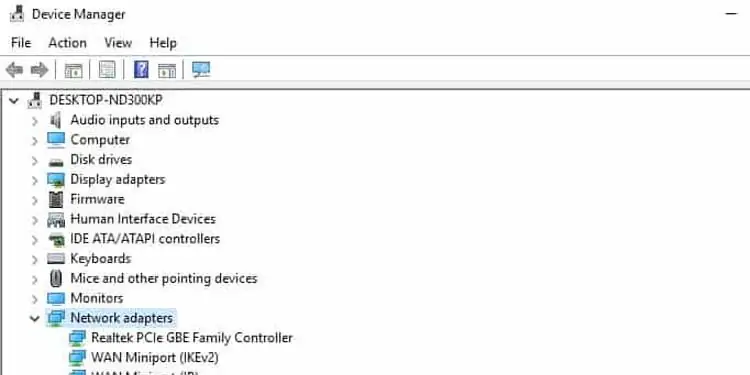
- Go to Start and then in the Search box type Device Manager and open it.
- In Device Managers, find Network adapters and click on it to expand it.

- Find your network adapter, right-click on it and select Properties.
- Navigate to the advanced section and find 802.1 1n Mode in the list of Properties.
- Make sure that the value is set to Disabled. Check to see if this resolves your issue.

Try Disabling Your Firewall
Your firewall is designed to prevent unauthorized access to your computer, but sometimes it can conflict with your Wi-Fi network. Try disabling the Windows firewall to see whether the Wi-Fi works with it turned off. If you have more than one firewall installed, open the management software for the other firewall and turn it off there.
- Press Windows key + X.
- Click Settings.
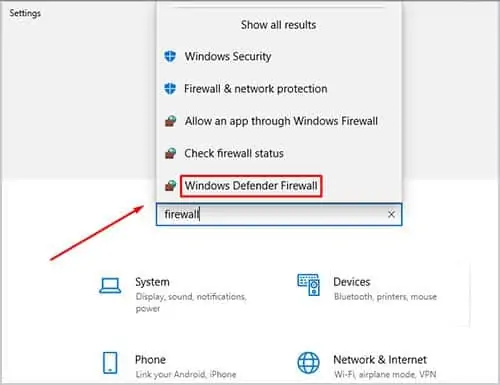
- Search firewall in the search menu at the top left.
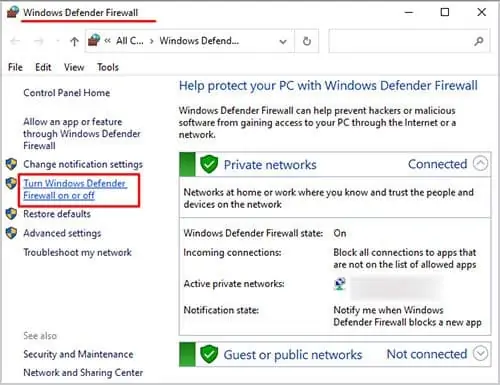
- Click Windows Defender Firewall in the drop-down menu.

- Click Turn Windows Defender Firewall On or Off.

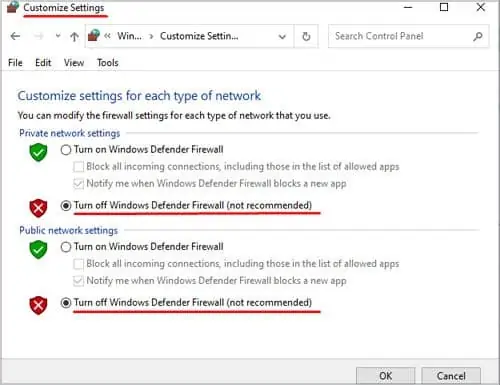
- Choose Turn Off Windows Defender Firewall.

- Click OK.
- Try to reconnect to the Internet.
- Return to the firewall menu and turn it back on when you’re done.
Even if the Wi-Fi starts working with the firewall off, you don’t want to leave the firewall disabled forever. It makes your computer far less secure. Better to search to see whether you perhaps have a second firewall up that’s conflicting with Windows Defender Firewall. Some antivirus programs deploy one, for example.
You can also go through the list of apps that Windows Defender Firewall manages. Make sure everything you’re using to connect to the Internet is allowed through the firewall.
Disable Your Antivirus Software:
Just like with a firewall, check to see if the source behind your network problem is the antivirus software installed on your computer. Follow these steps:
- Go to Start and then in the Search box type “System and security”.
- Click on Review Your Computer’s Status And Resolve Issues.
- Click on Security to expand it.
- Your antivirus software should be listed under Virus Protection. Note its name, go to start and type its name into the Search box.
- Once your antivirus software is open, turn it off. (This process will vary depending on the software. Go through the documentations.)
Reset the TP/IP Stack
Sometimes you need to refresh your settings to make Wi-Fi work again. Entering these commands will give you a new connection and help flush out any old or damaged files preventing your Internet from working.
- Press Windows key + X.
- Click Windows Power Shell (Admin).
- Click Yes.
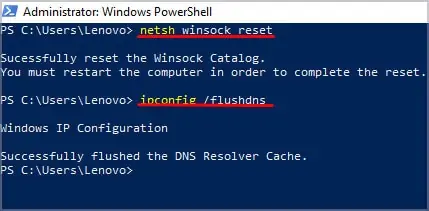
- Type the following commands, pressing enter after each one.

- netsh winsock reset
- netsh int ip reset
- ipconfig /release
- ipconfig /renew
- ipconfig /flushdns
- Restart your computer and try to connect to the internet again.
If you still can’t connect to the Internet, consider having your laptop examined by a technician. There may be an issue with the hardware.
Disable the Driver
Sometimes the driver experiences an error itself, even if it’s updated to the latest version. When that happens, disabling it and enabling it is like turning something off and on again to fix it. The process can correct errors that weren’t being reported and make your Wi-Fi work again.
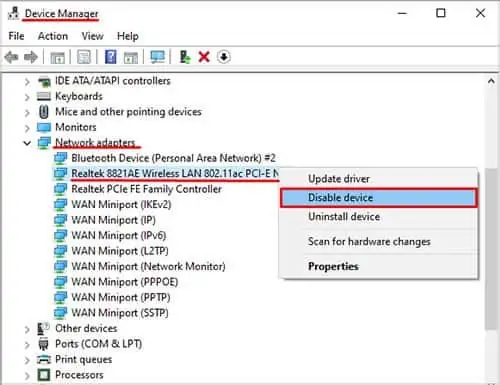
- Open Device Manager.
- Right-click on your Wi-Fi driver.
- Click Disable driver.

- Restart your computer.
- Re-open Device manager.
- Right-click on your Wi-Fi driver.
- Click Enable driver.
Once you’re done, try to connect to an available Wi-Fi network again.
Update Everything
Keeping your computer’s operating system and drivers updated is one of the best ways to ensure stability. Taking proper care of your computer can make it last longer. If you’ve been putting off installing updates and checking to see whether new drivers have been released, there’s never a better time than now.
Plug your computer into an Ethernet connection if you can or set up an external Wi-Fi card to connect to a network. If you can’t do either of these, you’ll have to check the manufacturer’s website for updates on network drivers.
Update Windows Online
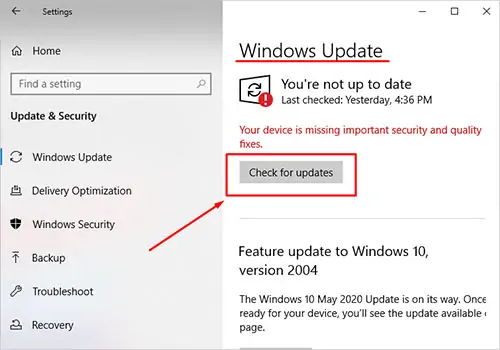
- Press the Windows key and type Check for Updates. Click the matching result.
- Click Check for updates.

- Follow the prompts to install updates once the process is complete.
- Restart your computer.
Update Windows Offline
- Plug a blank USB drive into a computer with Internet access.
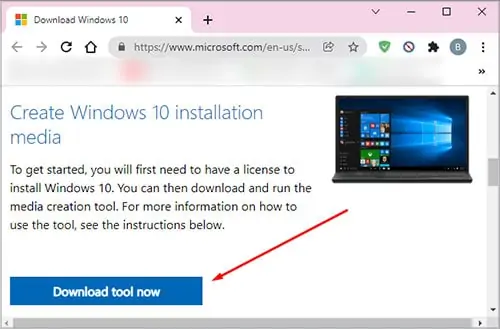
- Go to the Media Creation Tool download page.
- Click Download Tool Now.

- Run the file once the download is complete.
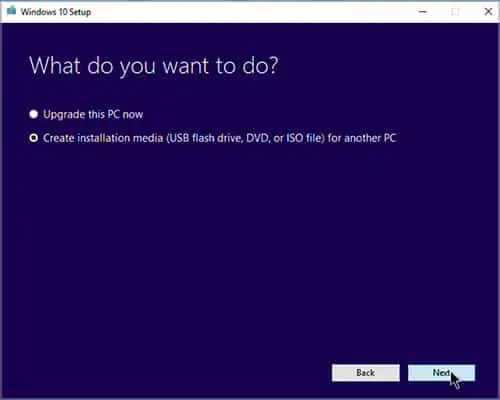
- Choose Create Installation Media, and then click Next.

- Choose the language, edition, and architecture of your laptop’s Windows 10 installation.
- Click Next.
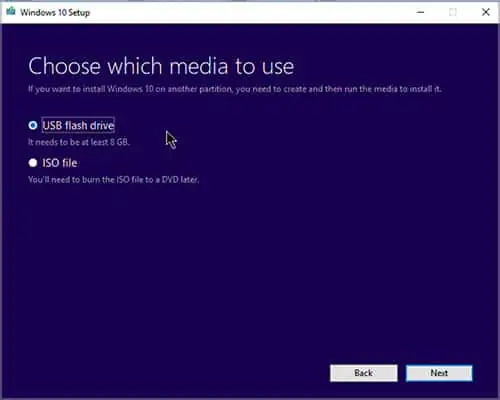
- Choose USB Flash Drive, and then click Next.

- Select the correct flash drive, and then click Next.
- Click Finish.
- Safely remove the USB from the computer and plug it into your laptop.
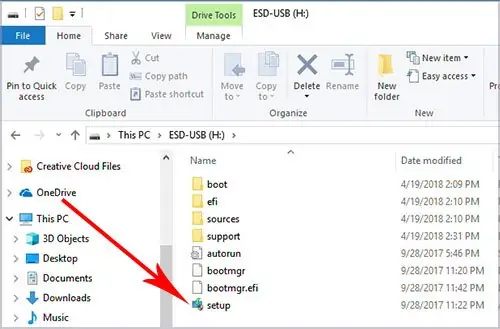
- Click Setup.exe in the USB folder.

- Choose to save your files and settings.
- Click Next, and then click Install.
The latest version of Windows should be on your PC after this process is complete.
Update Drivers Online
- Press Windows key + X.
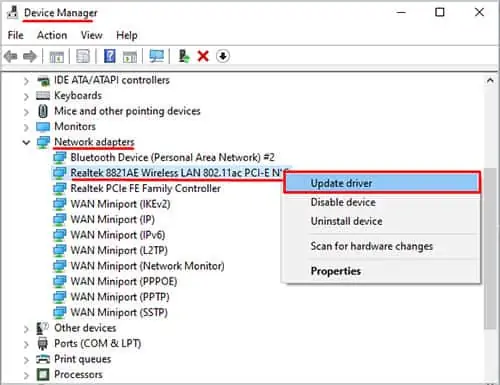
- Choose Device Manager.
- Expand the Network Adapters category.
- Right-click your Wi-Fi adapter and choose Update driver.

- Choose to let Windows search for a driver.
- Follow the prompts to install the driver.
Update Drivers Offline
- Plug a USB drive into a computer with Internet access.
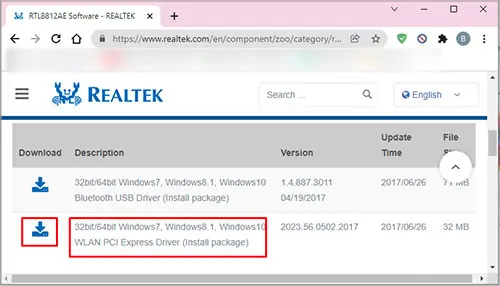
- Visit the website of your Wi-Fi adapter manufacturer.

- Look for the most updated drivers for your specific hardware.
- Download them to the USB drive.
- Safely remove the USB drive from your computer.
- Plug the USB into your laptop.
- Open Device Manager.
- Right-click your Wi-Fi adapter.
- Choose Update driver.

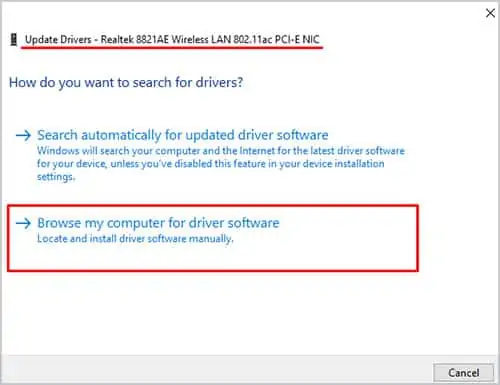
- Click Browse my computer for drivers.

- Select the folder with the drivers and click Next.
- Follow the prompts to update your drivers.
Once you’ve completed these steps, your computer should be updated.
Get the Wireless Network Report:
When all else fails, you should consider generating a wireless network report. This report will contain a summary of every single element of your wireless network, data that you can provide to experts who may be able to help you solve your problem.
Here’s how you generate a wireless network report:
- Go to Start and then in the Search box type “Command”.
- Right click on Command Prompt and select Run as administrator.Allow necessary permissions.
- In Command Prompt, type:
netsh wlan show wlanreport, and then hit Enter.
- This command will generate the wireless network report and save it as an HTML file. The location will be listed in the command prompt. You can open the report on your browser and forward it to experts for further analysis. Or you could analyze the report yourself.
Hope one of these solutions helped resolve your problem.
Frequently Asked Questions
Why Won’t My Laptop Connect to Wi-Fi but My Phone Will?
Usually, this means there’s a problem with your laptop’s Wi-Fi settings. If the Wi-Fi router is online and active, then the laptop should connect to it. Most of the time, you can fix this simply by troubleshooting and not by replacing the hardware.
HP Laptop Wi-Fi Not Working?
It depends on the model of your HP laptop. Some have a series of lit buttons that you can press to turn the Wi-Fi on and off. If it’s orange, it’s off. Others use a function key for the same purpose.

