Usually, DHCP is preferred over static IPs as you do not have to worry about individually assigning addresses to each device on the network. That’s also why DHCP is enabled (by default) on most systems today.
One thing to note here is that the IP is only leased for a certain time and will expire if not renewed. When this happens, the IP returns back to the DHCP pool. Now, this address becomes available for the DHCP server to lease to newer devices in the network.
If you’re keen to know more, here’s a detailed guide that discusses how a DHCP server leases IP to different devices on the network, its renewal process, and whether or not you can modify the lease duration.
Basics to DHCP Lease Time
DHCP lease time indicates how long your device keeps the same IP before its renewal or expiry. During this period, the DHCP server reserves this IP for that specific device and won’t assign it to any other client, preventing possible conflicts.
For example, 1 hour lease time means the device can hold the allocated IP address for 1 hour. The client can renew the IP anytime during the lease period by sending a renewal request message. But if the criterion is reached and the device fails to renew its configuration, it may lose the IP and has to restart the process to get a new IP.
The main purpose of DHCP lease time is to specify a duration until which a client can use the IP address. This ensures that no device will hold the address for an indefinite time.
On an enterprise network, the network administrator configures the DHCP lease time. On a typical SOHO router, if you have access to the router settings, you get the option to change the default lease time.
How Does DHCP Lease Time Generation & Renewal Work?
The client device receives the lease time, IP address, and other additional information, like Default Gateway, Subnet Mask, DNS servers, etc. This process is called the DHCP lease negotiation or the DORA process.
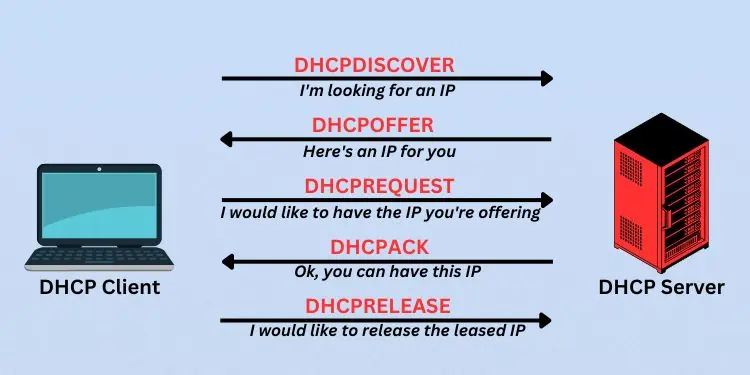
The process starts after a client requests an IP by sending a Discover message. It is usually a broadcast message. One or more DHCP servers can offer the device with an IP.
Now, the client sends a final request (as a broadcast message) to claim the offered IP and related configurations. Once the DHCP server acknowledges this request, the client finally gets the IP for a certain period (lease time).
The client keeps using the leased IP address for half of its validity time (50%). Then, it attempts to renew its lease by sending a unicast message to the DHCP server. Only if the request is acknowledged its timers get refreshed.
However, if the DHCP server sends a NAK message, the client has to reinitiate the lease negotiation process to get a new IP address. In case the server doesn’t respond or is offline, the device keeps using the IP address until the rebinding time (at 87.5%).
The same process repeats in this state—the only difference is that the device sends a broadcast message. Now, every other DHCP server in the network can acknowledge the lease extension request.
Well, the client can still choose to release and renew the IP manually anytime during the lease period. The individual sections below should give you a much more technical understanding of this subject.
What are unicast and broadcast messages?
If a message from a client reaches a specific device on the network, it’s called a unicast message. On the other hand, messages reaching every device on the network is called broadcast message.
For example, if a client forwards a certain packet as a broadcast message, it will reach every station (can be both client and server). However, if it only reaches a specified device (let’s say, a DHCP server), this is a unicast message.
DHCP Lease Negotiation/DORA Process
DORA is simply the abbreviation for Discover-Offer-Request-Acknowledge. These are the messages that flow between the server and the client. In case the DHCP server is on a different network, a DHCP relay agent handles these messages.
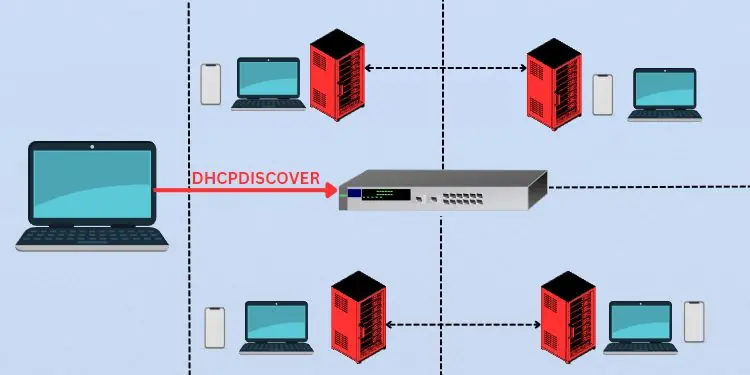
Let’s say, you have connected a new device on a network. Now, this device (client) broadcasts a DHCPDISCOVER message that reaches all the devices on the network. Think of this as the device asking for an IP address from an accessible DHCP server.
In some cases, the device can even include a ‘parameter request list’ option in the DHCPDISCOVER message. Here, the client may mention a particular IP it’s interested in and the lease time it wants to take.
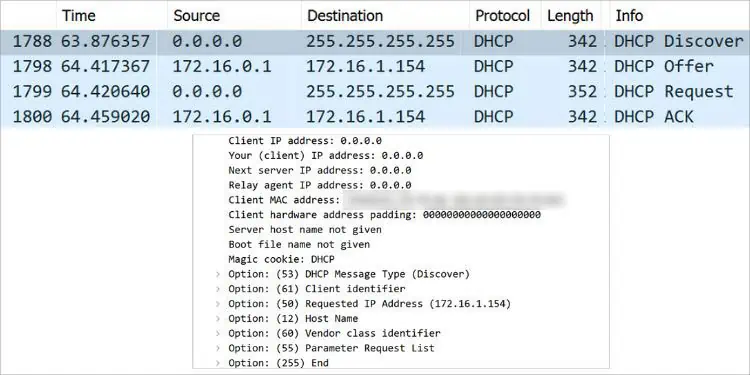
Let’s test this on network monitoring software. While I’ve used Wireshark, you may opt for anyone you like. You should notice that the source IP is 0.0.0.0 as the device hasn’t been assigned any IP address yet. The destination is 255.255.255.255 indicating a broadcast message.
Along with that, you can also check other parameters and options, like transaction IDs, client and server identifiers, relay agent addresses, packet lengths, and more. In case you see 0.0.0.0 in the Relay Agent address field, note that there’s no agent involved (both the client and server are on the same network).
Note: The DHCP protocol utilizes UDP port 67 for the servers and UDP 68 for the clients. You may check the source and destination ports from the User Datagram Protocol section in Wireshark.
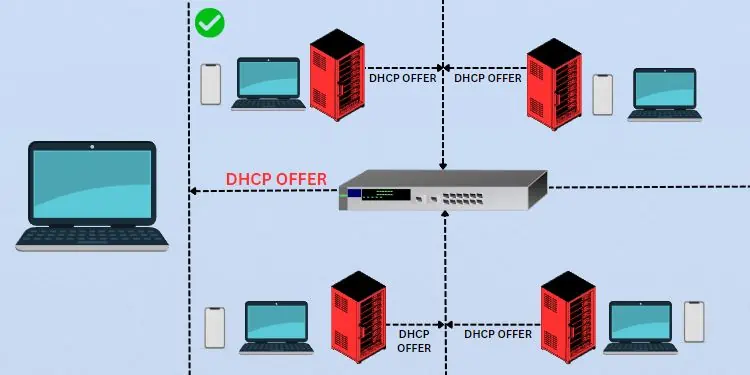
Now, every DHCP server (that received the DHCPDISCOVER message) might respond with a DHCPOFFER packet. Think of this as the DHCP server offering an IP address to the client.
Since the servers are yet unknown which client requires this IP, it broadcasts the message that reaches all the other devices.
Here, the source IP address is going to be the DHCP server address. In most cases, this is simply your router’s IP. The destination will likely be 255.255.255.255 (indicating broadcast message).
However, the DHCP server may send a unicast DHCPOFFER message if your device was previously configured to the DHCP server. In such a case, the server will offer the requested IP and other parameters that match the previous configuration.
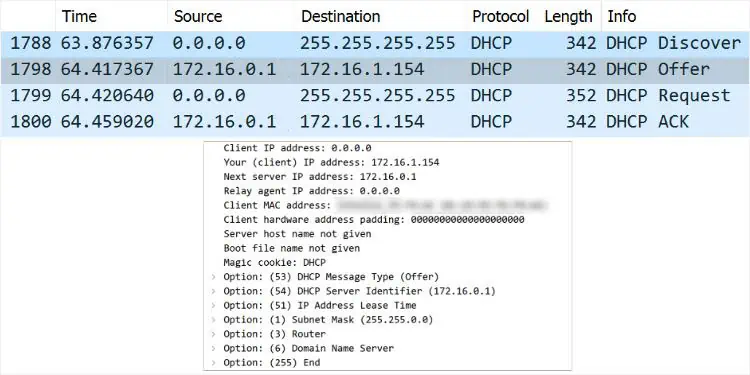
Monitoring the packet, you’ll see that the source IP is the DHCP server address. Unlike the broadcast message in the previous case, the destination IP field will show your device’s IP (indicating it’s unicast).
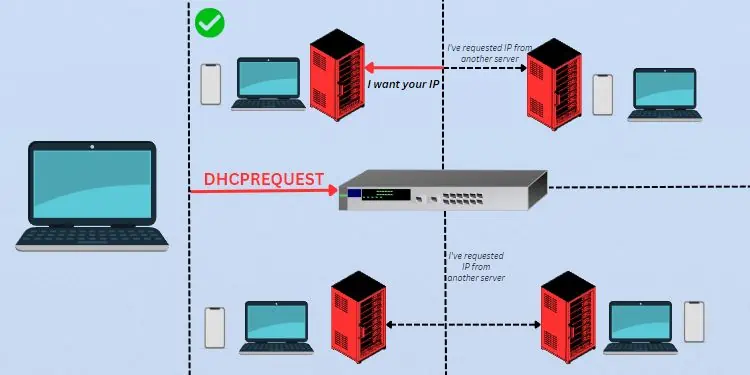
Based on this DHCPOFFER packet, the client will now respond with a DHCPREQUEST message. Basically, this is your device requesting the DHCP server to assign the offered IP address to it.
Since other servers could also be trying to communicate with this client, it has to broadcast the request packet. By doing so, the others now know that the device will only take an IP from the specified DHCP server.
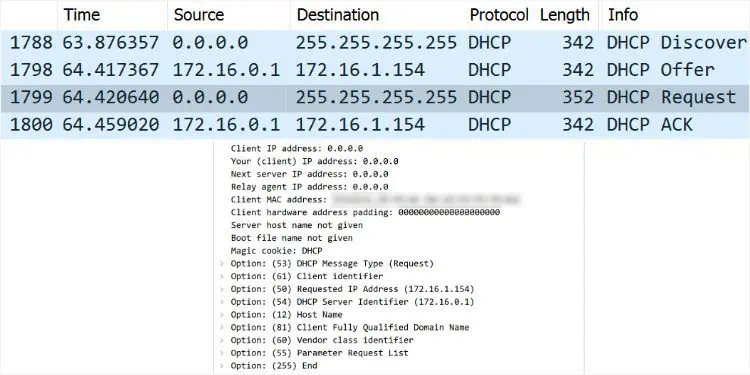
As the client is yet to be assigned this IP address, the Source field still shows 0.0.0.0. Also, since this is a broadcast message, the Destination field will be 255.255.255.255.
Note: If the client had previously included the parameter request list in the DHCPDISCOVER message, it must include the same when sending a DHCPREQUEST message. In case it requests an invalid IP, the DHCP server will respond with a NAK packet, sometimes with an additional error message.
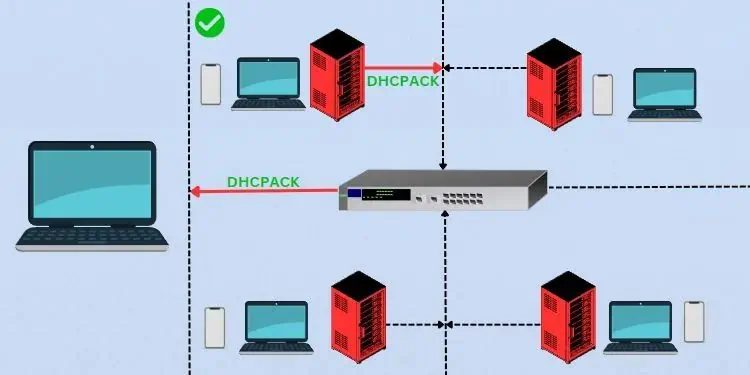
The final message (which can be either unicast or broadcast) is from the DHCP server. It acknowledges the client with a DHCPACK packet along with other configurations (including the lease time).
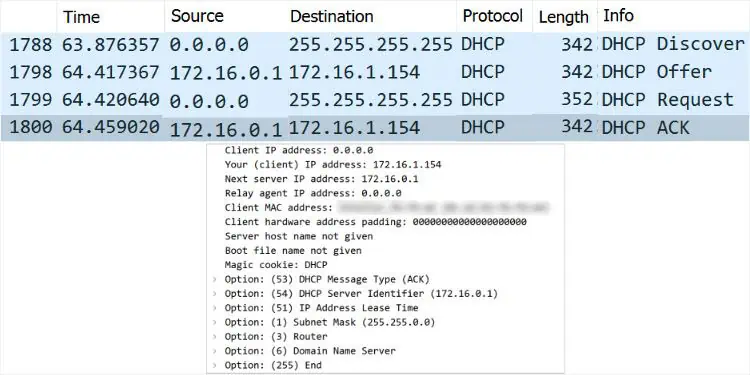
If it’s a broadcast message, the Destination field will still show 255.255.255.255. But if the server knows the device’s IP and MAC address, it should display the offered IP.
DHCP Lease Renewal Process
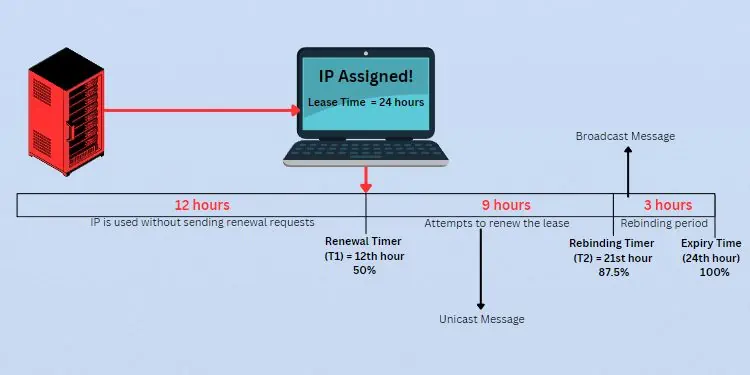
For the client to keep using the same IP address, it needs to renew its lease time. As mentioned earlier, the process starts automatically when the validity time reaches 50%, which is called the renewal timer (T1).
For example, if the lease time is set to 24 hours, the client keeps on using this IP for 12 hours. Once the T1 timer is hit, a DHCPREQUEST packet is sent as a unicast message to the DHCP server asking to renew the lease time.
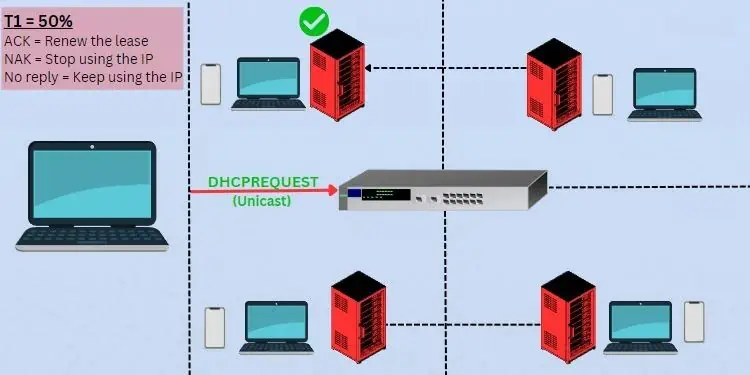
The device keeps using the address until the DHCP server responds. In case the server is down or not responding, it will continue using the leased IP until the rebinding timer (T2). During the process, it keeps attempting to reach the same DHCP server (9 hours in this example).
If the server responds with an ACK message, it’s basically extending the client’s lease time. When this happens, the renewal process restarts (gets back to the binding state), meaning the device uses the new lease until T1 and again, requests for renewal.
In case the server replies with a NAK message, it’s basically asking the client to stop using the leased IP address. Therefore, it returns to the INIT state and starts the DORA process again to obtain a new lease.
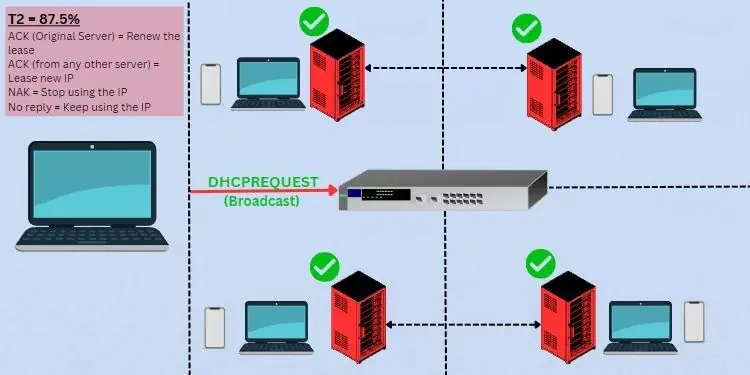
Once the lease time reaches 87.5% (T2), the client device sends a DHCPREQUEST packet again. But this time, it sends a broadcast message hoping to communicate with any DHCP server in the network.
In case the original DHCP server replies with an ACK, only the lease time is refreshed. But if another server responds with an ACK, your device will obtain a new IP address. In either of the cases, the process returns to the binding state.
If the client receives a NAK reply, it has to restart the DORA process. In case there’s no response from the DHCP server at all, it continues using the IP until the expiry (in this example, 3 hours). After that, it has to restart the negotiation to obtain a new IP.
This is generally the case with the IPv4 addresses. However, if you’re using IPv6, it changes the leased IP to a deprecated state. While this is not recommended, it can prevent applications from possible disruptions. When this happens, these apps will continue using the same old IP address until their necessary task is completed.
Also, the renewal can be triggered manually using the ipconfig /renew command. If you run the ipconfig /release command, the device will give up the lease. The DHCP server can now assign this address to a new device.
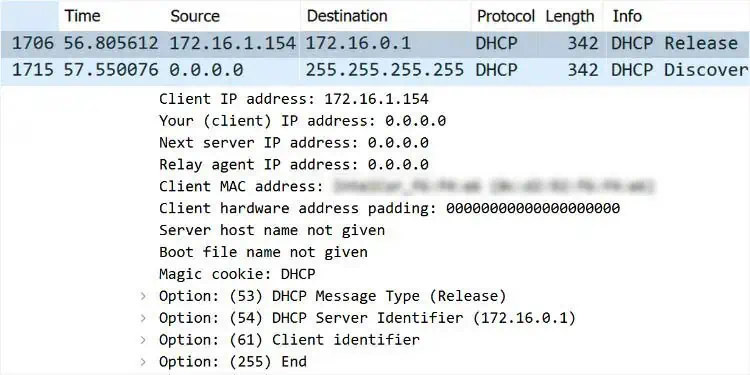
When doing so, the client is basically sending a DHCPRELEASE packet to the DHCP server. Think of this as the device releasing the leased IP back to the server. As you can see above, this returns the client to the INIT state, and the negotiation process begins (from the DHCPDISCOVER message again).
But if you renew it immediately, the device will likely obtain the same IP for an extended period. While just renewing would extend the lease for only a certain period, releasing and renewing will reobtain the IP with a new lease time.
Can You Change DHCP Lease Time?
You can certainly change the lease time from the related settings on your DHCP server. Most home routers have an embedded DHCP server within them. In that case, you need first to access the router settings to configure this option.
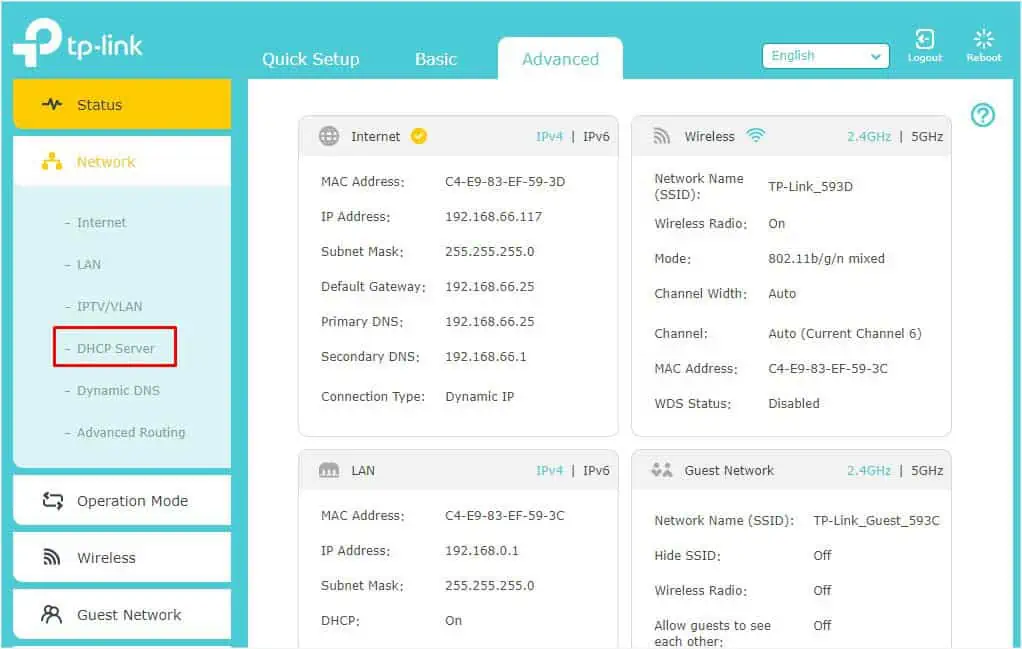
Below is the step-by-step guide on how to do it. The steps may vary on different routers. Here, I am using TP-Link Archer A7 for demonstration.
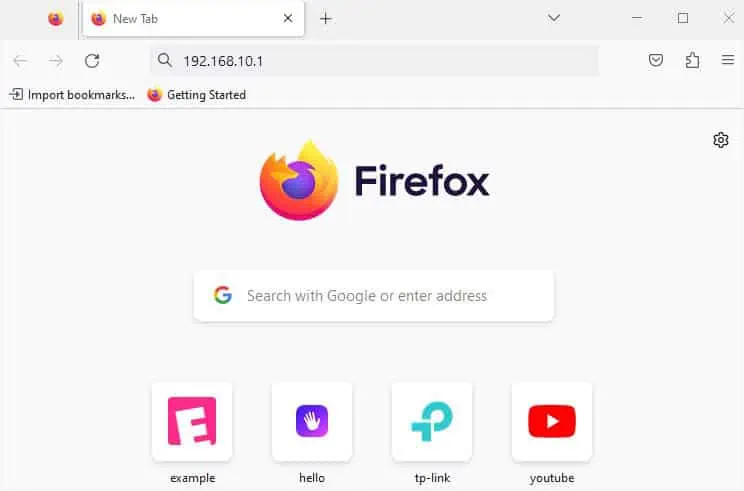
- First of all, open up any web browser and enter your router’s IP address.

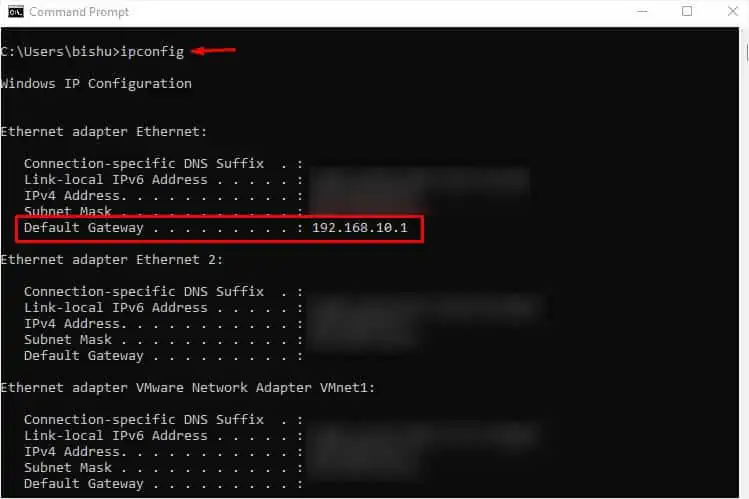
If you’re unaware of this, just launch Command Prompt and execute theipconfigcommand. Look for the Default Gateway option under your adapter.
- Once you’re on the router’s login page, enter the correct username and password to log in.

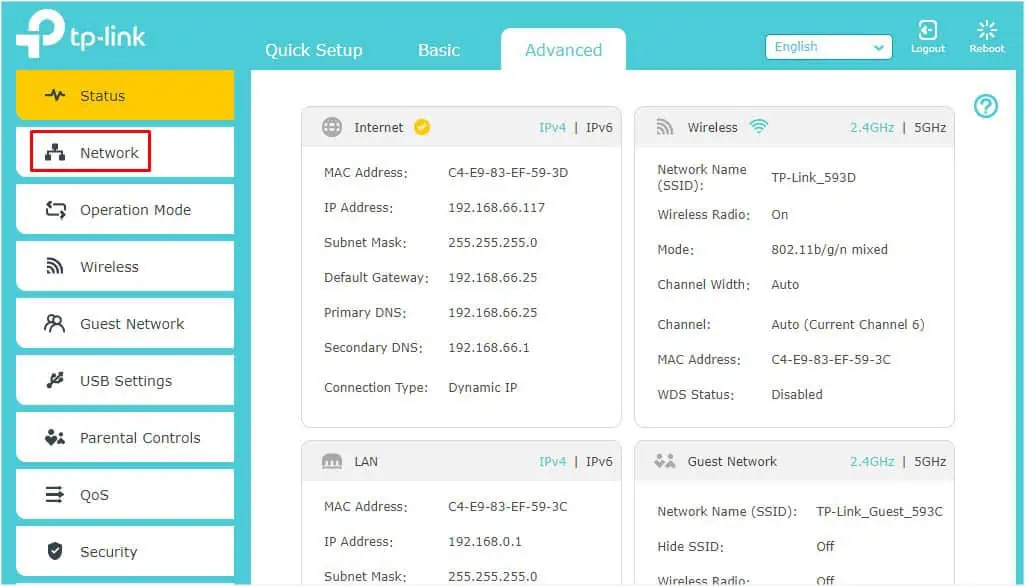
If you’re unsure about this, you may check the router sticker to get the default credentials. This could also be available online–just search for your router model. - Now, move to the Advanced option and expand Network.

- Select the DHCP server option from the left pane.

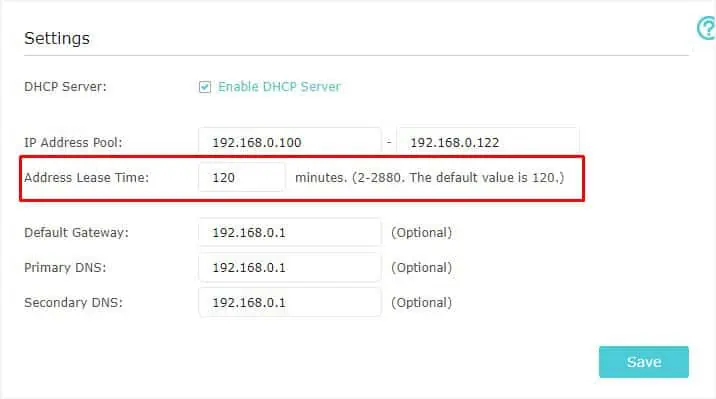
- Switch to the right and under Settings, get to the Address Lease Time field to check the default value. This is usually different for every DHCP server. As you can see below, mine is 120 minutes (2 hours).

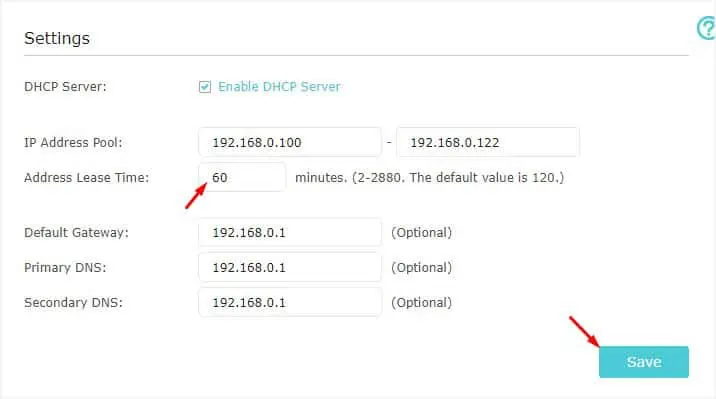
- To modify the lease time, simply edit the value.
- Finally, press the Save button.

While some DHCP servers even allow you to set the lease time to unlimited, it might not be supported by others. In the case of embedded DHCP servers on routers, you can find the minimum and maximum value next to the Address Lease Time field.
If you have set up DHCP on a Windows server, its default value is 8 days. To change this, you may expand IPv4 or IPv6 and open up the Scope folder’s properties. Here, you can configure the lease time based on days, hours, and minutes.
Note that clients can only view and renew the lease period. So, if you are a Windows user, you can not change the lease time. I’ve already discussed how you can release and renew your IP addresses earlier.
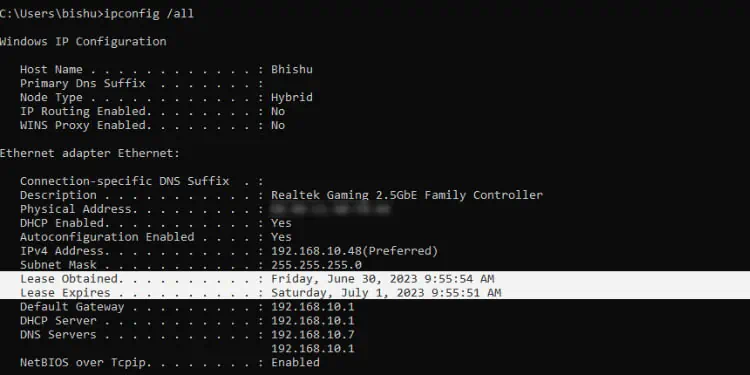
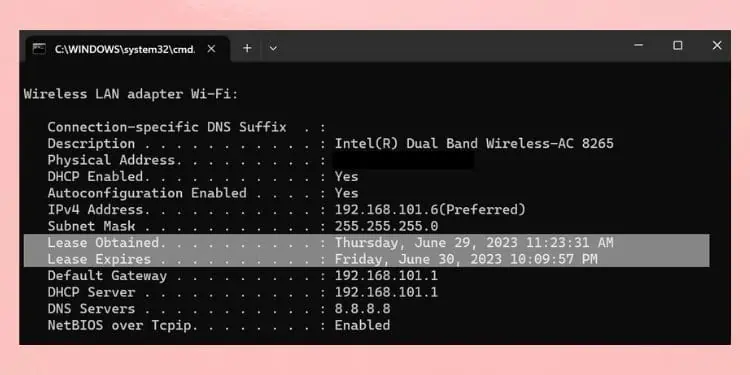
To identify the lease period, just execute the ipconfig /all command and check the Lease Obtained and Lease Expired fields. The former indicates when the DHCP server leased the current IP to your device, and the latter displays the time it will expire.
DHCP Lease Time Best Practises
When configuring or modifying DHCP lease time, there are several things to consider. You need to keep in mind the number of users in the network, the types of clients, the types of connected devices, how much traffic your network can handle, and more.
Certainly, it’s difficult to determine a setting that’s ideal for every situation. You need to test different lease times to find the best one that suits your networking environment.
Below are some of the best practices that most network administrators prefer. This should help you in choosing the optimal DHCP lease time:
- If you have set up a Wi-Fi network in a busy place where there’s frequent incoming and outgoing traffic, you may settle for shorter lease times. This ensures that a new device won’t have to wait for others to release its IP or expire. It would be ideal to set the lease time somewhere between 30 minutes to 1 hour.
- You may opt for shorter lease times in networking environments where the clients do not frequently utilize their devices. For example, if a user is only active for an hour or two on his/her smartphone, leasing IP addresses that last longer wouldn’t be a wise idea. I recommend opting for a few hours (3-4 hours or even less).
- In case you have a limited number of IP addresses in the DHCP pool, this also calls for shorter lease times (somewhere between 1 hour and 1 day). This way, unused devices get disconnected, and a newer device will obtain its lease. However, if you have enough IP addresses in the DHCP pool, opting for longer lease times would be ideal.
- If you’re at home and have a limited number of devices, you may reserve a specific IP address for every one of them. Otherwise, set a longer DHCP lease time here (8 days to unlimited if possible).
- In case you’re unsure about your network configuration, you do not have to worry much. Just leave the lease time to default or set the standard period (i.e. 24 hours).
At the end of the day, it’s up to you to decide between short and long DHCP lease times. Personally, I recommend opting for shorter ones in networks where the traffic is transient and requires more security. But choose longer lease times if you have sufficient IPs and the devices connected in the network are usually permanent.

