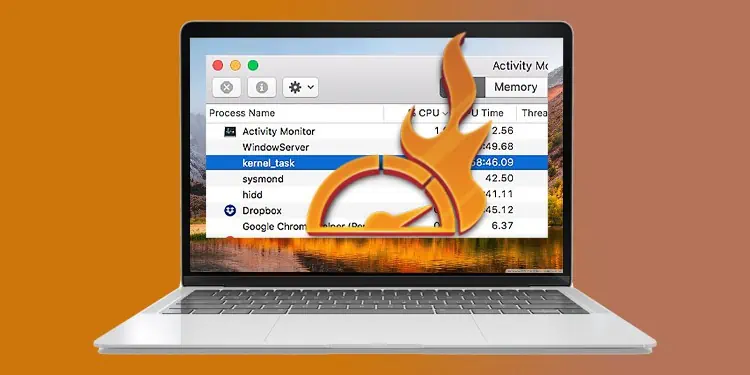
Usually, when your Macbook starts to feel slow and clunky, the kernel_task process can be considered a pretty strong culprit with its high CPU usage. This is because the kernel_task is actually designed to manage your computer’s core temperature after it exceeds a certain threshold.
The kernel_task is at the center of a Macbook’s operating system. It consists of several small but important functions to ensure that your computer is operating at full capacity. However, that being said, you might still notice that this process is taking a significant amount of CPU usage and memory.
So, here in this guide, we talk about the exact reasons that are causing the kernel_task CPU percentage to skyrocket and also how to fix it. By the end of this guide, you’ll understand what goes on inside the heart of your computer and how to manage its high CPU. Let’s begin!
Why Does the kernel_task Have High CPU Usage?
- A faulty charging port
- CPU-intensive applications, either in the foreground or the background
- Hardware glitches
- Overcharging your Macbook
- Your computer’s malfunctioning cooling fan
How to Fix This High CPU Usage of the kernel_task?
The kernel_task is always running. It starts up when your computer is booting and works continuously in the background. Usually, it takes only a handful portion of the CPU percentage, however, in times of significant usage, you can follow the steps shown below to fix it.
Switch the Charging Port
As strange as it may seem, switching your charging port can reduce the overall temperature of your processor, ultimately decreasing the kernel_task’s high CPU usage. This is because the ports generally become defective due to wear and tear. So, a defective port might still charge your computer, but it will do so inefficiently. So, try switching your charging port and see if it helps.

Furthermore, counterfeit chargers are known to cause overheating as well. So, if possible, use an authentic charger to charge your computer.
Restart Your Computer

When you notice the kernel_task using a high percentage of the CPU, first and foremost, restart your computer. This is because a reboot of your computer unloads everything from the system memory and refreshes the OS. The resources are unallocated from the system applications as well. So, restart.
Install the Latest macOS Update
macOS is known to release system update files in a timely manner. These files are usually large in size but provide effective patches and security updates.
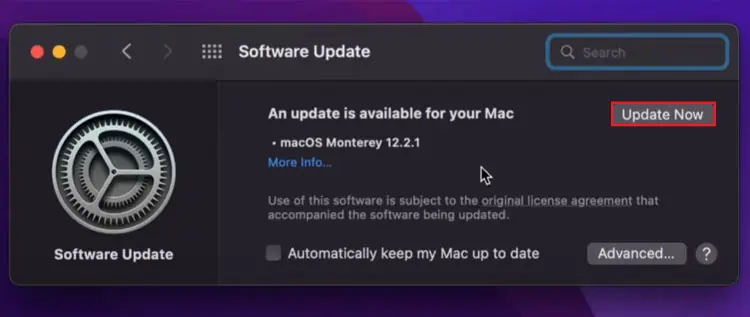
So, if there is the latest available for your system, install all the updates to fix the compatibility, performance, and overall durability of your system. The high CPU usage can also be fixed by updating your system. So, for this,
- Click on the Apple logo that’s towards the top left corner of your screen.
- Select About This Mac.
- Click on Software Update.
- Wait until your system scans for a newer update (if available).
- If it returns a new build available for your computer, click on Update Now to update your system.

Reset the SMC
The SMC (System Management Controller) is a chip on your MacBook’s motherboard that is in charge of lower-level settings on your computer. From turning on your computer when the power button is pressed to managing indicator lights on your device, the SMC handles all.
The SMC is also responsible for your processor’s temperature management, and hence, resetting the SMC could see the thermal level drop to normal, fixing the kernel_task’s high CPU usage.
For Macbooks With an M1 Chip
Resetting SMC on Macbooks integrated with the M1 chip is as simple as restarting the computer. So, to reset the SMC for M1 computers,
- Turn off your computer.
- Close the laptop’s lid for 30 seconds.
- Turn on your computer.
For Macbooks T2 Chip
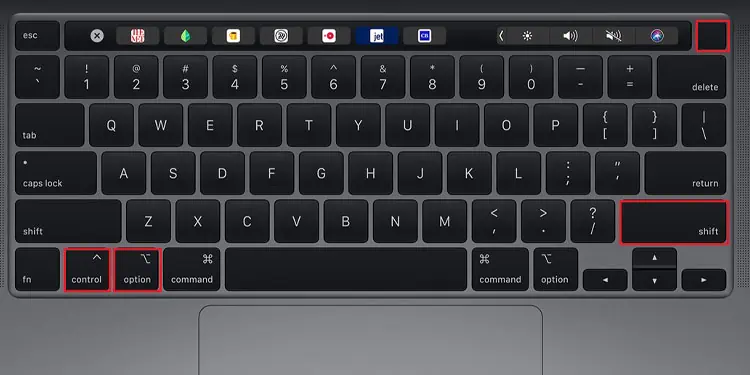
Resetting SMC for Macbooks with T2 chip is a bit different than that for other Macbook models. So, for Macs with a T2 chip, here are the steps to do so:
- Turn off your computer.
- Unplug the AC adapter.
- Hold the left Control button + left Option button + right Shift key for about 7 seconds.
- Now, without releasing the aforementioned button configuration, hold the power button for about 10 seconds.

- Finally, turn on your computer.
For Macbooks Without T2 or M1 Chip
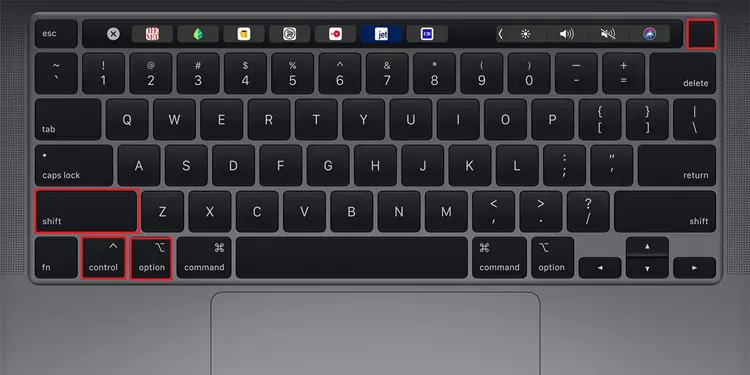
For Macbooks without T2 or M1 chips, resetting the SMC is similar to that of the T2 chip. The core concept is the same, with only the exact button configuration being slightly different. So,
- Turn off your computer.
- Unplug the AC adapter.
- Hold the left Control button + left Option button + left Shift key + power button for about 10 seconds.

- Finally, turn on your computer.
For Macbooks With Removable Battery
For Macbooks with a removable battery, resetting the SMC is done by removing the battery itself. Keep in mind that the button configuration shown above will not work if the Macbook you are using has a removable battery. So, for this,
- Turn off your computer.
- Unplug the AC Adapter.
- Extract your battery.
- Press and Hold the power button for about 5 seconds.
- Reconnect the battery.
- Plug back your computer and turn it on.
Reset the NVRAM
The NVRAM is also called a Non-Volatile RAM. It is called ‘Non-Volatile’ because it can store data even when the power is turned off. Generally, your system settings, configurations, and information regarding the kennel panic are stored in the NVRAM.
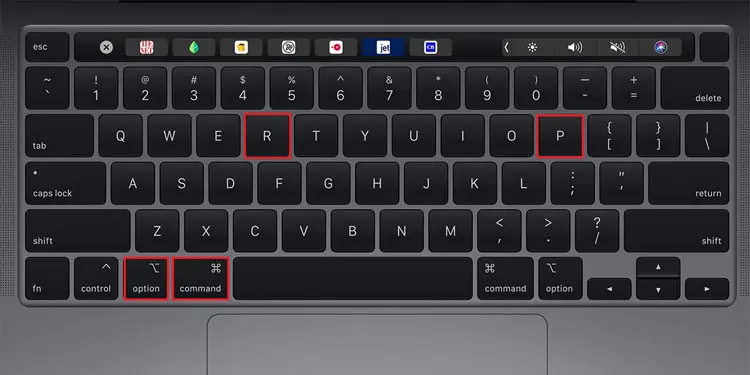
Resetting NVRAM resets back kernel_task’s overall CPU usage back to normal. So, to do this,
- Turn off your computer.
- Press the power button.
- Immediately after you hear the startup sound or after the display lights are on, hold the Option + Command + P + R keys.

- Keep on holding these keys until your computer restarts.
Boot Mac in Safe Mode

Booting your computer in safe mode makes use of only the minimum required system resources and applications. So, if your system performs well during safe mode and if the kernel_task CPU is below the threshold, you can be sure that this problem is caused by a third-party kernel extension that’s installed on your computer.
You can then proceed to delete the particular application entirely from your computer to fix your issue. The steps below show how you can boot your Macbook in safe mode.
For Intel-based Macbooks:
- Turn off your computer.
- Turn on your computer while holding down the Shift button.
- Finally, when the login screen appears, you can release the Shift button.
- Log in to your computer.
For Macbooks With M1 Chip:
- Turn off your computer.
- Press and hold down the power key until you see the startup option icon.
- Select a drive you want to boot from.
- Hold Shift and hit Continue in Safe Mode.
Now, if you find out that your issue is resolved in safe mode, the cause of your problem is likely to be some third-party extension working on kernel mode. So, in this case,
- Restart your computer in normal mode.
- Using the Spotlight Search, search for and go to Terminal.
- Type
kextstatand hit enter.
This command returns all the kernel extensions installed on your system. - Look for any third-party kernel extensions.
Any entry that doesn’t start withcom.apple.*is a third-party extension. - Finally, if you see a kernel extension that can be traced back to a suspicious application, remove this application.
Check the Integrity of Your System Fans
If your fan is spinning abnormally slow, the temperature for your processor will rise, and hence, the kernel_task takes much of your CPU percentage. So, verify that your fan is operating as per the required rpm.
You can download and install MacFans app in order to monitor and control your fans in relation to your computer’s thermal sensors. If the fan seems to be broken, you have to purchase a cooling pad.
Use an External Cooling Pad
An external cooling pad consists of fan(s) that are meant to provide a fresh supply of much-needed air to try and cool the temperature of your CPU. External fans should be bought in an electric store or online.
Here are some of the best cooling pads available on the market. We are sure you’ll find the article very much helpful. Do let us know what you think about it!

