Migration Assistant is one of the most convenient methods to transfer files between two Mac computers. Users mainly use it to migrate from an old Mac to a new one, hence the name.
However, sometimes the app doesn’t work properly. Your transfer may get stuck, or you may not be able to initiate the process at all. Such issues can happen because of various reasons, which we have mentioned in this article, along with their corresponding solutions.
Why is Migration Assistant Not Working?
Here are some of the reasons for Migration Assistant not working on your Mac computers:
- Outdated MacOS version.
- Connection issues.
- Firewall or antivirus blocking the transfer.
- Not fulfilling the requirements of the transfer process.
- Disk Drive issues.
- User account conflicts.
How to Resolve Migration Assistant Not Working?
First, we recommend waiting patiently for some time if the transfer seemingly pauses. It takes a long time to transfer files from a Mac with a large internal drive. So, you may believe the Migration Assistant to be malfunctioning by mistake.
You also need to run Migration Assistant on both Macs to transfer files between them.
If you have other issues or it’s been a long time, apply the possible solutions we have mentioned below:
Update Mac OS
First, make sure to install all available updates on your computer. If your hardware supports later versions of the OS, it’s better to upgrade your system.
Migration Assistant only allows data transfer from Lion OS or later to Mavericks OS or later. If you have older versions, upgrade your OS if possible. Otherwise, you need to use alternative transfer methods.
You can also try making a clean reinstall of the latest MacOS your computer supports.
Check Connection
You need a proper connection between the two computers to search for the other PC and transfer data. So, read through the instructions below and apply them if you haven’t done so already:
- Place the computers next to each other.
- If one of the PCs has El Capitan OS or earlier, connect them to the same network.
- Ensure smooth WiFi connection. Restart the Router if necessary. Also, keep in mind that the Transfer may fail if the connection is setup over WiFi network.
- If Migration Assistant can’t find the other Mac or there are any other issues, use an Ethernet cable. Also, make sure to use the CAT5E or CAT6 Ethernet cable.
- Unplug and reinsert the Ethernet cable if it still doesn’t show the other computer. You can also do so without closing Migration Assistant if the transfer gets stuck.
- You can also transfer over the USB. Use the Thunderbolt 3/4 cable to set up connection rather than Thunderbolt 2 that comes with Macs.
Also, remember to connect both computers to an AC power supply as the Migration may take a long time.
Disable Security Software
Third-party antivirus or firewall programs may interfere with the Migration Assistant. We recommend disabling such programs to avoid any issues while transferring data.
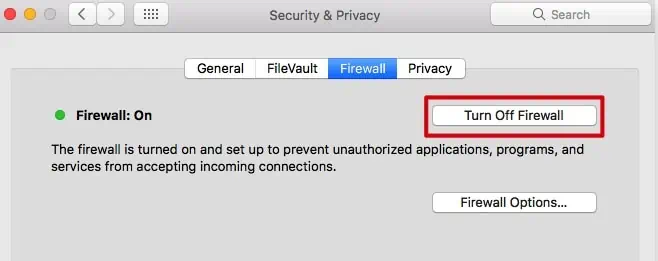
It’s also best to disable the built-in firewall on the old Mac (where you’re transferring from). To do so,
- Go to Apple menu > System Preferences > Security/Privacy > Firewall.
- Click on Stop or Turn Off Firewall and then Ok.

Check Sharing Settings
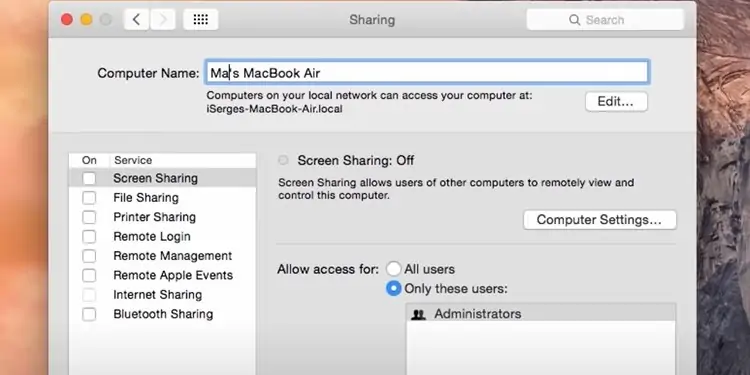
You must make some preparations before transferring through the Migration Assistant. One such preparation is to ensure the two computers are in the paired state. To do so,
- On your old Mac, go to the Apple menu > System Preferences > Sharing.
- Check the name in the Computer Name field.
- If it’s not the name of your new Mac PC, enter the name.

Run Drive Diagnosis
If there are any issues with your disk drive, you won’t be able to transfer the contents of the old drive completely. The Migration Assistant often gets stuck in such a scenario. You need to run the drive diagnosis if it happens.
First, shut down your Mac, and remove all peripherals except the Ethernet and power cable. Now, place the Mac on a flat surface with good ventilation and follow the instructions below:
- On Mac with Apple Silicon Processor:
- Power up your Mac and press and hold the power button as soon as it starts booting.
- When you see the startup options window, release the power button.
- Press Command + D.
- On Mac with Intel Processor:
- Power up your Mac and press and hold the D key.
- Release it when you see a language selection or progress bar screen. Select the language if necessary.
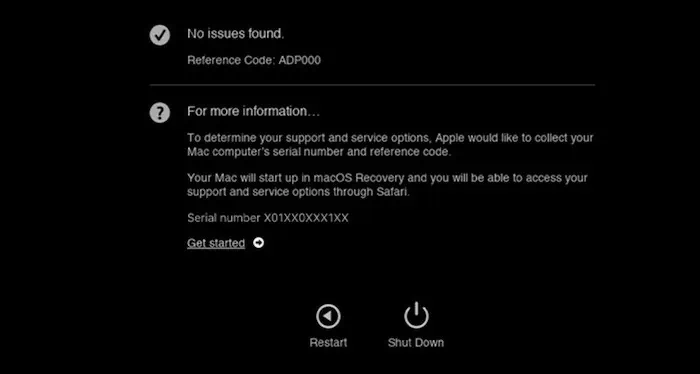
- Wait until you get the test results.
- Pick Get started for more information while keeping the internet connection (Ethernet).

Troubleshoot your drive issue after visiting the web page with more information. If you can’t, take it to a hardware specialist for repair or replacement.
Exclude Transfer of Applications
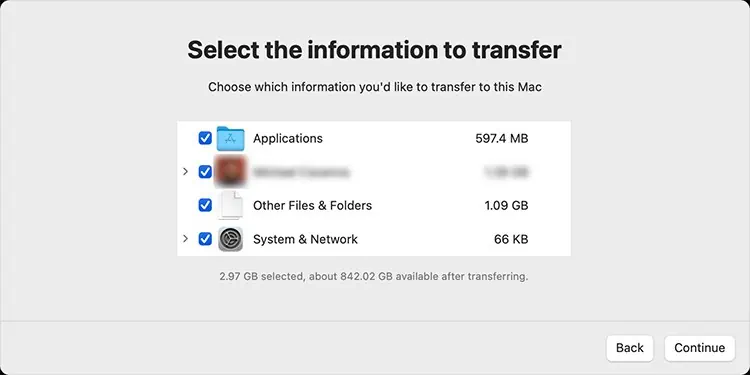
Transferring the Applications folder with Migration Assistant takes a long time. Many users have also experienced freezes while trying to transfer Applications.
So uncheck the option on the Select the information to transfer screen. If you really need your apps, download them on the new Mac.
Set Account Password
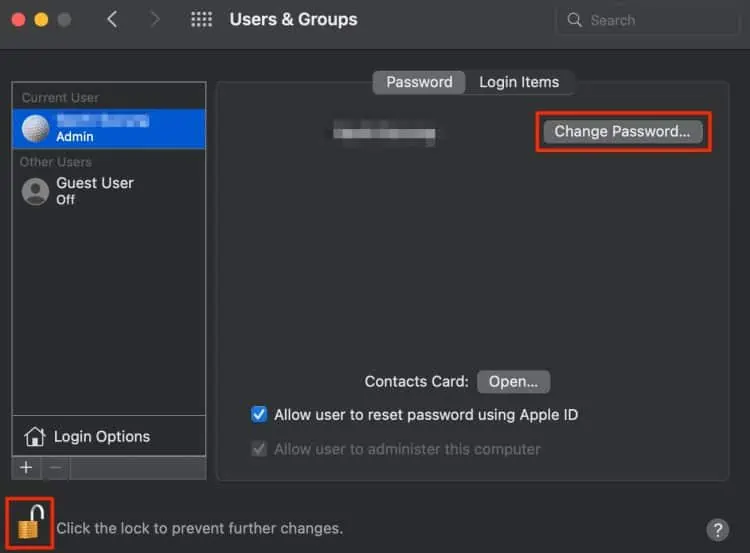
If you see the “This Mac can’t be used to migrate data” error message, it might be because you’ve not set a password for your old Mac account. It’s likely a security feature to prevent others from copying your data. Here’s how you can set the account password:
- Go to Apple menu > System Preferences > User & Groups.
- Select your account and click Change password.

- Set the password you want.
You can try reviving Mac with Apple Configurator if you still get the “This Mac can’t be used to migrate data” error. Visit the official Apple guide to learn the necessary steps.
Rename User Account
The “Conflicts Detected” error while using a Time machine backup indicates user account conflicts. It happens if you have the same user accounts on both Mac. You only need to delete the account from one Mac computer or rename it to resolve the issue.
Use Alternate Data Transfer Tool
As we mentioned earlier, you can’t transfer data to and from very old mac versions. For those, you need to use the Mountain Lion Migration instead.
Furthermore, if Migration Assistant still shows issues, you can use alternatives such as Target Disk Mode or Time Machine. It’s also possible to directly share files between two Macs with Apple Silicon processors.
We have a dedicated article on How to Transfer Files Between Two Mac Computers. Check it out to find all possible methods.
Reset SMC
Resetting SMC is the definite fix for the “Authentication failed… authorizing user” error on Migration Assistant. While power cycling Mac PC may also fix this issue, it’s better to reset SMC. Here’s how you can do so on a MacBook computer:
- Shut down your Mac.
- Now, press the Right Shift + Left Control + Left Option keys simultaneously for 7 seconds.
- Without releasing the keys, press and hold the power button for the next 7 seconds.
- Release the key and turn on your Mac after a few seconds.
Other Mac devices have different ways to reset SMC. So, we recommend visiting the Apple documentation on the process.
Related Questions
How to Properly Use Migration Assistant?
Our article on different methods to transfer files between Mac computers also includes how you can use Migration Assistant. Visit the guide to learn the necessary steps for using Migration Assistant. But make sure to follow the requirements we have mentioned in the above sections.
