Most manufacturers these days incorporate blinking patterns on monitors to determine the operating state your screen is in. So, the power indicator might flash a blue light and in this case, the screen usually turns black.
A blue light blinking on a monitor generally indicates that it’s in standby mode and a tap of a button on the keyboard should wake it up. However, I presume that this is not the case for you as sometimes monitors fail to light up no matter the key you press. In this case, it’s usually either hardware issues or power supply problems.
So, we have put together this guide to help you and other users that are going through the same problem. By the end of this article, you’ll be able to understand the causes and apply their potential fixes to effectively fix your issue.
Why Is My Monitor Blinking Blue Light?
When your monitor abnormally starts blinking blue light, it often indicates that the monitor is getting no compatible video feel. Either that, or it refers to prolonging hardware issues.
- Faulty cable/connection
- Unsuitable power supply
- Incompatible resolution
- Incompatible refresh rate
- Outdated drivers
- Corrupted capacitors
- A broken monitor
How to Fix a Monitor Blinking Blue Light?
This blue light issue on your monitor can usually be fixed by unplugging the power supply and only turning it on after a few hours. Doing this could discard the electrostatic charges accumulated on your device and see that it is back up and running.
Other than this, you can follow a few different methods that are shown below. However, keep in mind that not all fixes will work for you. So, be sure to try other methods as well. Let’s go straight to the point!
-
Monitors these days are integrated with a dedicated embedded system that aims to fix any anomalies and faults it detects within itself. So, if your monitor is in this protection mode, it blinks a continuous blue light to notify the user about the state it is in. Hence, in this case, you don’t have to worry too much as your monitor is recovering in the background and shall light up once the process is complete.
Check Your Cables
Before diving into the heart of the matter, it’s essential to ensure that all your cables are functioning properly. So, before anything else, check if video I/O cables operating at their full capacity or not. You can do this by swapping out cables or testing these cables on another monitor.
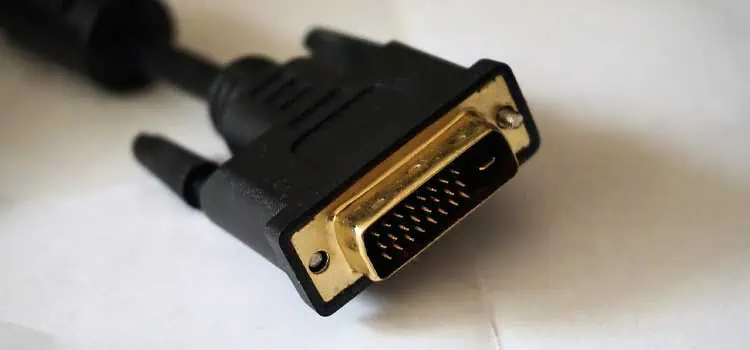
Also, ensure that your monitor is firmly connected to your CPU and to the power outlet as well. Be sure that the connection methods and their respective ports (HDMI, DisplayPort) are not damaged or worn out.
Try Using an Alternate Power Source
In case your monitor doesn’t receive a compatible video feed, it’ll not display anything on the screen. That is, a weak power source could provide enough electricity to light up the blue light on your monitor but might fail to run the display.
Hence, you can swap the power outlets, power supplies, and even the power strips to see if switching up the power source will provide enough power for your monitor to operate properly.
Perform a Power Reset
A power reset usually fixes frozen computers and blacked-out monitors. What this method does is dissipates the left out electrostatic charges from your computer and also clear its memory.
However, your custom settings will not be deleted. Performing a power reset will revert your monitor back from safe mode as well. So, for this,
- Turn off your computer.
- Turn off your monitor.
- Unplug your CPU and the monitor from the power cable.
- Also, disconnect all the rear cables from your monitor (DVI, HDMI, power, etc).
- Now, hold your monitor’s power button for about 30 seconds to discard the remaining electricity within it.
- Similarly, hold your CPU’s power button for about 45 seconds.
- Connect the required cables to your system.
- Turn on your monitor.
- Turn on your computer.
Most fixes from this point onwards require a second monitor to try and solve the problem from within the Windows OS. However, if you don’t have one, we have prepared a guide for you to help determine the best budget monitors you can purchase right now. So, considering this, let’s move ahead.
Change Your Monitor’s Resolution and Refresh Rate
Incompatible video settings often cause monitors to fail to light up the display. So, the logic is similar for your case as well.
Setting your computer’s resolution and the refresh rate to a value that’s more than the amount supported by your monitor can cause it to go black and hence, only blue light is visible. The steps below show how to alter your computer’s video settings.
- Connect a second screen to your PC.
- Press Win + I to open Settings.
- Select System from the left panel.
- Click on Display.
- From the Display Resolution menu, click on the drop-down options and select a lower resolution.

- Keep Changes when prompted.
- Go back to the display settings window.
- Now, select the Advanced display option.
- Choose a refresh rate and set it to a lower value.

- Again, Keep Changes when prompted.
Change the Power-Saving Settings
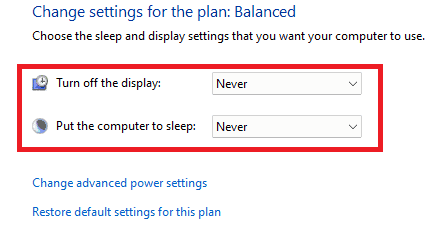
A glitch within the system can influence your monitor to go black and flash a blue light just because of unsuitable power-saving settings. So, you can probably fix your issue if these settings are altered to a suitable configuration. For this,
- Connect a second screen to your PC.
- From your Start menu, search for and go to Control Panel.
- On the top right corner of this window, set View by to Large Icons.
- Now, select Power Options.
- Choose the Balanced power plan.
- From beside the balanced power plan option, click on Change Plan Settings.
- Set Turn off the display and Put the computer to sleep to Never.

- Finally, Save changes.
Restart the Windows Explorer
The Windows explorer is functioned to manage the desktop canvas, the taskbar, all the data on your computer, and also the system resources.
So, a misbehaving Windows Explorer often returns a black screen on your monitor and so, a blue light. You can restart the Windows Explorer via the task manager and the exact steps to do this are:
- Connect a second screen to your PC.
- Press Ctrl + Alt + Del and select Task Manager.
- Navigate to the Processes tab.
- Right-click on Windows Explorer and select Restart.

Disable Fast Startup
As the name implies, the Windows fast startup feature starts up your computer at a faster rate than usual. This is possible as the computer is put in a sudo-hibernate state even when you fully shut it down.
So, the fast startup feature can lead to many startup issues, including a black screen and a blue blinking light. Hence, for this,
- Connect a second screen to your PC.
- From the Start menu, search for and go to the Control Panel.
- On the top right corner of this window, set View by to Large Icons.
- Now, select Power Options.
- Select Choose what the power buttons do from the left panel.
- Click on Change settings that are currently unavailable.
- Uncheck Turn on fast startup.

- Finally, Save changes.
Update the Display Driver
Latest compatible display drivers are required for your monitors to operate at full capacity. So, when your monitor is blinking blue light and going dark, it’s probably because your display component couldn’t communicate with your operating system.
This unfortunate scenario can be prevented by updating your display driver to the latest version. So, to do this,
- Connect a second screen to your PC.
- Search for and go to Device Manager.
- Expand Display Adapters.
- Right-click on your graphics adapter and Update Driver.

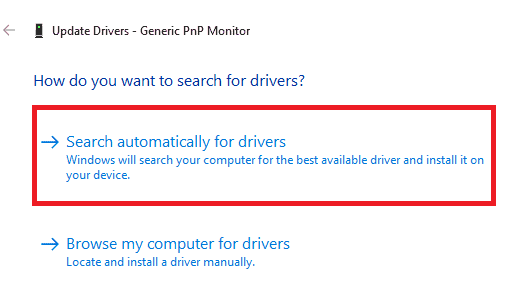
- Select Search automatically for drivers when prompted.
Reinstall the Display Driver
Corrupted drivers also give rise to unwanted issues on your system. So, removing the graphics driver corruptions could see your monitor’s display light back up.
This can be done by reinstalling your graphics driver, which sets a new batch of installer’s files on your computer. The steps below explain how you can do so.
- Connect a second screen to your PC.
- Search for and go to Device Manager.
- Expand Display Adapters.
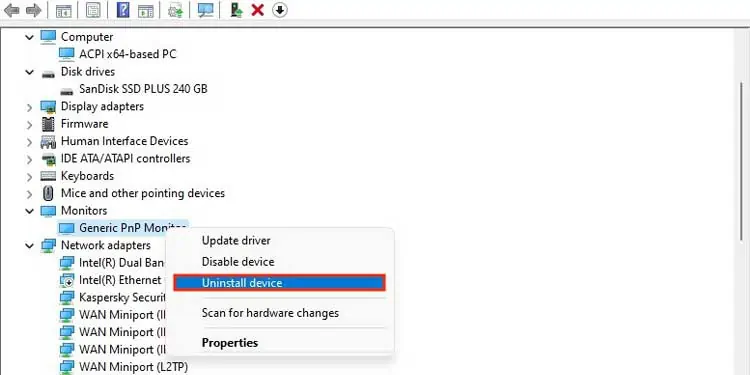
- Right-click on your graphics adapter and Uninstall Device.

- Select Delete the driver software from this device when prompted.
- Once the process completes, Restart your computer.
- Open Device Manager once again.
- Right-click on your computer’s name and select Scan for hardware changes.
- Windows will then start to automatically scan and install the required drivers.
Replace Your Monitor’s Capacitor
One of the main reasons your computer is continuously blinking blue light can be traced to probable bad capacitors. A capacitor that’s worn out over time often tends to bulk up due to voltage overload and high temperature.
So, if none of the aforementioned methods work for you, it’s best to take your monitor to a nearby repair center and check if the capacitors have malfunctioned. The repairmen may then give you a suggestion regarding this issue or replace the capacitor itself.
Monitor Is Blinking Blue Light When the Display Is on
Scenarios where a monitor continuously blinks blue light while the display is running as usual generally indicate a failure to connect to the internet. That is, this happens when an ethernet cable is plugged-in or WiFi credentials are entered, but the monitor cannot connect to the network.
Check Your Connection
So, in this case, the first thing you have to do is to ensure that your ethernet cable or your Wifi connection is not broken. So, test the cable on another device, and also try to connect to the Wifi using another device.
Additionally, you have to make sure that the Wifi you’re using to go online must have a 2.4Ghz frequency with an automatic channel connection.
We also recommend you ensure that no more than 10 devices are connected to that particular network.
Furthermore, if you find out that your router is failing to connect to the internet, you can hard reset the router to reset it to its default configuration state and see it go online.
Update Your Monitor Driver
Modern monitors might not completely depend on an operating system to function. So, for these monitors, check if your cables are connected properly and reset your router.
However, for monitors that are running an operating system, you can update their driver to ensure that it communicates efficiently with the operating system and can effectively connect to the internet. Here are the steps to do so:
- Press Win+R to open the run command box.
- Type and enter
devmgmt.mscand open the device manager. - Expand the Monitors tab.
- Right-click on your monitor and select Update Driver.
- Select Search automatically for drivers when prompted.

Perform a Power Reset
Performing a power reset often fixes your internet issues and also the blue light issue on your monitor. Drawing out the residual power from your device gives it an opportunity for a fresh boot, which could ultimately fix these issues for you. The steps above explain how you can perform a power reset in brief.
However, if these didn’t work for you, we have a dedicated guide on what you can do when your motherboard ethernet fails to connect and also the steps you can take when your motherboard Wifi fails to connect to the internet. So, check it out for a detailed explanation.

