It’s annoying when our screen goes to sleep in the middle of our work or while playing games. Nonetheless, such issues are temporary, and you do not have to worry about them.
Well, our monitors might go to sleep randomly when we haven’t updated the general settings. Also, this could be an issue due to some system failures or outdated drivers.
Whatever the reason, they can be solved using simple techniques. By the end of this article, you will learn why your monitor is going to sleep randomly and the basic methods to fix them.
Why My Monitor Is Randomly Going to Sleep?
- Your software or drivers are outdated.
- If you’re using a second monitor, you haven’t changed a few settings that might have set the screen to sleep.
- There are a few problems with your cables or other hardware.
- Some viruses or malware might have tweaked your sleep settings.
- Lastly, there could be underlying issues if you have installed a graphics card on your device.
How to Fix Monitor Going to Sleep Randomly
Before proceeding with these fixes, we advise you to first check for any system update. Also, you can try restarting your PC as this may fix some common faults that send your monitor to sleep.
Furthermore, you should check for viruses that could be playing with your system settings. Interestingly, you can install multiple antivirus programs on your device to fix these problems.
Now, let’s dive into the simple ways of how you can fix the monitor going to sleep randomly. If one doesn’t work for you, try others, as one of these methods is likely to resolve the issue.
Turn off or Reduce the Computer Sleep Settings
Knowingly or unknowingly, we might have tweaked the settings such that the system puts our monitor to sleep in a short time. Thus, we are facing this issue frequently and randomly.
Hence, the first method is to disable the sleep option. Or, we can increase the time the system sends the monitor to sleep.
The following steps will guide you on how to turn off the computer sleep option on Windows 11:
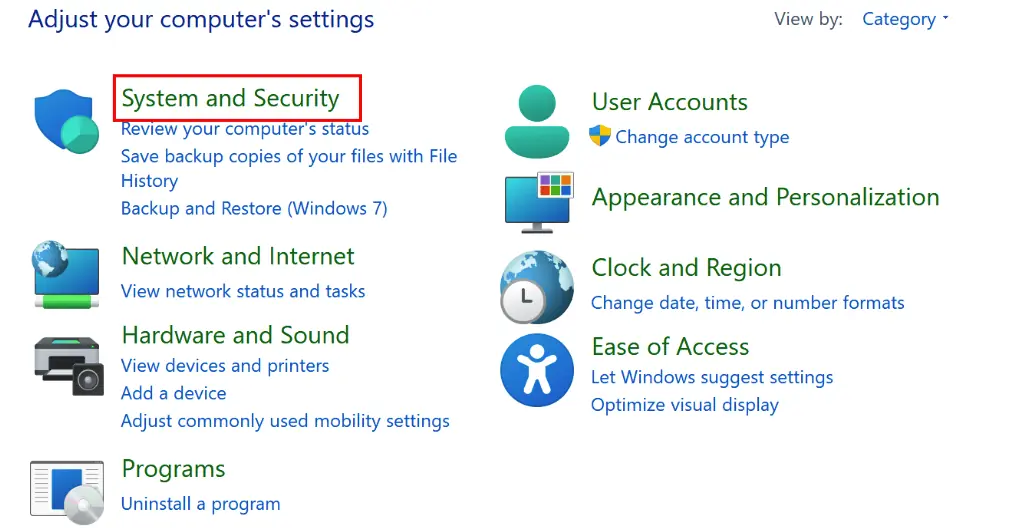
- Navigate to Control Panel and select System and Security.

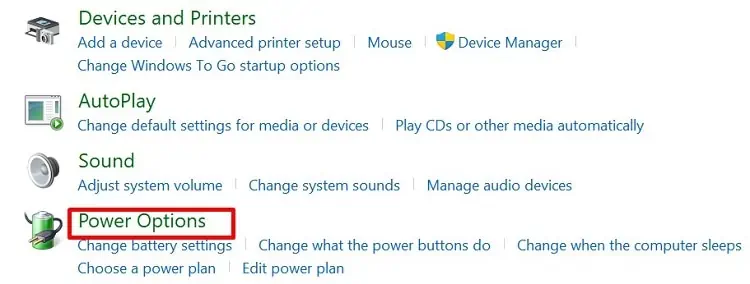
- Next, visit the Power Options tab.

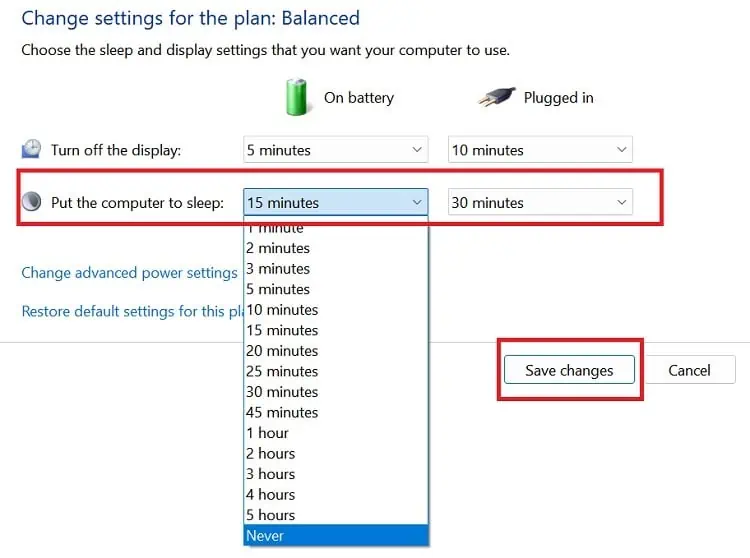
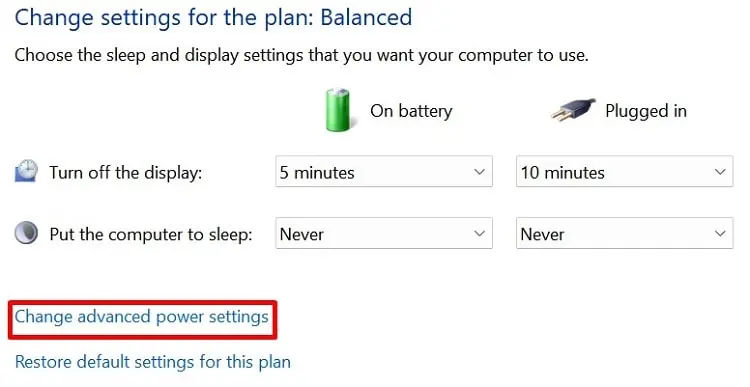
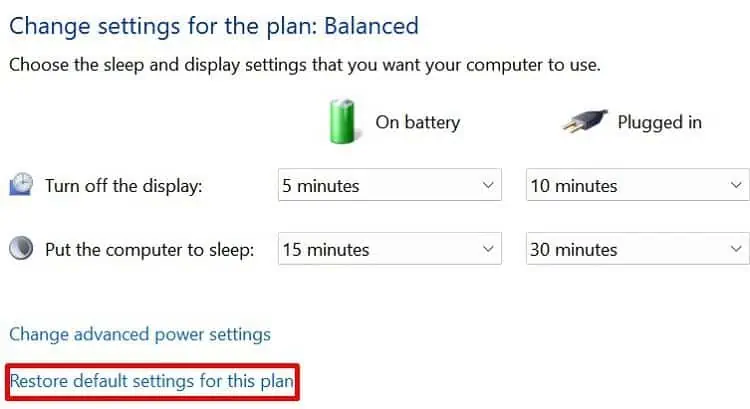
- Then tap on the Change Plan Settings.

- Under the Put the computer to sleep option, choose Never for both On Battery and Plugged In. Else, you can choose an appropriate time you wish your computer to sleep.

- Finally, click on Save Changes.
Well, there’s also an option to change the time for turning off your display. But, if you choose Never in the Put the computer to sleep option, this setting will be disabled automatically.
Disable the Allow Hybrid Sleep Option
If turning off the sleep settings didn’t work, a hidden function might be sending your computer to sleep. So, here’s how you can disable the Allow Hybrid Sleep option on your PC:
- Launch Control Panel, then go to System and Security > Power Options > Change Plan Settings.
- Now, choose Change advanced power settings.

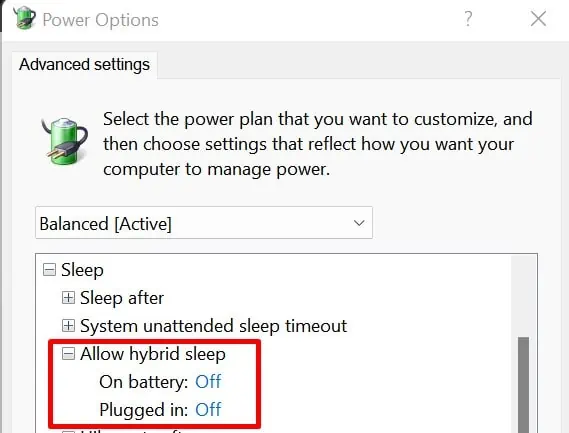
- Once a new setting window opens, press the ‘+’ icon beside Sleep to expand it.
- Then, select Allow Hybrid Sleep and ensure the option is turned off on both Plugged In and On Battery.

- Lastly, click on the Ok button to apply the changes.
Increase the System Unattended Sleep Timeout Duration
Sometimes, making changes in the Windows registry can solve the problem. To make the System Unattended Sleep Timeout visible, we must first tweak certain changes in the Registry Editor. Follow the general guideline to solve monitor sleeping issues using this technique:
- Navigate to the Registry Editor from Start Menu.
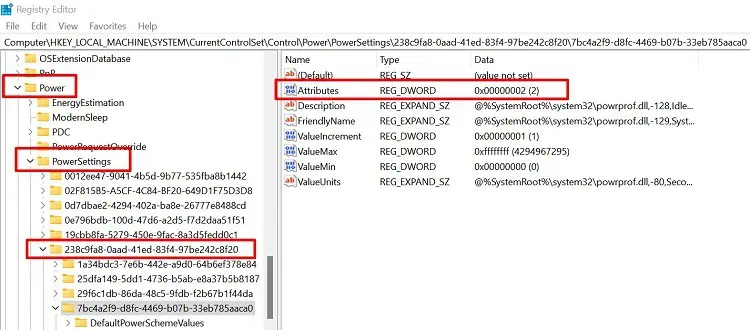
- Next, expand the Power drop-down from the left pane.
- Again, expand the Power Settings menu.
- Under 238c9fa8-0aad-41ed-83f4-97be242c8f20, select 7bc4a2f9-d8fc-4469-b07b-33eb785aaca0. Alternatively, you can directly copy and paste the path from below:
Computer\HKEY_LOCAL_MACHINE\SYSTEM\CurrentControlSet\Control\Power\PowerSettings\238c9fa8-0aad-41ed-83f4-97be242c8f20\7bc4a2f9-d8fc-4469-b07b-33eb785aaca0
- Now, double-click on Attributes from the right panel.

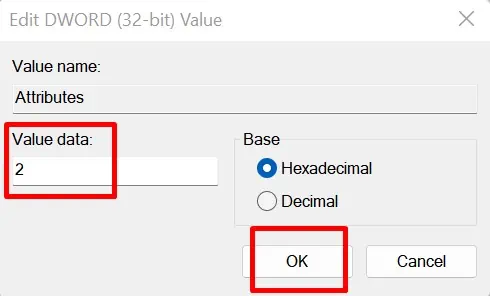
- Edit the Value data to 2 and hit Ok.

- Finally, you can navigate Control Panel > System and Security > Power Options > Change Plan Settings > Change advanced power settings.
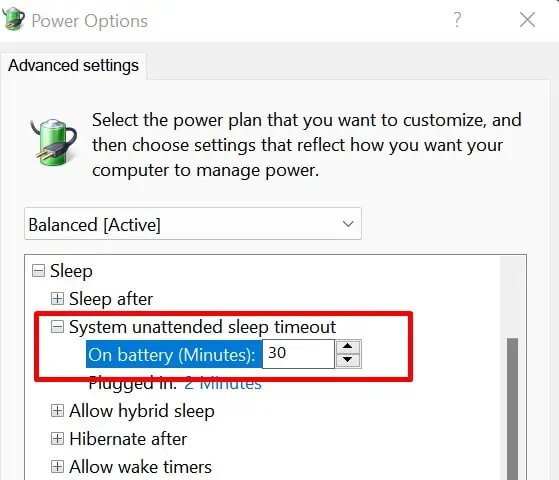
- Expand the Sleep section and choose System unattended sleep timeout. However, this option won’t be visible if you do not make changes in the registry.

- By default, this value is set to 2 minutes. So, for both On Battery and Plugged In, increase the duration and press Ok.
Using registry editor without prior experience can result is new issues. So, it is better to backup your registry editor before playing with the settings. Read this article to find out how to do it.
Tweak Second Screen Options [For Dual Monitor Users]
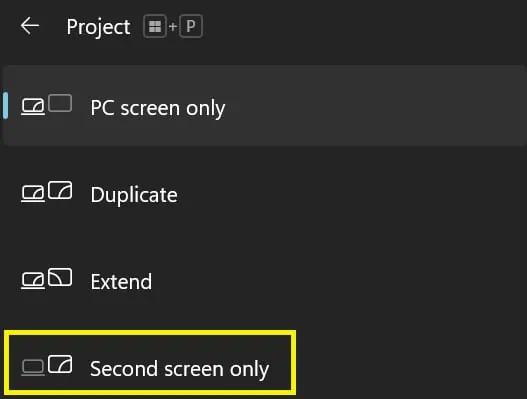
If you use an external display, your screen may sometimes not show on the device. This is probably because your primary device is set to PC Screen Only. Go through the steps below to learn how to tweak this change:
- Press Windows + P keys to launch the Project settings.
- With your external device connected, choose Second Screen Only. This will send your primary device to sleep and solve the issue on your secondary monitor.

Well, there are plenty of ways to switch your primary and secondary monitor. If you want to know more, read our other article.
Try Running the Power Troubleshooter
Running the Power Troubleshooter automatically fixes any underlying problems with the sleep settings. Read the guidelines below to resolve these issues using this in-built Windows tool:
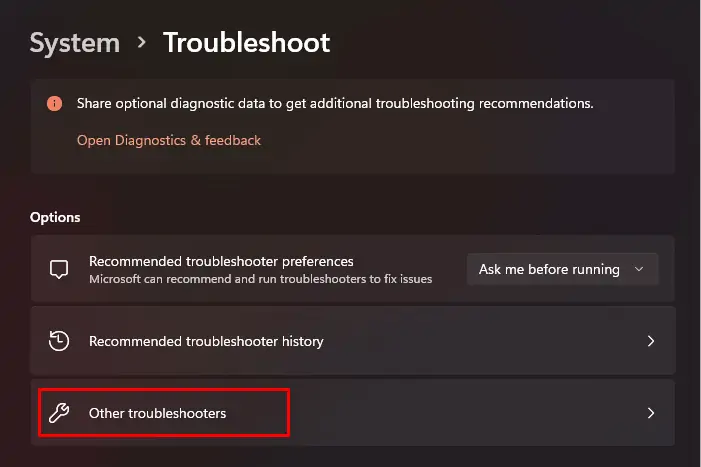
- Navigate to Settings > System > Troubleshoot.

- Next, tap on the Other troubleshooters option.

- Under Other, find Power and click on the Run button.

- Now, wait until the issues are detected. Then, you can close the troubleshooter.
Scan and Repair Corrupted Windows Files
Often, corrupted operating system files may take your monitor to sleep randomly for no reason. So, to solve these issues, we use two popular commands on Command Prompt: sfc and dism.
To run the dism command, simply visit the Command Prompt on your computer and type the following and wait for several minutes:dism /online /cleanup-image /restorehealth
You can use the following command line to run the sfc command on your terminal:sfc /scannow
However, the scannow command may not work sometimes. If you face this issue, here’s our article on how to fix it.
Update Your Display Driver
Well, it’s obvious that most display settings are controlled by the display adapters. Thus, it’s possible that the issues relying on the driver may put your monitor to sleep randomly.
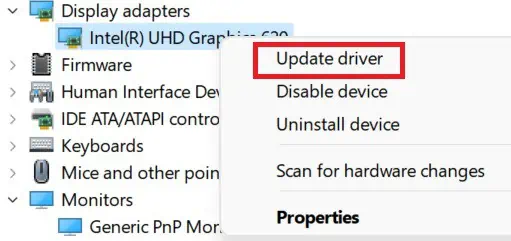
Go through the following steps to learn how you can update your display driver on Windows 11:
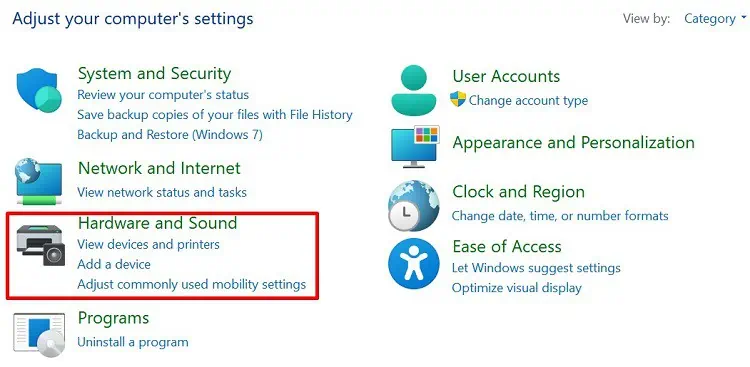
- Go to Control Panel and choose Hardware and Sound.

- Under Devices and Printers, select Device Manager.

- Navigate to Monitors and right-click on your graphics driver.
- Then, select Update driver.

- Now, tap the Search automatically for drivers option and wait until it is upgraded.
Reset Power Plan to Default Settings
If none of the fixes work, our final option is to reset the power plan. Here’s how to do just that:
- Open Power Options from Control Panel.
- Navigate to Choose plan settings and select Restore default settings for this plan.

- Now, you’ll be asked to restore the default settings. So, click on the Yes button.
Even if resetting to default didn’t do the magic, check if your cables are working fine. If the problem persists, you might need to reset your entire system.

