For avid gamers and overclockers, it’s always a hard time striking the right balance between GPU temperature and performance. An overheated graphics card or a noisy fan–what’s your choice?
If you’re an MSI Afterburner user, you can tweak the fan speed for both MSI and non-MSI graphics cards to achieve optimal cooling. Aside from its extensive hardware monitoring and overclocking features, it offers both manual and automatic fan speed configurations.
Without further delay, let me walk you through the step-by-step process of adjusting the GPU fan speed on this application:
Launch the Utility
If you have already installed MSI Afterburner, directly open it from Start Menu or launch the shortcut app from your Desktop. A prompt should pop up asking you to provide administrative privilege–press Yes to continue.
For newer users, I advise downloading the installation file only from the official Afterburner website. Reportedly, there have been plenty of phishing sites reported to MSI lately. Keeping this thing in mind, avoid third-party solutions as far as possible.
Set Power and Temperature Limits
The second step is to set a cap for both the power and temperature parameters. This way, your graphics card won’t go beyond the threshold and help prevent overheating issues.
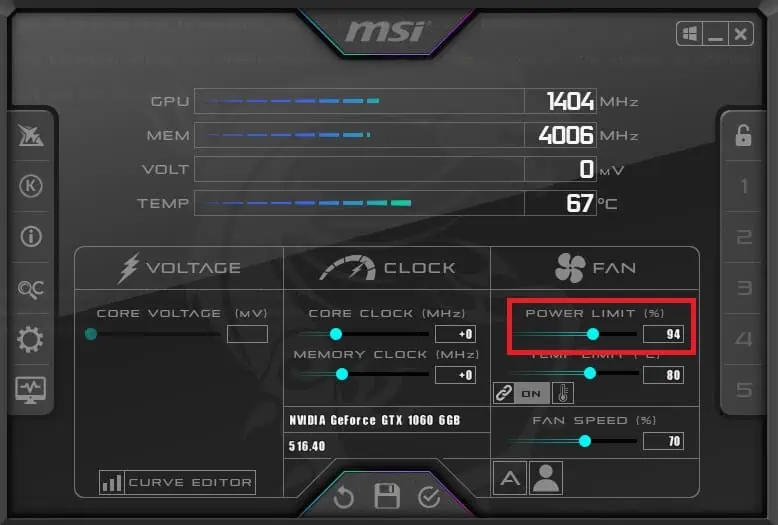
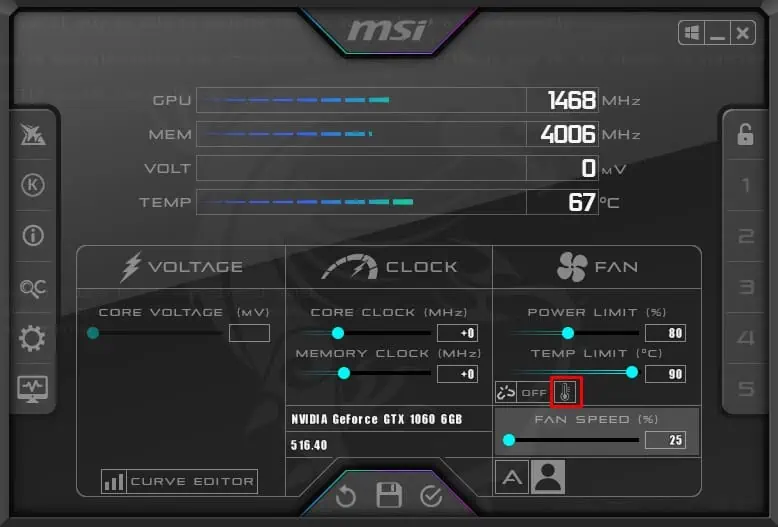
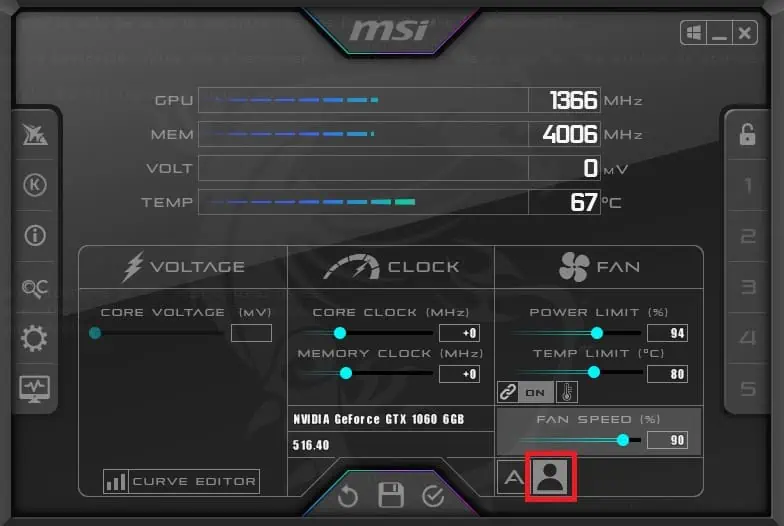
- To set the power limit, get to the POWER LIMIT (%) field and move the slider to a desired percentage.

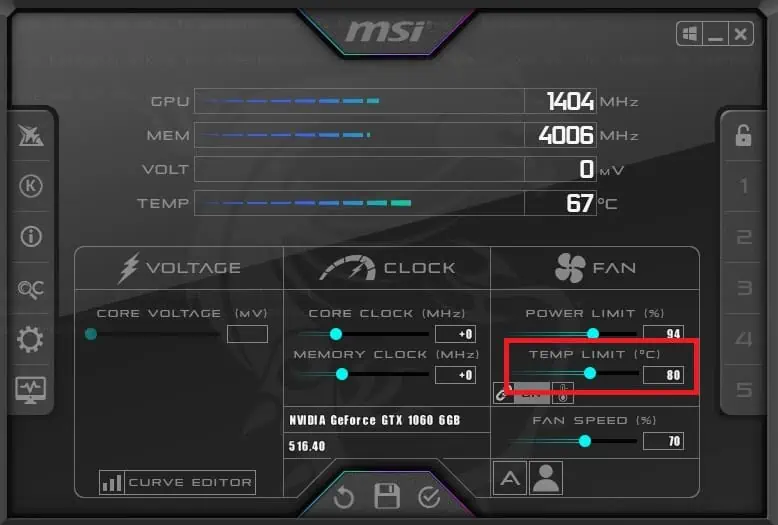
- In a similar way, you can set the temperature limit by tweaking the TEMP LIMIT (%) slider. Also, it’s possible to edit the values manually.

- Once you configure this, the GPU won’t receive enough power or temperature. The graphics card starts to throttle once the provided power and temperature go beyond the limits.
- GPU throttling can cause issues with the OC settings. So, if you have overclocked your GPU, it’s wise to set them to their full capacity.
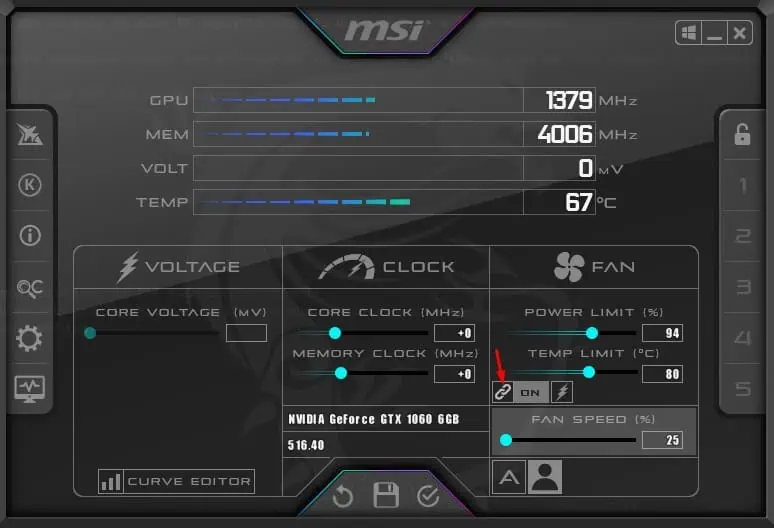
- Moreover, you can turn on the Link option to allow the fields to adjust together.

- But if you want to set individual configurations, press the button again to unlink them.
- You can even find a dedicated button to switch between temperature and priority. This will just prioritize one over the other.

It’s a good idea to stress test before adjusting the fan speeds. This lets you understand how your graphics card can perform at its maximum capacity.
In fact, you can even monitor its stability at different temperatures, powers, and fan speeds to find the optimal fan speed you require.
You may use any application of your choice. But since MSI Afterburner recommends MSI Kombustor (check the ‘K’ option in the left pane), I suggest the same.
Choose Auto or User-Defined Mode
GPU fan speeds are dynamic, meaning they keep adapting to the card’s temperature (which changes constantly). For this reason, you do not get the direct option to tweak their RPMs. Instead, you have to configure the fan speed as a percentage of its maximum capacity.
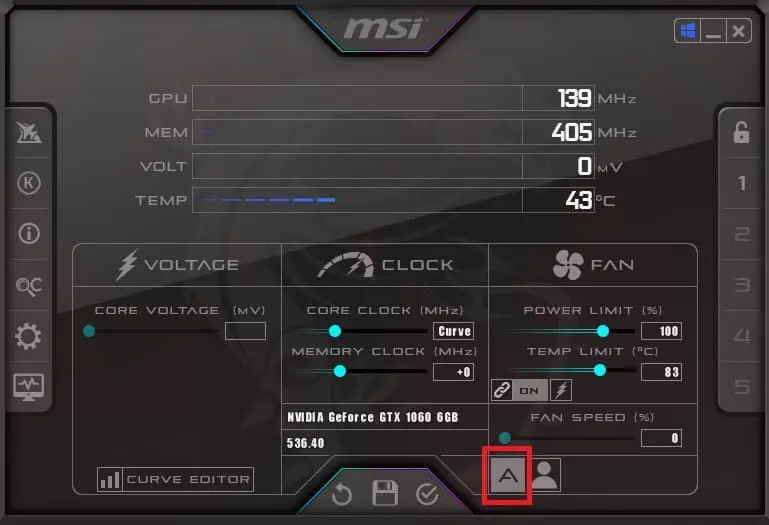
- Just press the ‘A’ or ‘Auto’ button and this will automatically control the speed at the hardware level (by your GPU’s fan controller chip). This means that the fans will rotate periodically based on the graphics card’s increasing/decreasing temperature.

- However, if you wish to set a custom fan speed, disable the Auto button to activate manual mode.
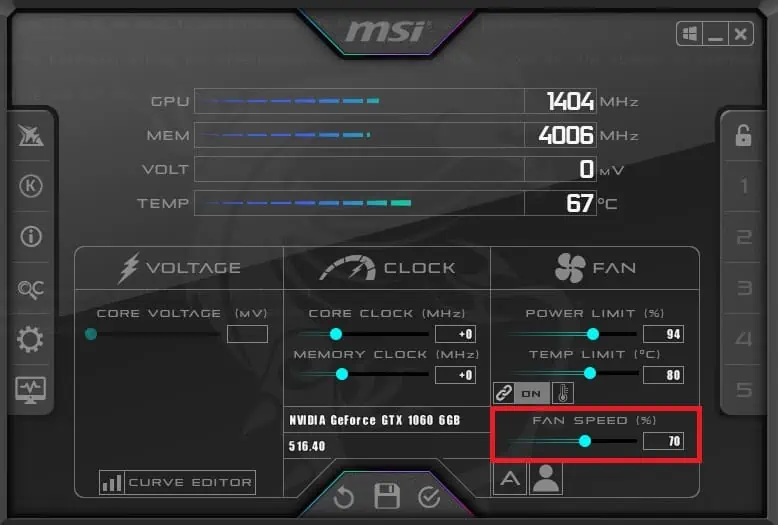
- Then, set the slider to your desired percentage. When doing so, keep in mind the temperature and power limit that you had configured earlier.

For example, when you set the fan speed to 70% and if the temperature limit is 100°C, you’re definitely not going to achieve optimal cooling. This is because the fans will still rotate at 70% even when the graphics card is boiling at 100°C. - It’s best to lower the percentage when you’re not running graphics-intensive applications (also keeping a low temperature/power limit).
- But to achieve optimal cooling (especially when gaming), I recommend increasing the limit and setting a high fan speed.
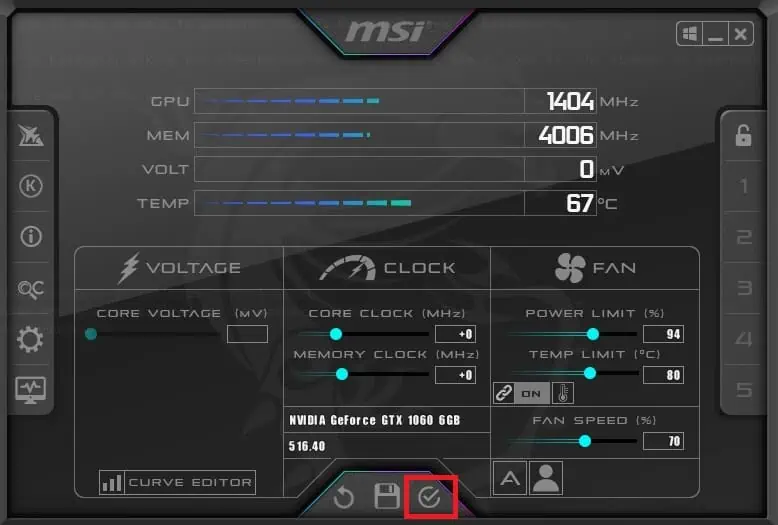
- After configuring auto/manual mode, don’t forget to apply the change. Take note of the fan behavior to confirm it’s working or run a stress test as per my above tip.

Finally, you may proceed to load this setting to a custom profile. Move to Step 7 to learn more. - Along with the Auto option, you should find a ‘user define’ button next to it. This feature allows the Afterburner software to check the GPU temperature periodically and change speed as defined by the fan curve.

We will look in detail about this configuration in the next steps. - When enabled, you can still choose to manually configure the fan speed (by moving the slider or editing the value).
Enable User-Defined Software Automatic Fan Control
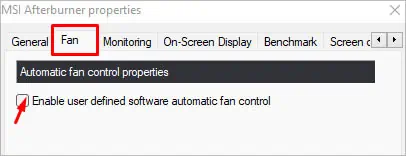
Before making use of the ‘User define’ option in the main application window, you need to enable the feature from the advanced settings. Follow the below instructions to learn how to do so:
- From the left pane, select the Settings icon.

- Once the MSI Afterburner Properties window pops up, switch to the Fan tab.
- By default, the ‘Enable user defined software automatic fan control’ option is disabled. Put a checkmark to turn it on.

Note: If you’re running a dual graphics card, you can select/change your master graphics processor. Go to Settings > General > Master graphics processor selection > Select your GPU. In case the MSI Afterburner application didn’t detect your graphics card, here’s a guide that should help you fix it.
Customize Fan Speed Curve
Once the User-defined Software Automatic Fan Control is enabled, the fan speed curve editor should appear along with additional options.
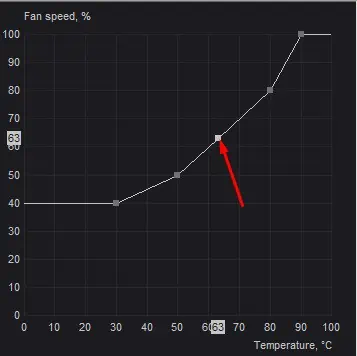
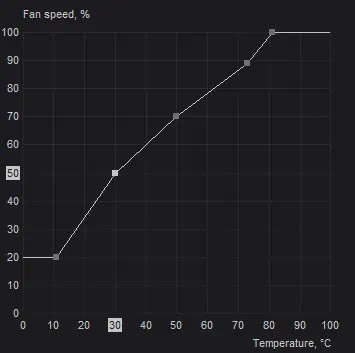
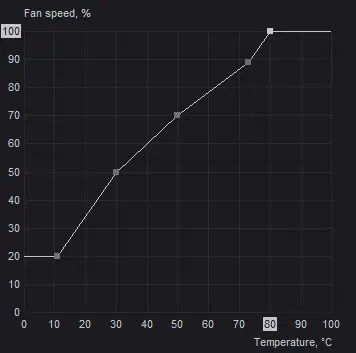
The horizontal line indicates the different fan speeds (in percentage) and the vertical represents the change in temperature (°C). All you have to do is drag and drop the nodes in increasing order.
The general idea is to place the point somewhere above its previous one. Even if you place the second node below, you’ll get an error message as the configuration is invalid. This is because your fan speed should never decrease with an increase in temperature.
So, you see, you’re never going to make a mistake and even if you do, you’ll be asked to change the curve. Here’s how I like to do it:
- I always start by adding a few more nodes (maximum of 8). You can follow a similar approach. Just press anywhere in the curve and this adds it automatically.

To delete a node, press Del or Delete. - Setting the first point is essential. This lets you decide how your curve is going to be–normal, silent (at the lowest RPM possible), or aggressive (to achieve maximum fan speed potential).

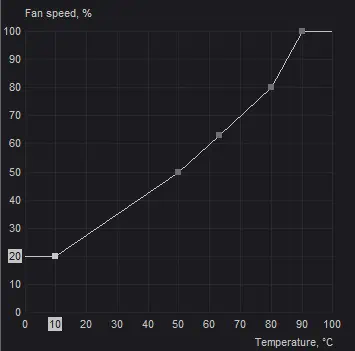
As you can see above, I’ve set the speed to 20% at 10°C. - Now, set the second node somewhere above it. If you’re looking to plot a normal one, my approach would be the best (50% at 30°C).

But if you’re looking for a silent one, keep it slightly below (say, 30% at 30°C), and for an aggressive one, place it higher (say, 70% at 30°C). - Similarly, drag and drop all the remaining nodes in the appropriate spots.

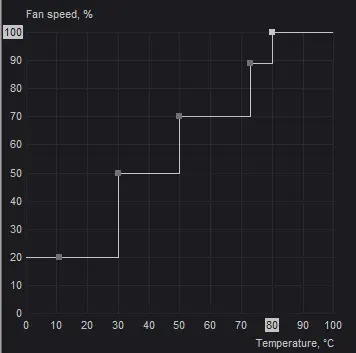
- You can even manually switch between step-up and linear curves. Just double-click anywhere on the editor and it should do the trick.

Configure Automatic Fan Control Properties
Now that you’ve plotted a manual curve, it’s time to enable/disable other advanced options before saving the changes:
- User firmware control mode: You can enable this to let the firmware take control over the fans based on the curve you have set. But do note that it will only work if your graphics card supports this feature.
- Predefined fan speed curve: Once you start tweaking the curve, it’s automatically set to Custom. To load the default values, you may pick the Default option or simply use Ctrl + D.
- Fan Speed Update Period: By default, the value is 5000 milliseconds. This field allows you to increase/decrease the monitoring time.
- Temperature Hysteresis: This feature lets you set a delay period to prevent frequent GPU fan speed adjustments. For example, you can set it to 2°C, and the fans will try rotating at the same earlier speed when the temperature is increased/decreased by the specified degrees.
Along with these options, you can also force the fan speed on each period or override the fan speed (when set to 0) with the hardware curve. Once everything is adjusted, press the Apply/Ok button to save your changes.
Save and Manage Your Profiles
Whether you have configured a manual, automatic, or user-defined software automatic fan speed, the final step is to save this to a profile slot. For the last one, make sure you have enabled the ‘User Define’ mode before proceeding to the below instructions:
- As mentioned earlier, first press the Apply button to quickly check whether the configured settings are working fine.
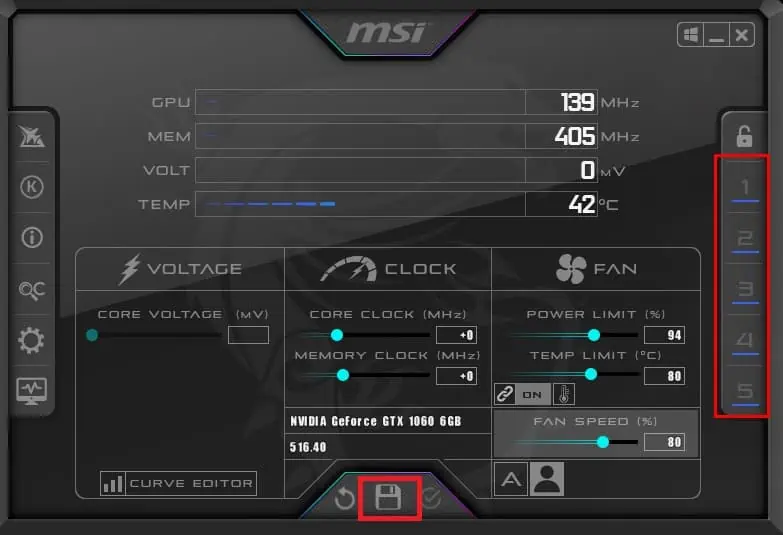
- Once you’ve confirmed your fan’s behavior, hit the save icon and all the slots should start blinking.

- Choose any one of them and your setting should now be permanent, even after you quit the app.
- To ensure your settings are applied from the startup, make sure you enable the Windows icon from the top.

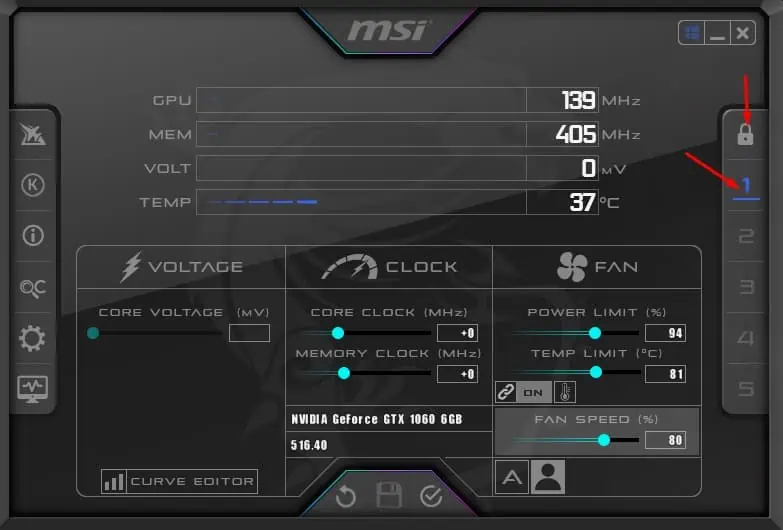
- You even get the option to lock your profile. This way, you won’t override the previous configuration as the save button gets greyed out. To make the new changes, press the same button to unlock it.

- You can create multiple profiles (up to 5), each for a different purpose.
For example, set an individual slot when you want the fans to be fast and a different one when you want to get rid of the loud noise. Once you do that, you may load the desired setting based on the type of task you’re going to perform.

