Network discovery enables your computer to access all PCs and devices connected to the network.
And, if you have the right credentials, you can even share files and folders over a shared network. You can use Wi-Fi devices, such as wireless printers that are connected to the same network.
As convenient as it may be, it can be equally dangerous if used on the wrong network. If you are on a public network, someone else can easily sneak into your device. Due to this reason, Network Discovery is turned off by default.
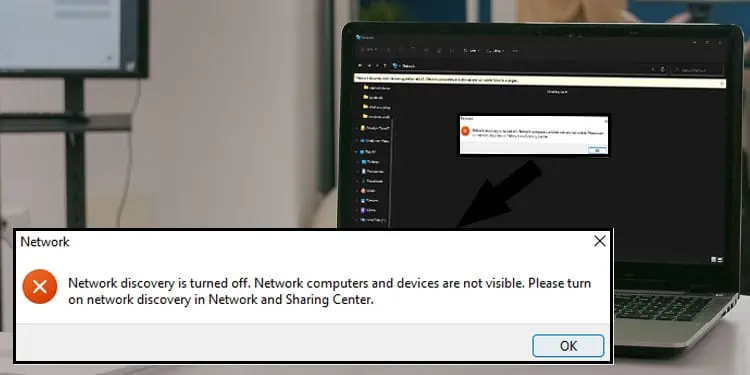
To enable Network Discovery, you need to set certain settings. If you miss any of these steps, you will get the error message “Network discovery is turned off“.
How to Fix Network Discovery Is Turned Off in Windows
You need to enable several components to make your device discoverable on a network. So, you may need to perform all the steps mentioned below.
Turn on Network Discovery
When connecting to PCs and devices over a network, the first thing you should do is enable network discovery. This setting is disabled by default for security reasons.
Here are the steps to enable Network Discovery.
- Press Windows + R to open Run.
- Type
control /name Microsoft.NetworkAndSharingCenterto open Network and Sharing Center. - On the left panel, click on Change advanced sharing settings.
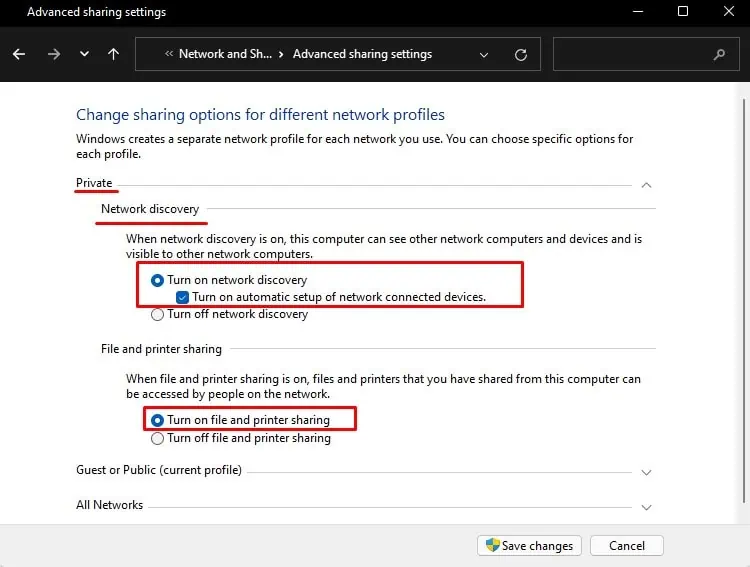
- Expand Private and check Turn on network discovery. Also, check Turn on automatic setup of network-connected devices.

- Under File and printer sharing, check Turn on file and printer sharing.
- Expand Guest or Public and check both Turn on network discovery and Turn on file and printer sharing
- Expand All Networks and make sure that you check Turn on password protected sharing. This lets people who have a user account and password to your computer access shared files.
- Click on Save changes.
Start Necessary Services
Just turning on network discovery may not always work. Multiple Microsoft services must also run for a computer to be discovered over the network.
Follow these steps to start the necessary Services.
- Press the Windows + R key to open Run.
- Type
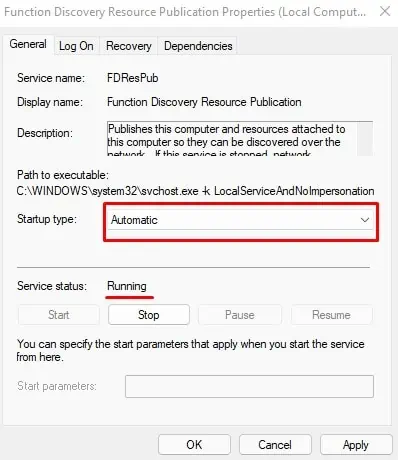
services.mscto open the Services window. - Double-click on Function Discovery Resource Publication
- Make sure that the Service status indicates that it is running. If not, click on Start.

- Also, set the Startup type to Automatic.
- Click Apply, then OK
Repeat Steps 4 and 5 for the services mentioned below.
- DNS Client
- SSDP Discovery
Now check if you can see devices connected to the network.
Set Network Profile Type
If you still get the error message saying network discovery is turned off, you might need to set the network profile type to Private. This will make your device discoverable on the network.
Below, we have mentioned the steps to set network profile types for Windows 10 and 11.
- Press the Windows + I key to open settings.
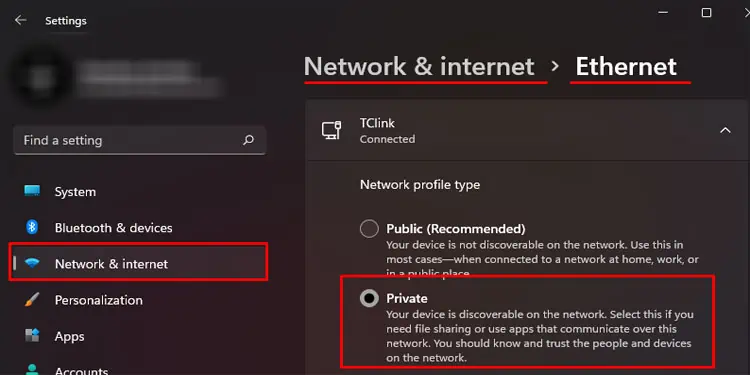
- Go to Network & Internet.
- If you are using Wi-Fi, click on Wi-Fi and then your network’s properties. Here, set the Network profile type to Private.

- If you are using a wired connection, click on Ethernet, and set the Network profile type to Private.
Enable Network Discovery Through Firewall
Another reason you cannot access devices on the network might be that the firewall has blocked Network Discovery itself. In that case, even if you perform all the steps mentioned above, you might still get the error message network discovery is turned off.
- Press the Windows + R key to open Run.
- Type
firewall.cplto open Windows Defender Firewall. - On the left panel, click on Allow an app or feature through Windows Defender Firewall.
- Click on Change settings.

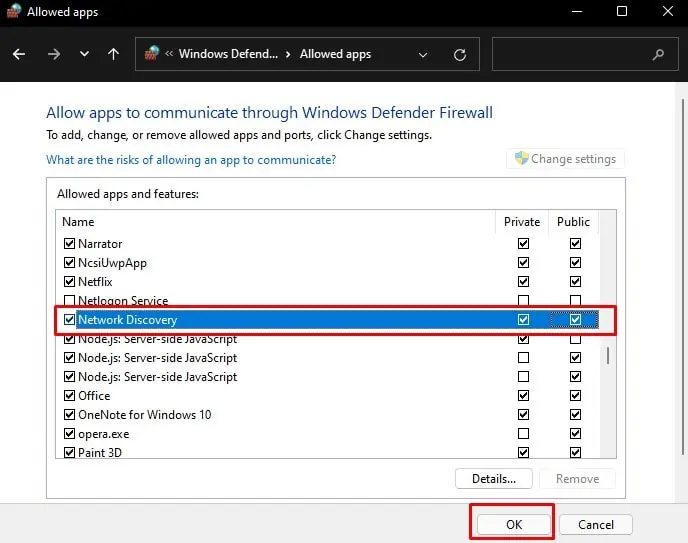
- Now, make sure that Network Discovery is checked.
- Also, check Private as well.

- Click on OK to save the changes and restart your computer.
Run Network Troubleshooter
If none of the above settings enables network discovery, it’s very likely that there is something wrong with the network itself. If that’s the case, we can run the network troubleshooter to pinpoint and fix any issues.
- Press the Windows + I key to open Settings.
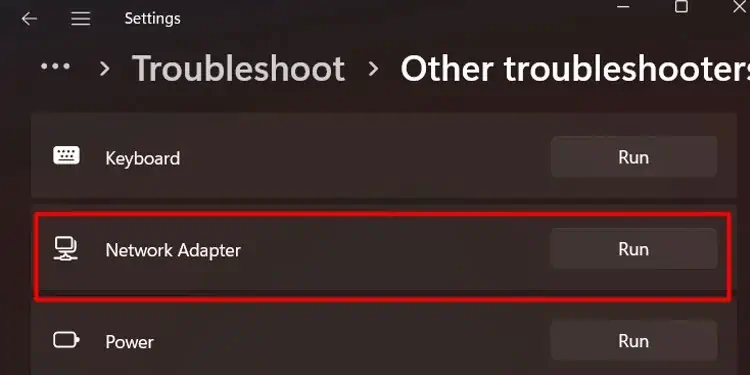
- Go to System > Troubleshoot > Other troubleshooters.
- Run Network Adapter Troubleshooter.

- Now select the adapter you are facing issues with, i.e., Wi-Fi or Ethernet, and click Next.
- Now, the troubleshooter may give you an error message if the network adapter is what’s causing the issue.
Update Network Adapter Driver
An outdated network driver may have multiple compatibility issues that can malfunction the network device. So, if you face any network issues, it is always recommended to update the network adapter drivers.
- Press Windows + X key to open Device Manager.
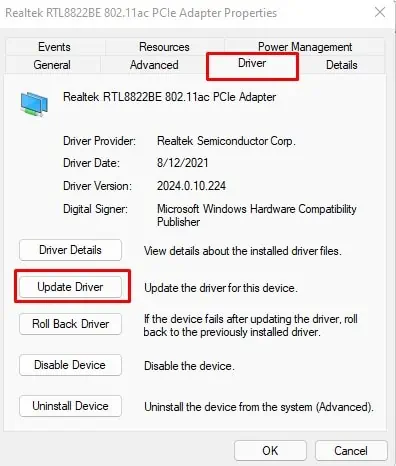
- Expand Network Adapter and double-click on the device that says PCIe Adapter.
- Go to the Driver tab and click on Update Driver.

- Select Search automatically for drivers and wait for the update to complete.
Reset Network Settings
If none of the mentioned solutions work, you can try and reset all the network settings. Resetting the network removes all network adapters, including its setting. So, if there are any unfixable problems in your network adapter, resetting them will do the trick.
Here are the steps for both Windows 10 and 11.
For Windows 10,
- Press Windows + I to open Settings.
- Go to Network & internet > Status > Network reset.
- Click on Reset now.
For Windows 11,
- Open Settings.
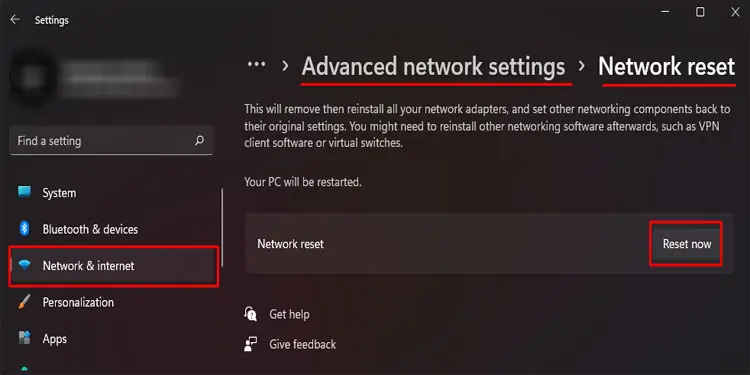
- Go to Network & internet > Advanced network settings > Network Reset.
- Click on Reset now.

Restart your computer once the reset process is complete.
How to Check if Network Discovery Is Turned on?
To check if network discovery is turned on on your PC, you can follow the steps mentioned below.
- Press the Windows + E key simultaneously to open File Explorer.
- On the left panel, scroll down and click on Network.

If connected, you will be able to see all the devices and computers connected to the network. If not, you will get an error message saying Network discovery is turned off.
Why Won’t My Network Discovery Stay On?
According to Microsoft’s official documentation, the Windows defender firewall does not allow the Network Discovery feature to remain on. Try switching the firewall off for some time to ensure that this is not the case here.
Along with this, multiple dependencies services such as DNS Client, SSDP Discovery, UPnP Device Host, and Function Discovery Resource Publication must also be running in order to keep network discovery stay on.
How Do I Turn on/off Network Discovery From Command?
To enable or disable network discovery using Command Prompt, follow these steps.
- Press the Windows + R key to open Run.
- Type cmd and press Ctrl + Shift + Enter to open Command Prompt as Administrator.
- Type the following command to turn on network discovery
netsh advfirewall firewall set rule group="Network Discovery" new enable=Yes
- Type the following command to turn off network discovery.
netsh advfirewall firewall set rule group="Network Discovery" new enable=No

