The Settings app is a newer alternative to the classic Control Panel. While both control panel and Settings are available, Microsoft adds new configurations to this app instead of the Control Panel on all later versions. So if you need to make any changes, it’s best to do so from the Settings app.
There are many ways with which you can open the Setting app. The fastest methods require clicking an icon or pressing some keys. But even the slowest methods take no longer than a few seconds.
How to Open Settings App in Windows
Below mentioned are the methods to open the Settings app in Windows. You can choose any option depending on your preference.
From the Start Menu
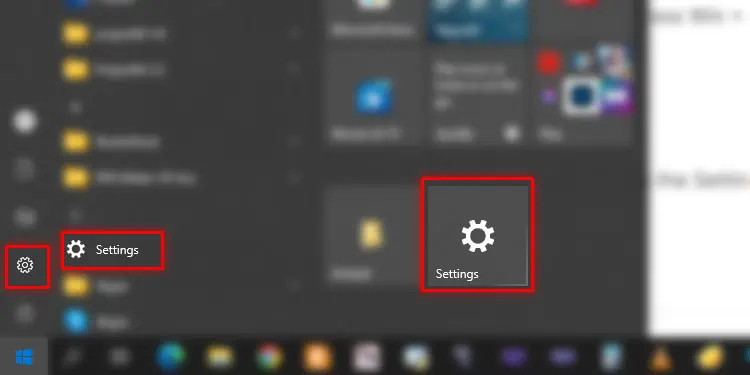
The usual method of opening the Settings app is through the Start Menu. Press the Windows Key or click on the Windows icon to open Start. There are several ways of opening Settings from Start, which are as follows:
- Scroll through the application list and click on Settings.
- Click the Gear icon.
- Click on the pinned Settings icon from the Start Menu.
You can pin it by right-clicking on the above icons and selecting Pin to Start. - Type Settings and pick the app. You can also press Win + S to access the search bar to search for Settings.
Using Hotkey Shortcut
Using the shortcut is the most convenient way to open the Settings app. You only need to press Win + I on your keyboard.
Through the Power User Menu
You can also open Settings from the WinX or Power User menu. To do so, press Win + X to load the menu and pick Settings.
From the Action Center
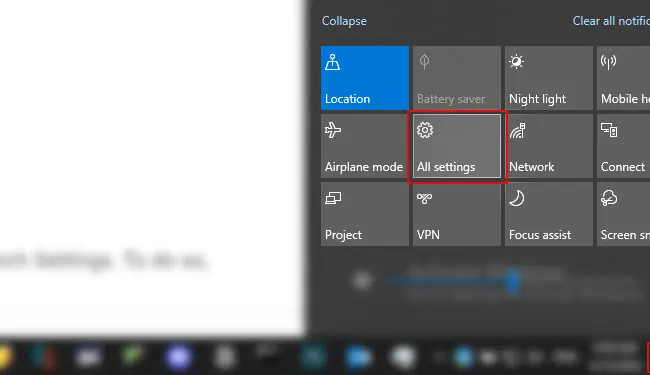
The action center also includes the option to launch Settings. To do so,
- Click on the Notification icon or press Win + A.
- Select Expand if you need to.
- Click the gear icon or All settings.

Using Run or Creating New Task
Another easy method is to use the Run command to launch Settings. To do so,
- Press Win + R to load Run.
- Type
ms-settings:and press Enter.
You can also enter this command in the address bar of your File Explorer.
Or you can use the Task Manager to run this task. Follow the steps below to launch Settings from the Task Manager:
- Press Ctrl + Shift + Esc to open the Task Manager.
- Click on File > Run new task from the menu bar.
- Type
ms-settings:and press Enter.
Additionally, you can go to specific settings by entering the corresponding Run commands. Visit the launch resume of Microsoft document to learn those commands.
Using Command-line Interface
It is also possible to open Settings using CLI tools like Command Prompt or PowerShell. To do so,
- Search for and open Command Prompt or PowerShell.
- Enter
start ms-settings:
By Creating Shortcut for Settings
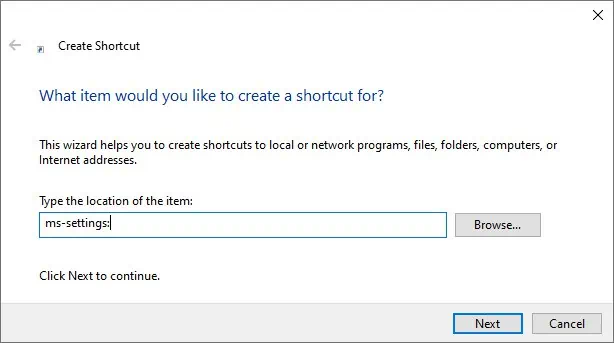
The next possible method is to create a shortcut for the Settings app. You can make the shortcut anywhere you desire. Here’s how you can do so:
- Navigate to the location you want to create a shortcut.
- Click on an empty area and select New > Shortcut.
- Type
ms-settings:in the text box and click Next.
- Type Settings app or any name you want and hit Finish.
From Taskbar if Pinned
If you don’t want to use keyboards or go through several steps to open Settings, you can pin it to your taskbar. A single click on the pinned icon is enough to open the app.
To pin it to the taskbar,
- Open Start and right-click on Settings.
- Select More > Pin to taskbar.

Through the File Explorer
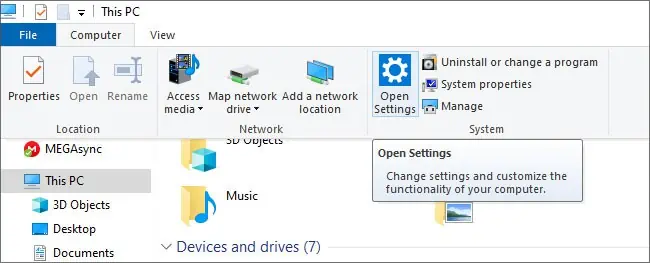
If you’re already navigating through the File Explorer, you may as well use it to launch Settings. Here’s how you can do so:
- Go to This PC from the navigation pane.
- Click Computer from the menu bar and choose Open Settings.

By Asking Cortana
You can use the built-in Windows AI, Cortana, for various tasks. Naturally, you can also ask it to open Settings.
- Open Cortana.
- Click the microphone icon and say “Open Settings”.
You can also type Open Settings and press Enter.
Using Shortcuts to Specific Settings
Your system includes many shortcuts for particular settings. You can get to the root Settings window by clicking Home from any Settings page.
Here are the ways to access some easy-to-access settings shortcuts:
- Click on the Battery icon on the taskbar and select Battery Settings.
- Right-click on the WiFi or Ethernet icon and select Open Network & Internet Settings.
- Right-click on the Sound icon and click Open Sound Settings.
- Right-click on anywhere on the taskbar and select Taskbar Settings.
- Right-click on the Desktop and choose Personalize or Display settings.
Can’t Open Settings App in Windows?
If you can’t open the Settings app, there might be problems with the application or your system. Here are the possible ways to troubleshoot such issues.
Use Alternate Method to Open Settings App
The first thing you should try is to check if you can use any alternative method to open Settings.
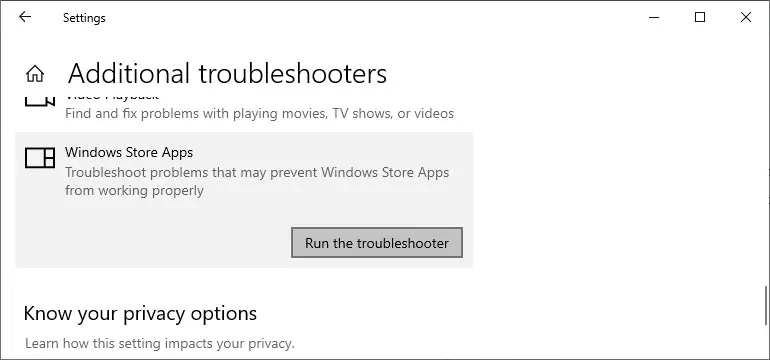
If you can, we recommend running the Windows Store troubleshooter. It will fix the minor issues blocking the Settings app. Here’s how you can do so:
- Click Update & Security > Troubleshoot > Additional troubleshooters.
- Click on Windows Store and select Run the troubleshooter.

Check Registry and Group Policy
It is possible to restrict access to Settings from the registry or group policy settings. Check in the relevant sections and change the configuration according to these steps:
- Open Run and enter
regedit. - Navigate to
Computer\HKEY_CURRENT_USER\Software\Microsoft\Windows\CurrentVersion\Policies\Explorer. - If you can’t find Explorer, right-click on Policies and click New > Key.
- Enter the name as
Explorer. - Right-click on Explorer and select New > DWORD (32-bit) Value.

- Name it as
NoControlPaneland make sure its value shows 0. - Now, enter
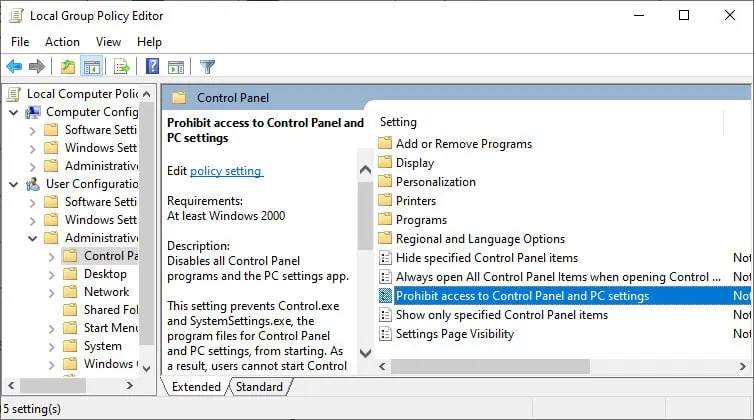
gpedit.mscon Run. - Go to User Configuration > Administrative Templates > Control Panel.
- Double-click Prohibit access to Control Panel and PC Settings.

- Check Disabled and click Ok.
Restart your PC and check if the issue resolves.
Make sure to backup your registry before making any changes to it.
Troubleshoot Windows Update
Many people have experienced this error after a system update. You can try running the Windows Update troubleshooter to fix any minor bugs. To do so,
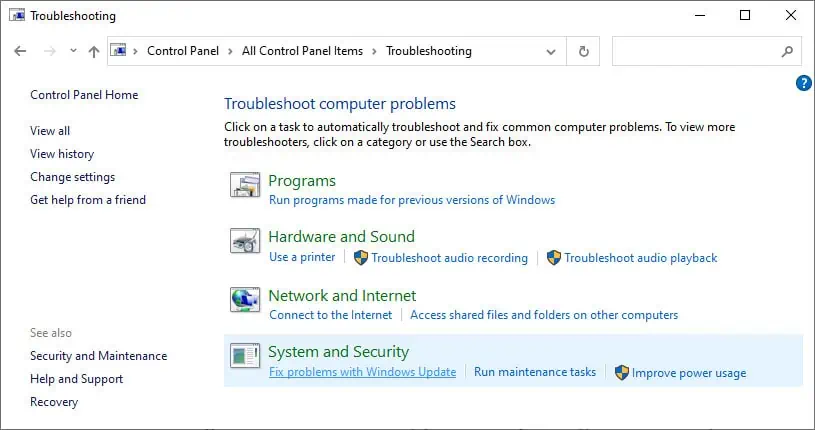
- Open Run and enter control.
- Set View by to Large icons.
- Click on Troubleshooting.
- Under System and Security, select Fix problems with Windows Update.

- Follow the on-screen instructions.
You can also download and run Microsoft’s Windows Update Troubleshooter.
If troubleshooting doesn’t fix the issue, you can try rolling back to the previous stable version. Of course, the best solution would be to wait for further updates and install them. You can do so by downloading them from Microsoft’s website or using the Update Assistant.
Reinstall Settings App
This issue often happens due to corruption in the Settings app. You can reset the application to resolve this issue. To do so,
- Open Windows PowerShell as administrator.
- Enter
Get-AppxPackage windows.immersivecontrolpanel | Reset-AppxPackage
If this doesn’t help, enter the following commands:
get-acl C:\Windows\ImmersiveControlPanel\SystemSettings.exe.manifest |fl
takeown /F 'C:\Windows\ImmersiveControlPanel\SystemSettings.exe.manifest'
icacls 'C:\Windows\ImmersiveControlPanel\SystemSettings.exe.manifest' /grant “username”:F  Here, replace “username” with your user name.

Rename-Item 'C:\Windows\ImmersiveControlPanel\SystemSettings.exe.manifest' 'C:\Windows\ImmersiveControlPanel\SystemSettings.exe.manifest_bak'

$manifest = (Get-AppxPackage *immersivecontrolpanel*).InstallLocation + '\AppxManifest.xml'
Run SFC and DISM
One of the main reasons for this issue is the corruption of system files. You need to repair your system integrity to fix such problems. You can do so by running the System File Checker and the Deployment Image Servicing and Management utilities. To do so,
Open Run.
- Enter
cmdand press Ctrl + Shift + Enter. It will load the elevated Command Prompt. - Type
sfc /scannowand press Enter.
After the process completes, restart your PC and check if you can launch Settings. If you’re unable to do so, open the elevated Command Prompt and enter:dism /online /cleanup-image /restorehealth.
After scanning with DISM, run SFC again.
Clean Boot
Third-party interference is another possible reason for being unable to open Settings. The OneKey Theater in Lenovo is a known cause of the issue.
Boot your PC in safe mode and check if you can open Settings. If you can’t, the issue is not due to such third-party apps. So you can move on to the later steps.
Otherwise, you need to perform a clean boot to narrow down the program responsible for the error.
Create New User Account
You won’t be able to open Settings if there are issues in the relevant user profile configuration. You need to create a new account in such cases. To do so,
- Open the elevated Command Prompt.
- Enter the following commands while replacing “new username” and “password” according to your choice:
net user “new username” “password” /addnet localgroup administrators “new username” /add
Now, log in with that account and check if you can open Settings.
Perform In-place Repair
If the previous methods are ineffective, you can try repairing your Operating System. It will replace all the system files without touching your user and app files. This way, you can fix any corruption in your system.
Follow the instructions below o perform an in-place repair:
- Download and Windows ISO file that matches your system’s build and language.
- Mount it on your PC, open the installation drive and run
setup.exe. - Click Change how Windows Setup downloads updates.
- Check Not right now and select Next.
- Hit Accept and follow the on-screen instructions.
- Click Install on the final page.
Restore or Reset System
If repairing your system couldn’t solve the issue, you need to restore or reset your PC. If you have an appropriate restore point, restore your OS to the point.
If not, reset your PC to the default settings. As a last resort, you can perform a clean install by deleting the previous system partition and installing a new Windows version.

