To delete a page in Word, you usually place the cursor at the start of the page and press the delete/backspace key. But sometimes, you can’t seem to delete the page. And even if you can, the formatting of the page gets disrupted.
It generally happens when you use the Enter key multiple times to go to a new page. However, deleting a page is much easier if you have used page breaks or section breaks.
So, without further delay, let’s get into the article to learn more about how to delete an unwanted page in Word.
How to Fix a Page that Won’t Delete in Word?
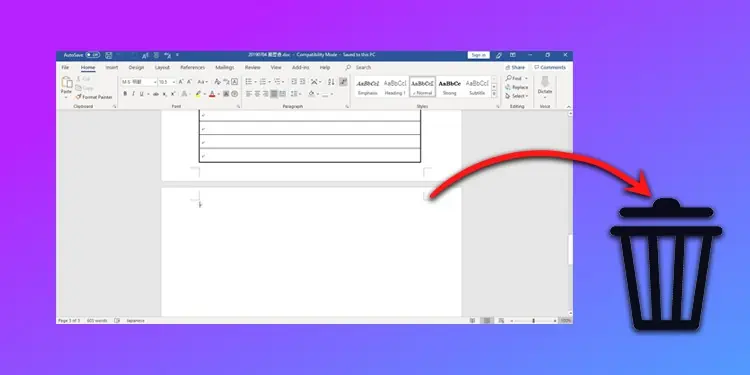
This issue is more frequently seen on a blank page. Also, you can face the problem if you have a table in your document.
One method is to decrease the font size until everything is sorted. But, it doesn’t always work as expected. Nonetheless, you can go through the various fixes mentioned below to delete the pages appropriately.
Search and Delete the Page in Word
You can reveal the invisible paragraph markers and page breaks and then delete them to remove an unwanted page. Refer to the following steps below to do it.
Use the Navigation Pane to Find Pages Quickly
Usually, you can delete a page in normal view. Otherwise, you can use the navigation pane to view all the blank pages in the document.
Here’s how you can do it.
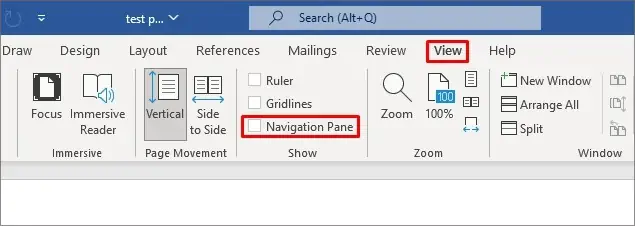
- Click the View tab from the top menu.
- Then, enable the Navigation Pane checkbox. Alternatively, you can use the shortcut key;
Ctrl + Fon Windows andCommand + Fon Mac.
Show All the Formatting Marks
Now, unhide the invisible page breaks and then use them to delete specific pages. You can do it as follows.
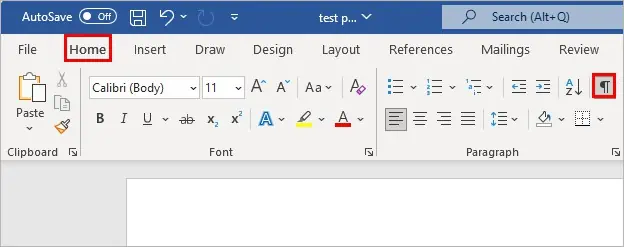
- Click the Home tab.
- Inside the Paragraph group, enable the pilcrow symbol (which looks like a backward P letter).

- Alternatively, you can use the keyboard shortcuts Ctrl + Shift + 8 and Command + 8 for Windows and Mac, respectively.
Delete an Empty Page with Page Breaks
Select the “Page Break” mark on your pages and delete it using the backspace/delete key to remove the entire blank page.
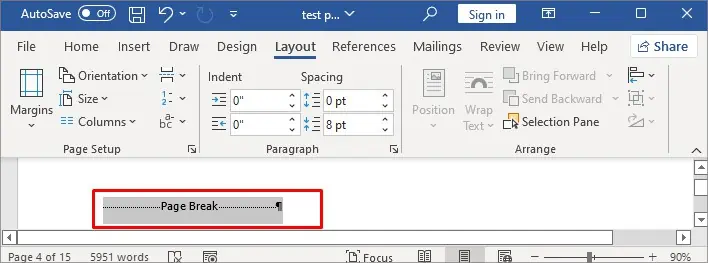
Alternatively, use the Find and Replace feature to find all the page breaks in the document. Then, you can use them to delete all the blank pages at once or only delete a particular page.
For this,
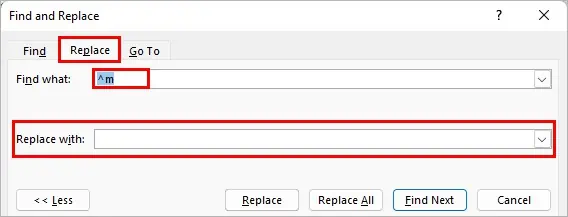
- Press the Ctrl + H.
- Under the Replace tab, type
^mand leave the Replace with field empty.
- Click Replace All to remove all the blank pages created with page breaks. And click the Find Next button and click Replace to delete specific pages with page breaks.
However, if you don’t see the page breaks but find extra empty spaces on your pages, it means you have used the Enter key multiple times. So, to remove them, select and delete the paragraph markers.
Delete Non-Empty Pages
You can also delete a specific page on your document as follows.
- First, navigate to the page you want to delete and place the keyboard cursor anywhere on that page. You can use the navigation pane to find a specific page quickly.
- Press
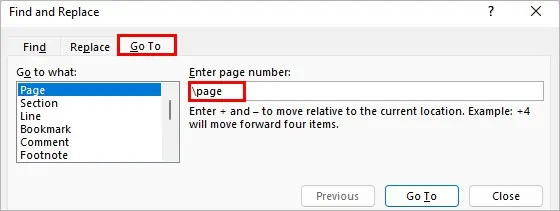
Ctrl + GorOption + Command + Gfor Windows and Mac, respectively. - Now, under Enter the page number, type \page, and click Go To. This will select all the text (empty or non-empty) on the page. Click the Close button.

- Next, press the Delete/Backspace key to delete the page.
Delete a Page after a Table
Since Word automatically adds a paragraph at the end of a table, it can cause an extra blank page to appear at the end of the document.
And, even if you press the delete or backspace key, the page won’t get deleted.
To resolve the issue, you can adjust the properties of the paragraph marker that Word inserted. Here’s how you can do it.
- Click the Home tab.
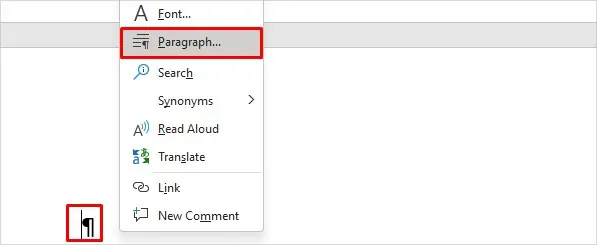
- Then, right-click in front of the paragraph marker, and choose the Paragraph option.

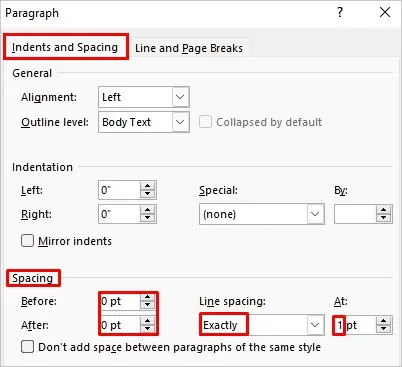
- Now, click the Indents and Spacing tab.
- Next, under the Spacing section, set 0pt for Before and After field. And set the Line spacing to Exactly and the At value to 1pt.

Alternatively, select the pilcrow and decrease its font size until it moves to the page above it. You can use the following shortcut keys to decrease the font size.
- Windows: Ctrl + Shift +
- Mac: Command + Shift + <
Save/Convert the Word Document as a Pdf
While formatting the Word document can get complicated, you can use this workaround to eliminate the unwanted page.
Here, we save the Word as a pdf to use the page range option and edit the pdf instead of the Word file. Here’s how you can do it.
- Open your Word document.
- Then, navigate to File > Save As.
- Browse a location to save.
- Next to the Save as type field, expand the dropdown and select the PDF option.

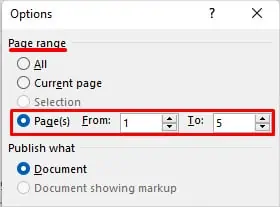
- Then, click the Options button and select Page(s) under the Page range section. You can find the total number of pages in the bottom left corner of your document.
- Now, enter the page range except the last page(i.e., Total Pages -1) and click OK.

Furthermore, you can right-click on the pdf and open it with the Word app. Alternatively, you can use various PDF editors to delete a page after converting the Word document to a pdf.
Remove a Blank Page in the Middle of the Word Document
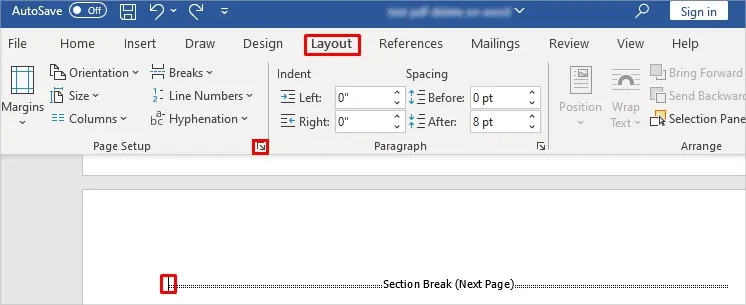
If removing a blank page breaks the document’s normal flow and formatting, you most likely have a section break.
So, you can modify the section break settings to keep the formatting as is and avoid a blank page simultaneously. Here’s how you can do it.
- Enable the Show all the formatting marks as mentioned in the above sections.
- Place the cursor before the section break.
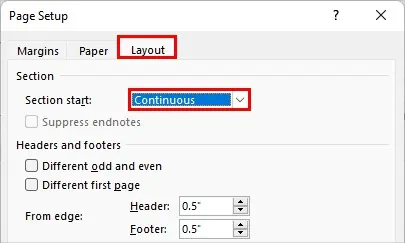
- Now, under the Layout tab, click and open the Page Setup dialog (looks like a diagonal arrow).

- Then, under the Layout tab, set the Section start to Continuous.

- Click OK and see if the unwanted page gets deleted without affecting your document flow.

