We use PDF format often to check a document’s layout before printing. But, it’s frustrating when we can’t save a file as a PDF.
Sometimes, we might get a message “The export failed due to an unexpected error” when trying to save a doc file as a PDF. Probably, you’ve wondered what has caused this issue.
Well, the Save as PDF problems can occur on both PCs and mobile phones. Moreover, there can be tons of reasons why we can’t save a file in PDF format.
In this article, we will cover some major probabilities of PDF save issues and discuss techniques to fix them.
Why is Save As PDF Not Working
Saving a PDF file shouldn’t be difficult on any device. However, with the introduction of new features, most of us have to scratch our heads when trying to save a file in PDF format.
Here are some of the prime reasons why you are unable to save your document as a PDF:
- There are issues with some of your Windows features and services.
- Your device drivers may not be functioning properly.
- You haven’t updated the document managers that help you view and edit the PDF files.
- The document you’re trying to access may be outdated or not compatible with your device.
- You might have changed some Windows settings that have stopped you from saving the PDF file.
How to Fix Save As PDF Not Working on Windows?
Windows 11 has many services that help run installed applications. However, these features might get outdated and need frequent updates. This is probably why you are having trouble saving a file in PDF format.
Nonetheless, we have mentioned some easy techniques that should solve your issue. So, do spare a few minutes of your time to go through these fixes.
Fix Microsoft Print to PDF Issues
Microsoft Print to PDF is a special Windows feature that helps you save a document as a PDF. With the help of this service, we do not have to download a third-party tool to edit and save PDF formatted files.
Therefore, if this feature is disabled, we won’t be able to convert any document into PDF. Nevertheless, we can reenable it to fix the problem.
Disable and Reenable From Windows Feature
Without further delay, let’s see how we can disable Microsoft Print to PDF feature and enable it again:
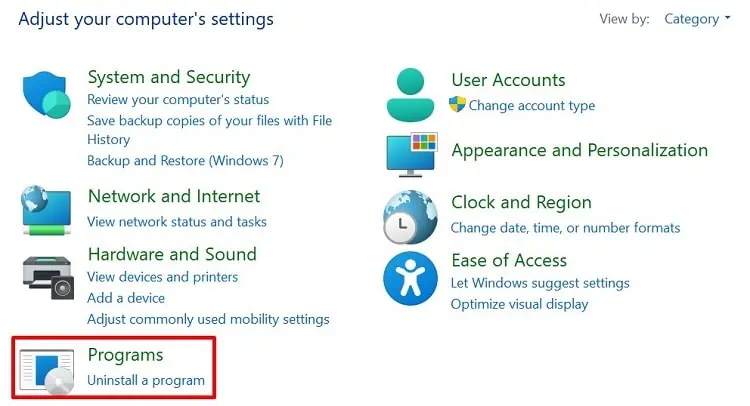
- Navigate to Control Panel and go to Programs.

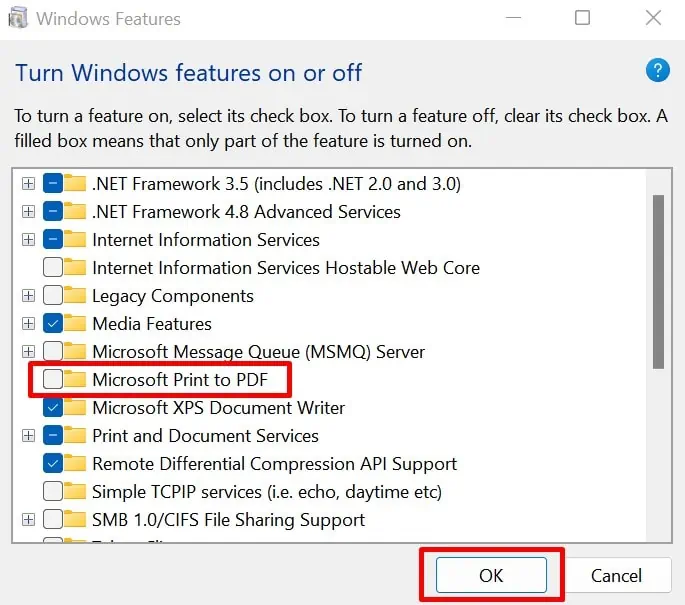
- Under Programs and Features, choose Turn Windows features on or off.

- Once the Windows Features window opens, find and untick Microsoft Print to PDF option.

- Next, press Ok and wait until the feature is disabled.
- Now, reopen the Windows Features and tick the option to enable it again.
Make Microsoft Print to PDF as Your Default Printer
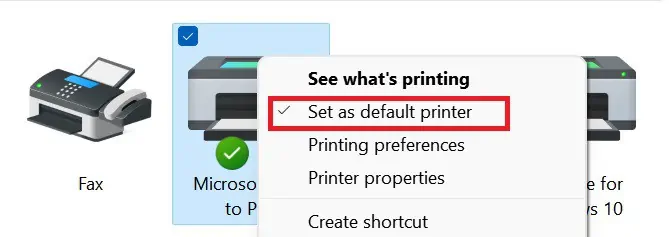
If reenabling Microsoft Print to PDF doesn’t work, try making it your default printer. Here’s how you can do that:
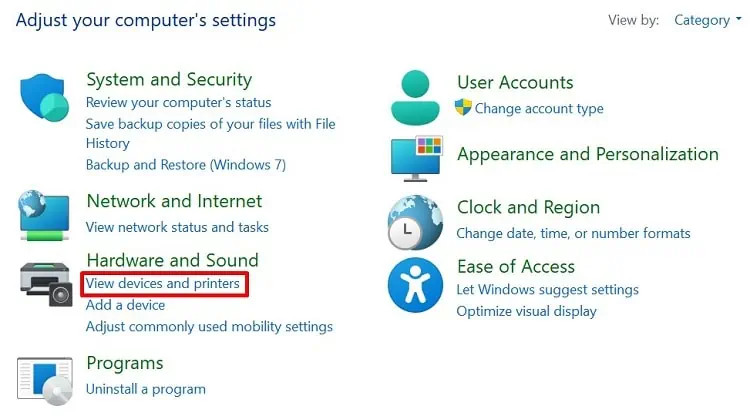
- Launch Control Panel from Start Menu or Run.
- Under Hardware and Sound, select View devices and printers.

- In the Printers section, find Microsoft Print to PDF and right-click on it.
- Now, choose Set as default and press Ok to confirm.

Even if this doesn’t help, remove the device and restart your computer. Upon rebooting, Windows will reinstall it and fixes an issue if present.
Update Microsoft Print to PDF Driver
If none of the two options work, try updating the Microsoft Print to PDF driver. The following guide should help you fix the issue:
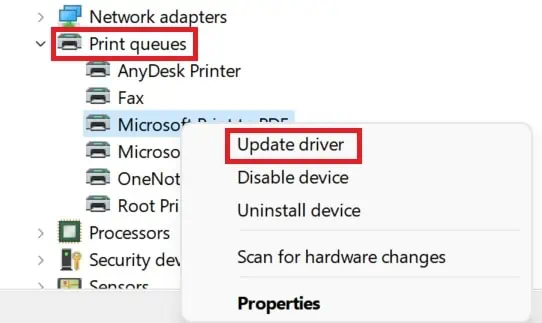
- Right-click on the Start Menu and open Device Manager.
- Expand the Print queues drop-down menu.
- Next, right-click on the Microsoft Print to PDF option, choose Update Driver, and follow the process.

Restart Print Spooler Service
Print spooler is the tool that saves your document in memory before printing them. So, if the service is not working properly, you might face issues while printing and saving in PDF format.
Go through the steps below to learn how to restart the print spooler in Windows 11:
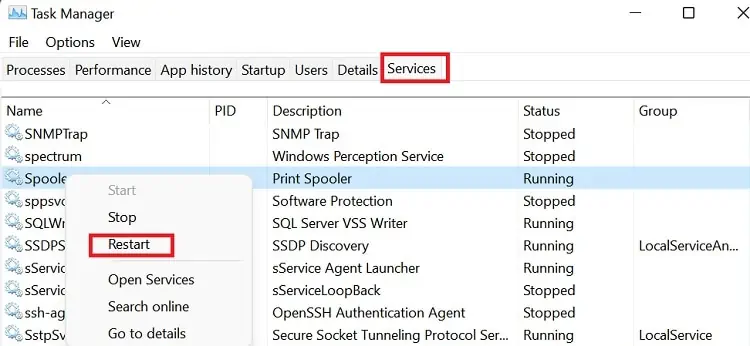
- Right-click on the Start Menu to launch Task Manager.
- Visit the Services tab and find Spooler.
- Right-click on it and choose Restart. Alternatively, you can select Stop and wait for some time to start the service again.

Fix PDF Save As Not Working on Microsoft Office
If you’ve tried all the methods we discussed and the issue persists, there might be issues with your Microsoft Office package. Now, let’s see how we can resolve them.
Enable Bitmap Text When Font May Not Be Embedded
Microsoft Office provides an in-built option to convert a non-embeddable font to an image while saving a file in PDF format. Here’s how you can enable it:
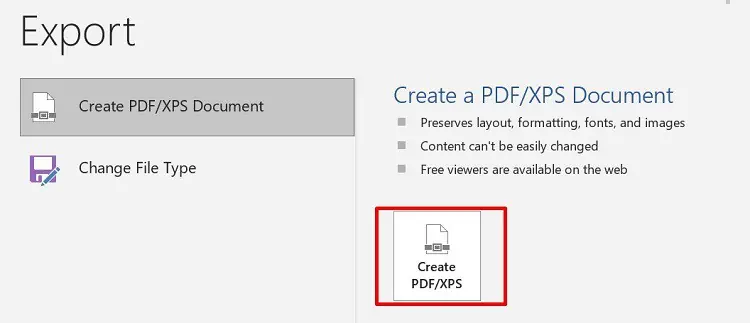
- Navigate to File and click on Export.
- Then, select Create PDF/XPS.

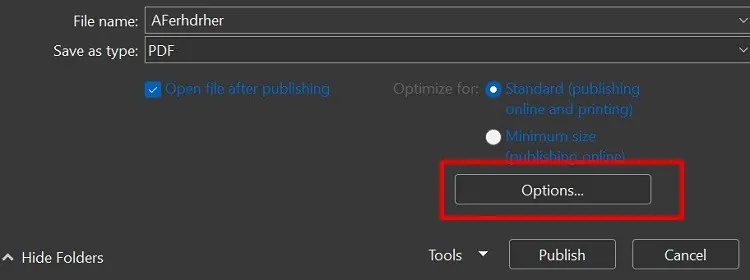
- Once the Publish window appears, click on the Options button.

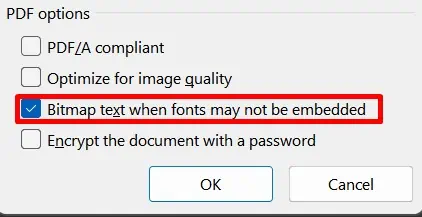
- Under PDF options, make sure the Bitmap text when font may not be embedded is ticked.

- Now, press Ok and check if you can save your document as a PDF.
Use the Latest Version of Microsoft Office
Reportedly, Microsoft introduced saving as a PDF option only since their 2007 version. So, the older versions do not support it. Therefore, we recommend getting the latest version of Microsoft Office.
Try Third-Party Software
You can use any third-party software if your problems are still not resolved. Some popular ones are Adobe Acrobat Reader, Slim PDF, and internet browsers.
Fix PDF Save As Not Working on Adobe Acrobat
Undoubtedly, most of us prefer using Adobe Acrobat for PDF purposes. But, recently, several users have reported issues while saving PDF files. Nevertheless, here are some easy methods to fix this problem.
Disable Show Online Storage Options
When you’re trying to save a document as a PDF, Acrobat will upload your file to its online cloud by default. So, this might be causing trouble in saving it on local storage.
Follow the steps below to know how you can disable the online storage options in Adobe Acrobat:
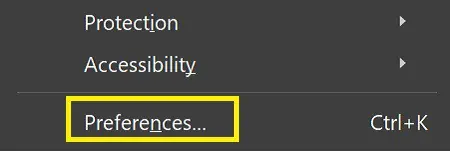
- From the Edit menu, select Preferences.

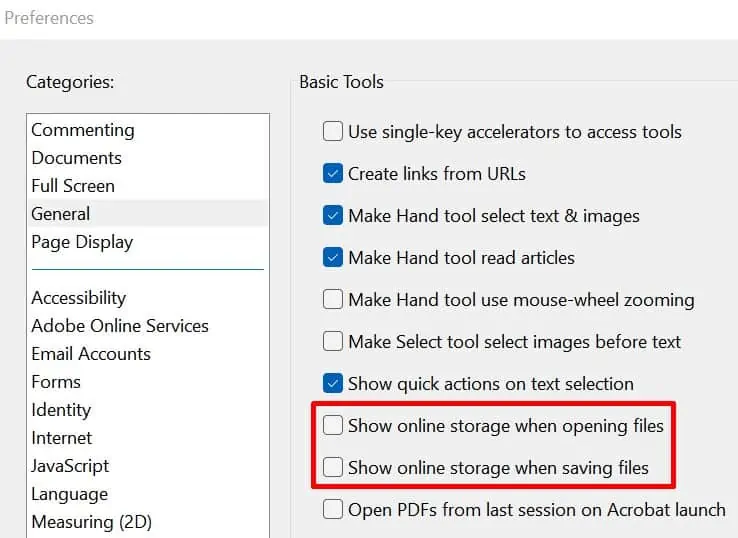
- Under Categories, click on the General tab.
- Now, untick these two options – Show online storage when opening files and Show online storage when saving files.

- Finally, click on the Ok button to save the changes.
Disable the Web Browser Options
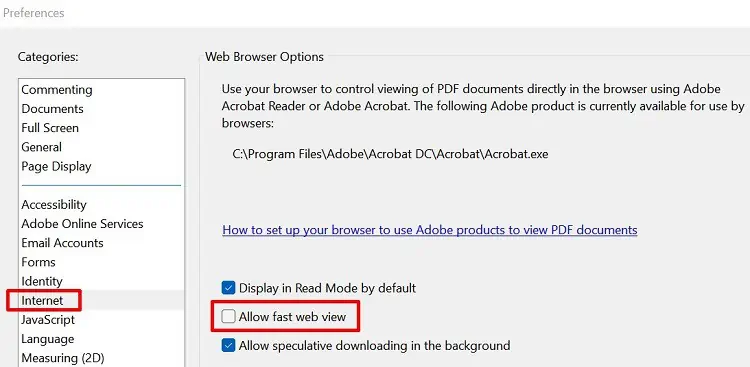
Another technique is to disable the fast web view in the Browser option. This way, the internet features for PDF files get disabled, and we can easily access them on Adobe Acrobat Reader. To turn off this option, go through the guide below:
- Open the Preferences window from the Edit menu or simply press Ctrl + K.
- Go to the Internet tab and deselect Allow Fast Web View.

- Finally, press Ok and check if the problem has been resolved.
Run the Compatibility Troubleshooter
If neither of the two options works, you can troubleshoot the program to solve issues. Here’s how you can do it:
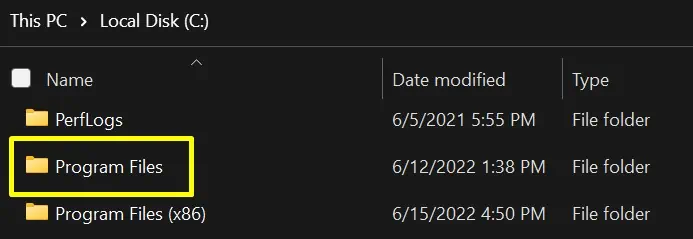
- Navigate to your system drive and visit Program Files.

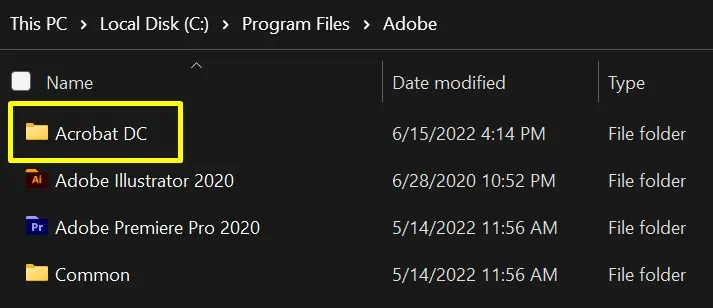
- Then, choose Adobe and go to the Acrobat DC folder.

- Inside the Acrobat folder, right-click on the Acrobat application.
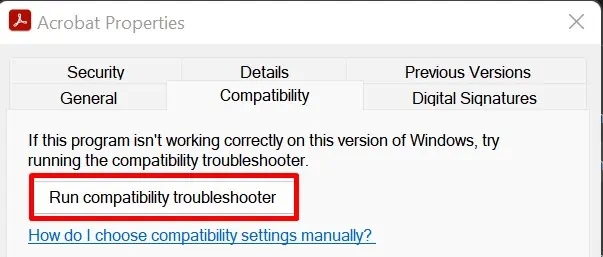
- Now, go to Properties and select the Compatability tab.
- Next, click on the Run Compatability troubleshooter.

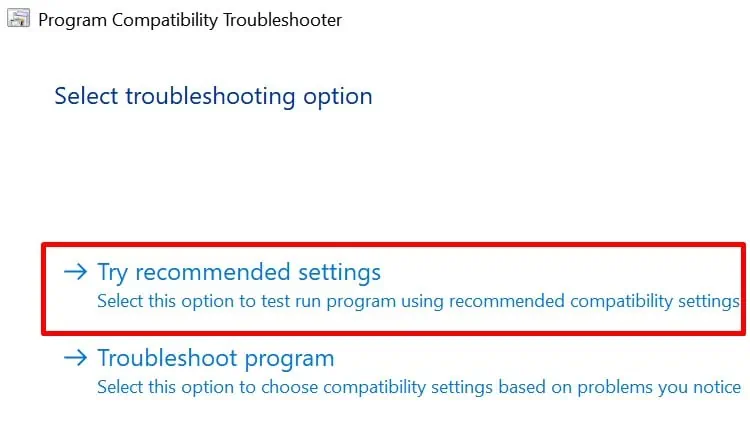
- Wait for a few seconds for the troubleshooter to detect issues. Then, choose Try recommended settings.

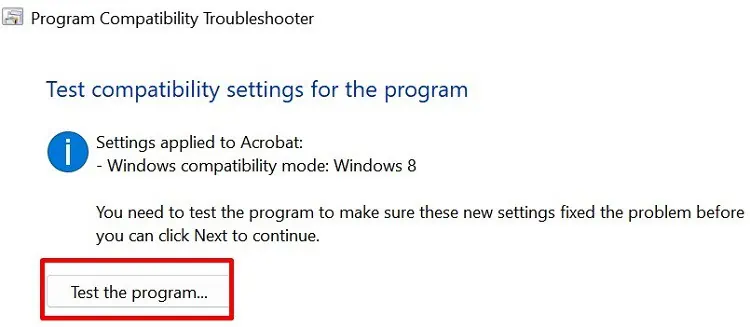
- Then, click on Test the program to see if your problems have been resolved.

Repair and Update PDF Tools
If your Windows drivers and services are working fine, there must be issues with the software that helps you save a PDF file. Therefore, we need to update them to a newer version to fix them.
Go through the step-by-step guide below to repair these programs on Windows 11:
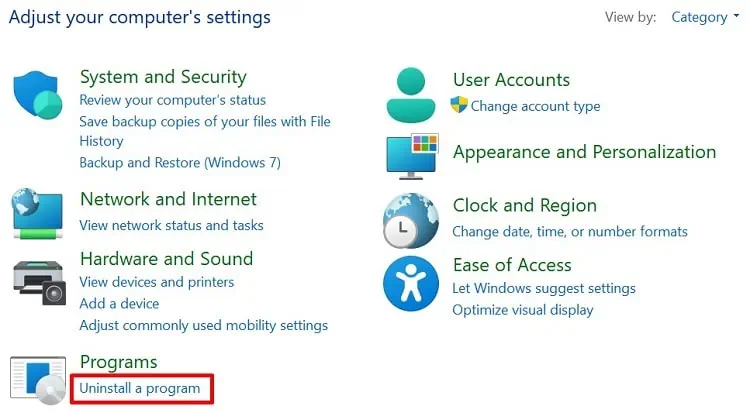
- Visit Control Panel and select Uninstall a program from the Programs tab.

- Navigate to your desired PDF reader. For example, if you have installed Adobe Acrobat DC, right-click on it and click on Change.

- Now, you will enter the application’s setup page. Choose Next to continue.
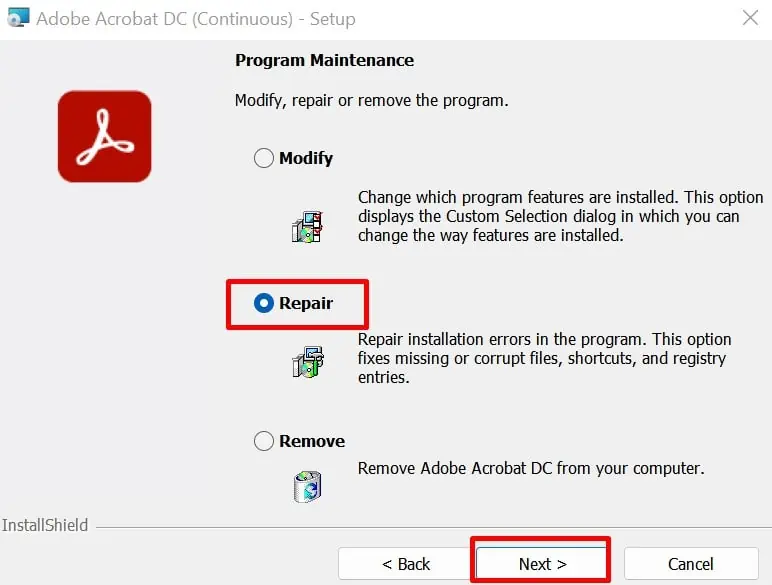
- Then, choose Repair and click on Next.

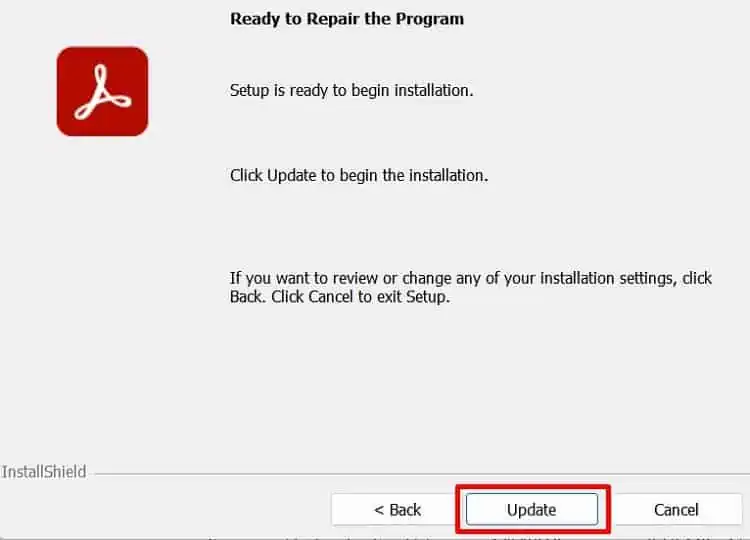
- To update the program, select Update and wait until the installation is complete.

- Finally, click on Finish and navigate to the PDF reader. Now, try to save your earlier document in PDF format. If there were issues with the program, the Save as feature should work fine now.
Unfortunately, not all PDF-supporting programs and browsers can be repaired. So, you can always uninstall the application and reinstall a newer version to fix the issues. Well, you can go through our other article that guides you to uninstall any app on Windows 11.
If your PDF is opening on Google Chrome, learn how to stop it from our other article.
Update Windows 11
Windows update is the best method to solve all your bugs and issues. Therefore, you need to update Windows to its latest version as it fixes every problem on your PC.
Well, you can easily check for the latest update on Settings. But, if your OS is up to date, you need to repair corrupted files on your Windows.
How to Fix Save As PDF Not Working on Mac?
Like in Windows, PDF Save As option may not work due to printer issues in Apple computers. Also, we need to allow Automator Actions if we’re using third-party PDF readers. So, this section covers both of these methods to fix PDF Save As not working on Mac.
Select an Imaginary Printer
Even though you do not have a printer, you must select an optional one to get PDF Save As option on Mac. Here’s how you can do just that:
- Click on the apple icon from the top-left corner of your screen.
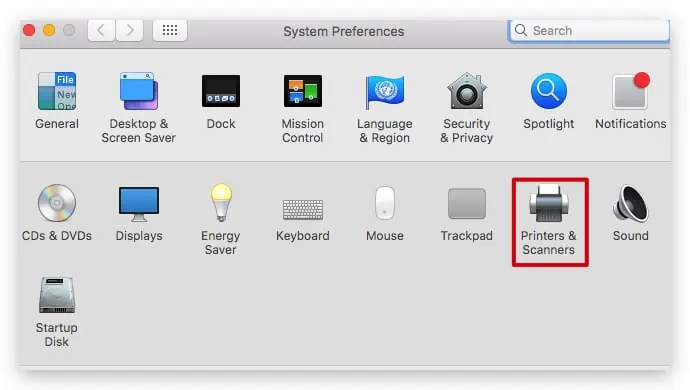
- Navigate to System Preferences… and choose Printers & Scanners.

- Now, click on the + icon to add a printer.

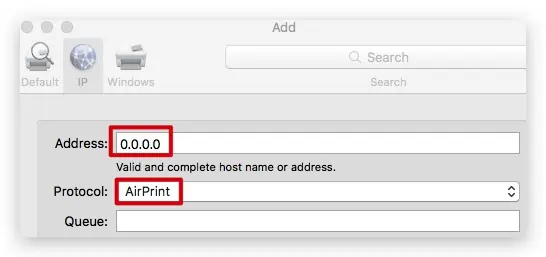
- Next, navigate to the IP tab and fill the Address as 0.0.0.0. Also, make sure to set the Protocol to AirPrint.

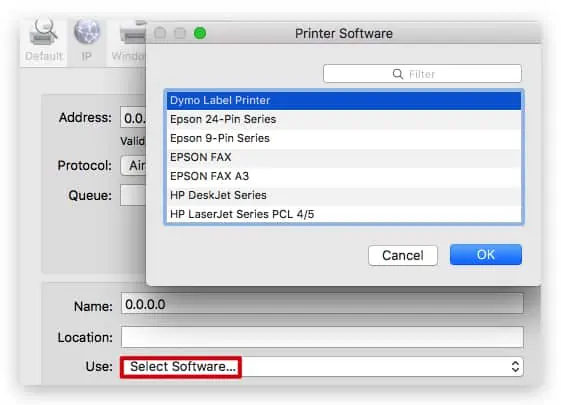
- Go down and under Use, choose Select Software… This shows a list of default printers and scanners accepted by your Mac.

- Choose any one of the printers and click on Add.
- Since you do not have an actual printer available, getting an error message is obvious. Nonetheless, click on Continue.
- Finally, press Ok to add a virtual printer.
Now, check if the PDF Save As feature is available. If not, you can try the next technique.
Enable Automator Actions From Third Parties
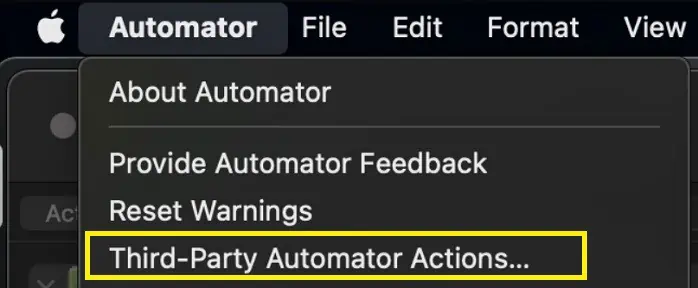
If you see an error message, “This workflow contains the action Save As Adobe PDF, which is provided by a third party. Third-party actions must be explicitly enabled”, it’s because you’re accessing Adobe PDF, which is third-party software.
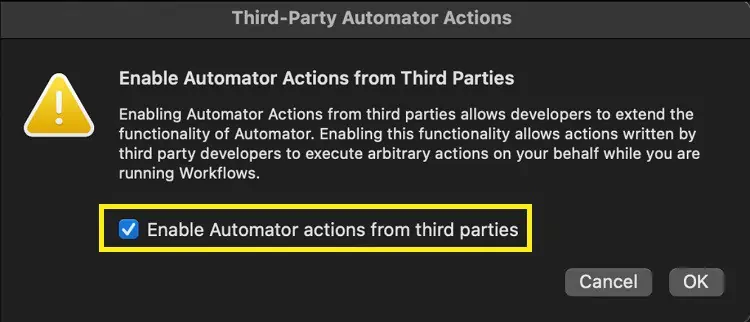
Well, you must enable the Third Party Automator service on your macOS to resolve this issue. The following guide will assist you in doing so:
- On your Mac menubar, click Automator and select Third Party Automator Actions…

- Once a dialogue box appears, tick the Enable Automator actions from third parties.

- Finally, press Ok to confirm this change.

