Finding the right power supply for your computer can be confusing. With so many options and technical specifications, it’s hard to know where to start. If you opt for a pre-built PC, you might be good to go. However, if you’re building a PC from scratch, consider several factors to ensure the PSU’s compatibility.
Choosing the wrong PSU might result in your PC not booting, becoming unstable, or even damaging the hardware components.
Once, I overlooked my system’s power requirement and purchased a PSU that lacked sufficient headroom for my GPU. Consequently, I had to return it and get a higher wattage one.
To ensure PSU compatibility, start by checking the pin configuration and number of cable connectors you require. Then, calculate the power requirement of your system and get the right wattage PSU.
Next, select a PSU that fits snugly into your PC case’s PSU compartment. Also, consider the modularity suitable for your build.
Cable Connections
Almost all the power supply units these days follow the ATX standard. So when it comes to connector compatibility, you should not have problems using any PSU with your setup.
You will be getting a 20 or 24-pin ATX power connector for connecting the motherboard to your PSU, 4 or 8-pin connectors for powering the CPU, and a 6, 8, 12, or 16-pin connector for your GPU, including a few connectors for powering the SATA and Molex devices too.
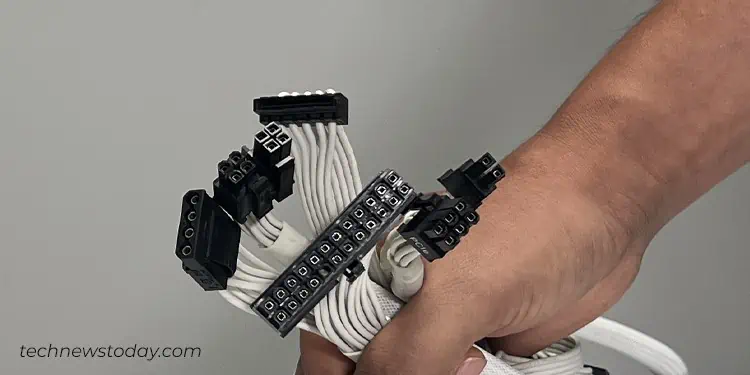
Coming to the ATX power connector, the 24-pin ones are primarily designed for motherboards with a 24-pin ATX header. But they are also backward compatible with the older motherboards that only have a 20-pin ATX header. The only thing is the connector should have detachable blocks—the 20-pin block and 4-pin block.
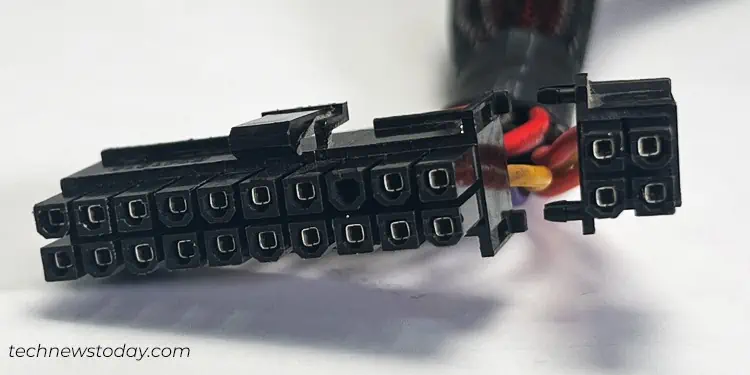
On the flip side, 20-pin power supply connectors are generally used only for motherboards having a 20-pin ATX header.
You may get any one of them depending on your requirement. The best bet would be to get a 20-pin connector for a 20-pin motherboard and 24 pin connector for the boards with 24 pin ATX header. You may also opt for a (20+4) pin connector if you want increased flexibility.
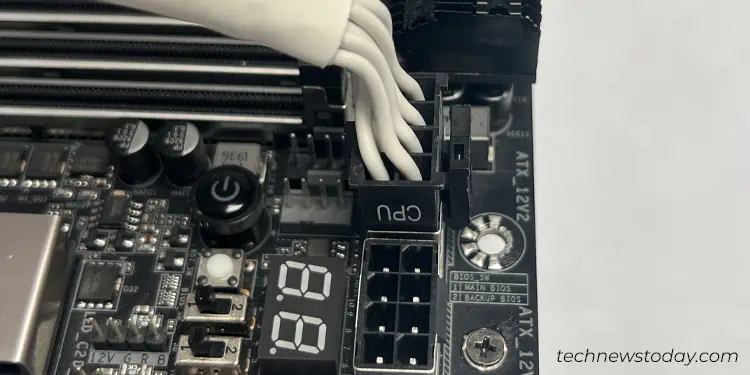
Similarly, check the pin configuration of the CPU connector and get the compatible one. Below are the ATX_12V1 and ATX_12V2 headers for plugging the CPU power connector in my GIGABYTE TRX40 AORUS MASTER. I have plugged in the single 8-pin connector for powering it.
Now coming to the GPU connectors, make sure what pin configuration it requires. Most of the GPUs out there use a standard 6 or 8-pin configuration, but it may vary depending on your model.
For instance, the latest Nvidia’s GeForce RTX 40 series utilize a 16-pin 12VHPWR connector. As such, you may have to choose a PCIe 5.0 compatible PSU.
To sum up, it is not that difficult to figure out the connectors required for your setup. But hold on! There’s still one more thing. You should also check the number of each cable connector the PSU comes bundled with.
Your PC can basically get up and start working with one of each type of connector, but that might not be the case if you have multiple numbers of the same component or are into overclocking.
If you are planning to overclock your CPU, GPU, or RAM at any time later, it will require a bit more juice to get going, which may require multiple cable connectors along with the increased power requirement.
It also holds true if you want to upgrade or add components later. So, make sure you also get the required number of cable connectors for your setup.
Do note that you should only use the cables provided by your manufacturer to avoid any incompatibility issues. For instance, Below is the Molex connector pin configuration on my EVGA Supernova 550 G3 and CORSAIR RM850X. They have an entirely different pinout. Swapping the cables could result in damage to your devices.
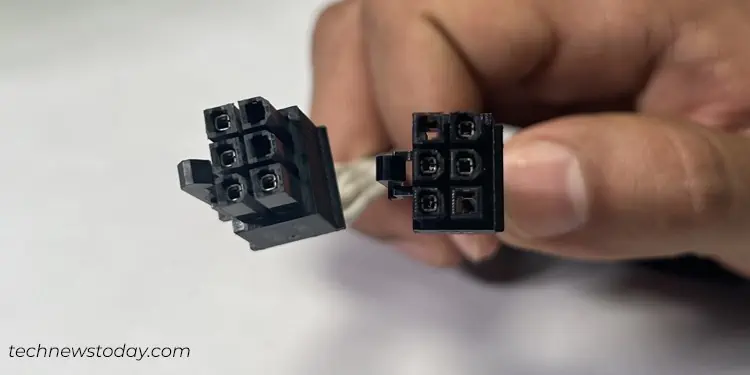
Power Requirement
Now let’s move forward to calculating the power requirement of your system and choosing the right PSU accordingly.
Manufacturers often recommend settling for a PSU that has a wattage rating of anything like 25% or higher than the requirement of the build. This headroom not only ensures optimal performance but you are also leaving sufficient space for future upgrades or overclocking.
Let me quickly share my experience regarding this. A few months ago, I had to build a PC for my colleague where the specs were like this—an ATX motherboard equipped with AMD Ryzen 5 5600X CPU, AMD Radeon RX 6650 XT GPU, 2 sticks of 16GB DDR4 RAM, and a 1TB M.2 NVMe SSD.
I calculated the power requirement for this system using the online power supply calculator from Cooler Master and it came out to be approximately 400 watts. As I mentioned earlier, I got him a 650W PSU, keeping a headroom of 25%. Plus, a few more watts to help him accommodate future upgrades.
I also suggest you go through a similar process. Simply figure out how much juice your system will need and get a PSU that best fits it.
On the other hand, using a low-wattage PSU for high power setup causes your PSU to restart frequently or lead to overheating of the power supply. So, always choose the one that has a sufficiently higher rated output power than the power demand of the system.
I further suggest you get a PSU that can deliver high power without losing much of it as heat. For that purpose, you may opt for a PSU that has a higher power supply efficiency, most preferably an 80 PLUS Silver, GOLD or Platinum.
Form Factor
After checking the connectors compatibility and power requirement, comes the form factor! You can’t even fit the PSU into your PC case if you do not make the correct choice between an ATX and SFX PSU.
Briefly speaking, ATX PSUs are larger than SFX ones and are more suitable for mid-tower, full tower or super-tower cases. On the flip side, SFX PSUs are a better option for small form factor and mini PC cases.
I am currently using the ATX Corsair RM850X PSU with my NZXT H700 PUBG case, which is a mid-tower PC case, and the SFX Corsair SF600 with my Phantek EVOLV Shift PC case which is a mini-ITX one. Let me quickly demonstrate how these power supplies differ in dimension.
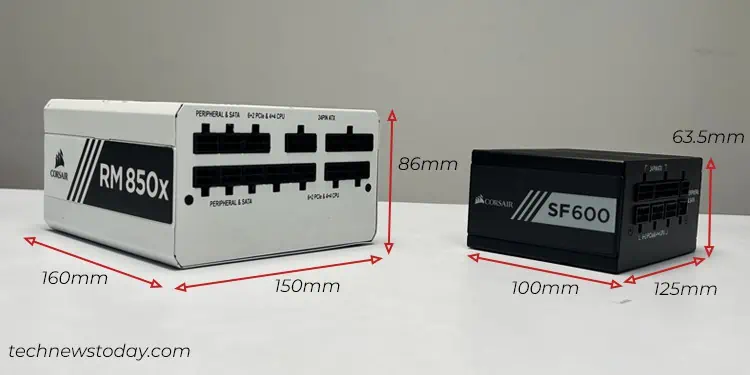
Hopefully, you’re clear from the image above and know the importance of choosing the correct form factor.
Quickly refer to your PC case specifications to find out what form factor PSU it can accommodate.
Modularity
Modularity doesn’t often have much to do with power supply compatibility. But yes, it can somehow impact cable management and the aesthetics of your build, mostly if you have space restrictions inside the PC case.
Depending upon how spacious your PSU compartment is, you may either opt for a non-modular PSU (no detachable cables,) a modular PSU (fully detachable cables,) or a semi-modular PSU (few detachable cables.)
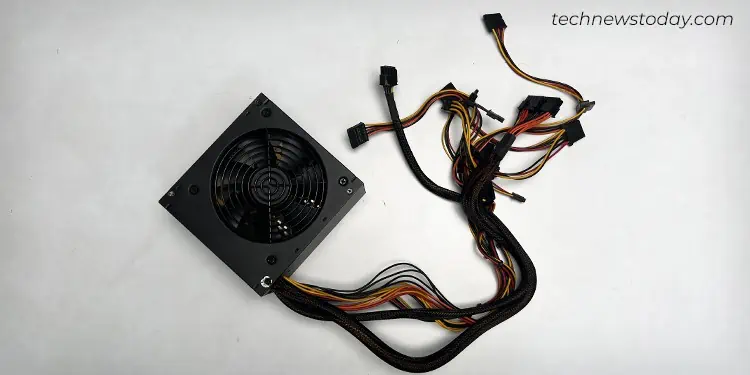
Personally, I prefer semi-modular ones for all my builds. Here’s a quick guide to help you compare modular, semi-modular and non-modular power supplies.

