Premiere Pro is a comprehensive go-to tool for video editing. If you are a video editor or work for film or television, you obviously know how important it is.
However, using the Premiere Pro does not always go well. You might be experiencing crashes and get tangled thinking about what’s causing the issue.
Premiere Pro can crash in many situations. For instance, it can crash when you import or export a project. Or, it may crash while linking media or rendering.
So, In this article, let’s learn about the troubleshooting methods for crashing Premiere Pro.
Why Premiere Pro Keeps Crashing?
- Your system does not meet the minimum requirements
- Using unsupported file formats and fonts
- Corrupted installation of Premiere Pro
- Trying to edit large size projects
- Use of GPU acceleration
- Corrupted C++ Redistributable packages
- Running resource-hungry applications
- Outdated Graphics driver
- Outdated Windows
- Malware
Fixes for Crashing Premiere Pro
If your Premiere Pro keeps crashing, all your projects will come to a stop. It’s vital to figure out the problem and solve it as soon as you can.
You will be able to sort out the problem once you go through this post. It’s not that tedious and time-consuming. We have guided you through a list of 15 fixes to help you fix the issue of Premiere Pro crashing. Let’s dive straight into them.
Check the System Requirements
Before you jump to other fixes, you must make sure that your system is actually capable of running the Premiere pro. It will certainly crash if your system does not meet its minimum requirements. You can see the system requirements from the official webpage of Adobe.
Organize Large Size Projects
You may be trying to edit a large project with hours of footage, which can be crashing the Premiere Pro. It is obvious for Premiere pro to crash if it tries to process a lot of media items at once.
What you can do is, split the bigger project into parts and process them accordingly. Later you can merge the parts into a single file. This way, Premiere pro will handle the media items efficiently and won’t crash.
Use Supported Fonts
If you are using subtitles/captions in your project, you must be aware of the fonts that you use. Not every font works well with the Premiere pro. If you use fonts other than normally used, you may encounter a crash. Lucida Grande and Arial are the best options to use as a font for your captions in Adobe Premiere Pro.
Use Proper Audio and Video Formats
Another common reason the Premiere Pro crashes is the use of video and image formats that it does not support quite well. It does support a wide range of formats, but if you want it to work efficiently without crashing, only certain formats will help. I have mentioned some of them below:
- Video CODEC: Normally, your videos are in MP4 format. However, they are resource intensive and may crash the Premiere Pro. Edit your video in DNx format if you are on Windows and ProRes if you are on Mac.
- Audio Format: If you don’t want your Premiere Pro to crash, don’t use MP3 audio formats. I personally faced a crash when I used MP3s. I could not figure out why using the MP3s created the issue, but it did. I recommend you to use WAV, AAC, or AIFF/AIF. They never created a problem.
- Frame Rate: Frame rate simply means the speed at which images or frames are displayed in succession. The standard frame rate for videos is 24FPS (Frames per second). If your video footage has a variable frame rate, Premiere pro may struggle to process it and crash.
To know if your video has a variable frame rate, Right-click the footage in the timeline and select the Properties option. It will detect and show if your video has a variable frame rate. You should use high-end devices to capture the footage to solve this issue. Videos captured from low-end devices like mobile phones have issues maintaining the constant frame rate.
Avoid Updating the Premiere Pro Immediately
You may see that an update is available to Premiere Pro, and try updating it as soon as the update is released. This is what you should never do. Newer versions are not stable and come with bugs and glitches.
Since the newer versions are still in the beta phase, they may crash. Wait until the bugs are resolved, and a stable version is released before updating.
If you still want to update and try its new features, keep the previous version installed in your system. It will facilitate you in case the newer version crashes.
Update Your Graphics Driver
Since the Premiere pro directly deals with graphics, any issues in your graphics driver may cause it to crash. The graphics driver may be corrupted or damaged, so you should consider updating it. The process of updating the graphics driver may depend upon your graphics card manufacturer.
Some of them are NVIDIA, AMD, and Intel. You can download and install the latest drivers from their official website.
You can also manually update the graphics driver using the Device Manager tool integrated into Windows.
Reset Your Preferences
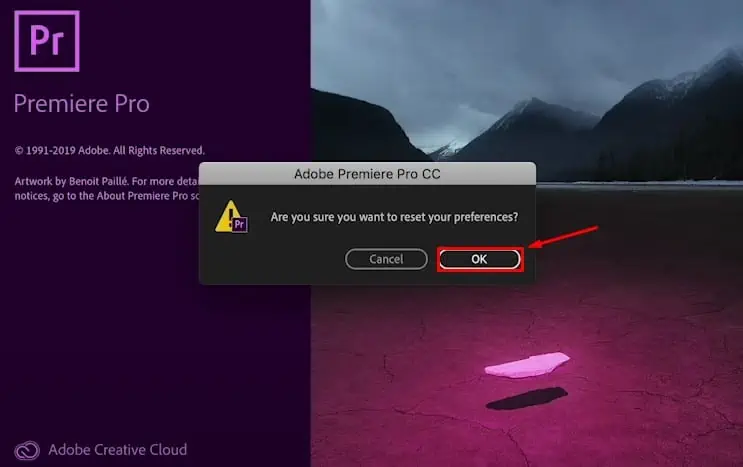
You might have made some conflicting changes in the Premiere pro settings that can cause it to crash. Resetting preferences will revert any changes made and reset them to factory defaults. Here’s how to reset the preferences:
- Launch Premiere Pro.
- Press and hold the Alt key if you use Windows and the Option key if you use Mac.
- It will show you a popup that asks if you want to reset the preferences.

- Click OK, and you are done.
Turn Off Mercury GPU Acceleration
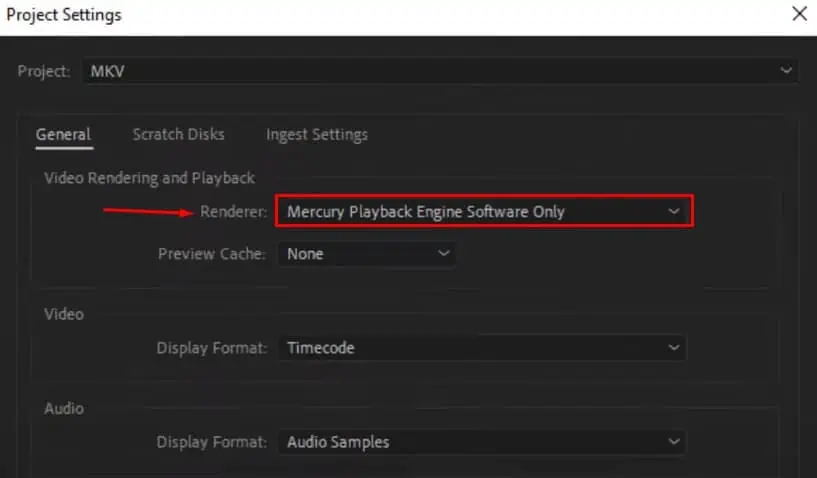
GPU acceleration in Premiere pro makes the use of CPU as well as GPU for high-quality real-time editing. However, if your graphics driver or hardware has a bug, you must turn off the GPU acceleration to prevent Premiere pro from crashing. Follow these steps:
- Launch the Premiere Pro.
- Navigate to File > Project Settings
- Under the General tab, You will see a drop-down besides Renderer.
- Select Mercury Playback Engine Software Only.

Clear the Media Cache Files
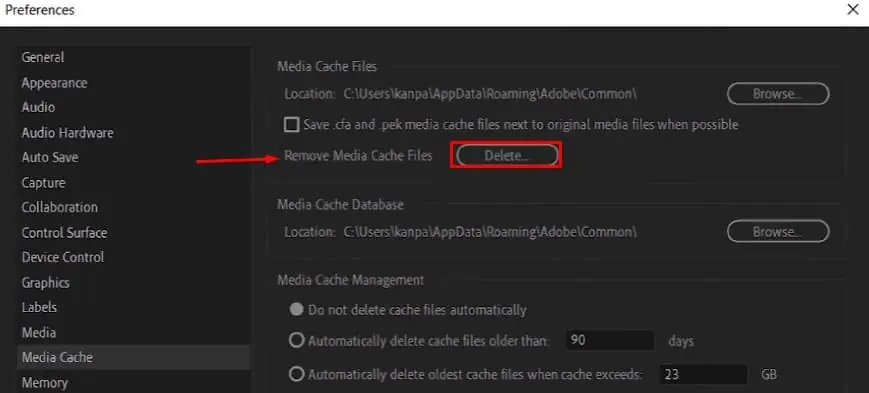
Premiere Pro uses cache to store accelerator, preview renders, peak, and conformed audio files. Old and unused cache files can crash the application. So it is best to clear the cache files to get the optimum performance. Follow these steps to clear the media cache files:
- Launch the Premiere pro and navigate to Edit > Preferences > Media Cache.
- You will see a Delete button next to Remove Media Cache Files. Click the button.

- In the next popup, check Delete all media cache files from the system option.
- Click OK.
Close CPU and Memory-Intensive Applications
As mentioned already, there are certain requirements for Premiere Pro to run. You should not use large applications or games along with it. If used, the RAM and processing power for Premiere pro may not be sufficient, and it can crash. Consider closing other graphics-heavy applications before you run the Premiere Pro.
To close the resource-consuming applications, you can use the task manager. Press Ctrl + Alt + Del simultaneously to launch it and end the heavy tasks. You can also consider upgrading your RAM if you need to use other applications along with the Premiere Pro.
Run a Malware Scan
Malware is a destructive program responsible for causing boundless harm to your PC. You can get it from the Internet or any external storage device. They disrupt and manipulate the computer’s normal operations and take control over your PC. So another reason why Premiere pro keeps crashing can be the malware.
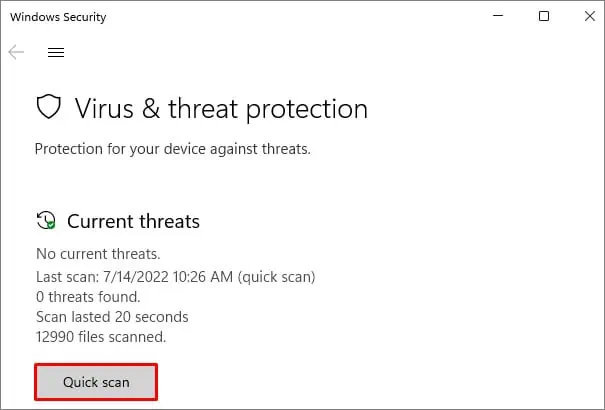
So removing malware is of the utmost importance if you don’t want Premiere Pro to crash. You can remove it easily using an antivirus or a malware scanner. If you don’t have them, you can use the quick scan integrated into Virus & threat protection feature in Windows. Follow these steps to run a quick scan:
- In the Windows Search box, type Virus & threat protection and open it.
- Click the Quick scan button to start the malware scan.

Repair C++ Redistributable Packages
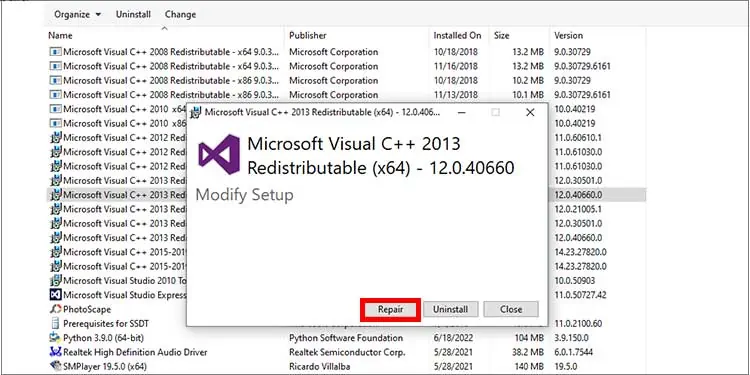
C++ Redistributable packages are the bundle of standard library files that provide a proper runtime environment for different programs, including Premiere Pro. It helps to maintain the side-by-side configuration of the applications. When they get corrupted, you may encounter the issue of Premiere pro crashing. Follow these steps to repair those packages:
- Hit Windows + R to open the Run dialog box.
- Type and Enter
appwiz.cplto open the Programs and Features window. - Find Microsoft Visual C++ Redistributable packages listed there. Right-click on it and click Change.
- A pop-up will appear where you need to click the Repair button. It will fix any errors if found.

- Repeat the process for every C++ package in the Programs and Features window.
Clean Boot Windows
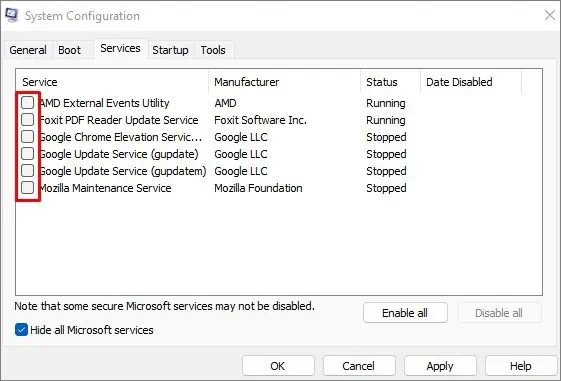
Clean booting of a computer means loading only the basic services required for the functioning of the computer. Windows provides a System Configuration application to allow you to change what services to run and what not. Certain services may prevent Premiere Pro from working, so consider disabling them and see if it fixes the issues. Here’s how:
- Press Windows + R open the Run dialog box. Type and Enter
msconfigin the search box to open the System Configuration application. - Jump to the Services tab and check the option Hide all Microsoft services.
- Next, uncheck all the services that are from manufacturers other than Adobe.

- Save the changes and restart your computer.
If the Premiere pro starts working fine now, go on enabling the services that you previously disabled, and you will figure out which service was causing Premiere Pro to crash.
Update Windows to the Latest Version
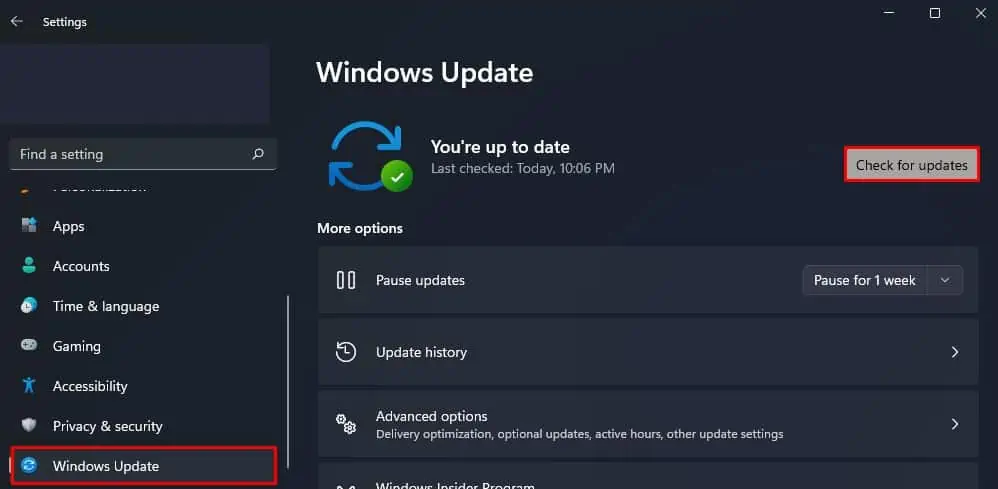
Microsoft releases updates regularly to fix any errors and glitches in its previous versions of Windows. If Premiere pro was crashing due to bugs in Windows, it would help if you update your Windows to the latest version. Here’s how to update Windows:
- Hit the Windows key + I key on your keyboard to open Settings.
- From the left section, click the Windows Update tab.
- Click Check for updates in the right section. It will show you if any updates are available.

- Download and install them.
Reinstall Premiere Pro
This is the final fix you can apply if nothing else mentioned above worked. You need to uninstall the Premiere pro completely and perform a fresh installation. Reinstallation will replace all the program files, registry entries, and other associated files needed to run the program. It will fix issues in case you had a corrupted installation. Here’s how to reinstall the Premiere Pro:
- Search Control Panel in the Windows search box and open the application.
- Navigate to Programs > Programs and features
- Find Adobe Premiere Pro from the list of programs.
- Click the Uninstall button at the top and proceed with the uninstallation.

- After the uninstallation is completed, reboot your computer.
- Then, download the latest version of Premiere Pro from the official website of Adobe and install it.
- Once the installation is completed, try launching the Premiere Pro and see if it still crashes.

