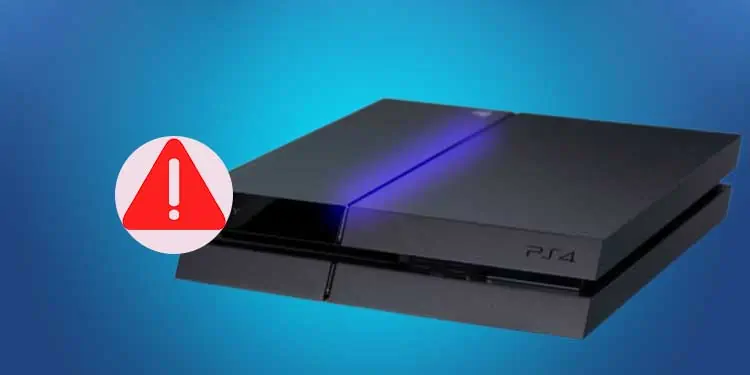
One day, you turned on your PlayStation 4 only to find a blinking blue light at the console’s center. It indicates a severe hardware or software issue, so the users gave it a name. Yet, we’re here to fix PS4 Blue Light of Death.
In general, the pulsing blue light indicates the PS4 has no audio or video output. The problem may revolve around TV compatibility, the PS4’s power supply, the power cord, corrupted software, corrupted hardware or other hardware issues.
An additional problem may come after the Blue Light of Death’s first appearance. Over time, if you don’t address the issue, your PS4 may fail to turn on or shut itself automatically. For users already at this point, there are solutions as well.
PS4 Blue Light of Death causes?
The blue light indicates the PS4 doesn’t have the state of power it needs, the one it has when a solid white light shows.
It prevents the console from responding or sending signals to the TV. That means it won’t even enter Safe Mode by conventional matters, enter any menus, or play any games. For example, some TVs will say “No Signal” when you turn on the PlayStation 4.
In other words, if you get a picture on the TV, or if the PlayStation shines a white light after a while, you’re not facing the BLoD issue.
Either way, there’re several possible reasons, some of which are challenging to diagnose. Here’re the causes you may be facing:
- HDMI Issues: Your HDMI cable or HDMI ports are not working together.
- Resolution Incompatibility: You’re trying to run the PlayStation in a different resolution than your TV.
- Incompatible monitor or TV: Likewise, your TV may feel to run the console because of its outdated software.
- Faulty Hard Drive: Your hard drive may be malfunctioning.
- Faulty PS4 Power Supply: Your power supply may not be sending enough power to the console.
- Corrupted Software: There could be a random bug in the console preventing it from sending a signal.
Overall, it’s a common problem for consoles with many years of use. The BLoD indicates users about hardware and software corruption preventing normal functionality.
How To Fix PS4 Blue Light of Death?
We’re revising a series of easy and advanced solutions, one by one. Try them until you find the one that works for you.
According to Sony, the BLoD may also look like a blinking white light, solid blue, or blinking blue light.
The official information states the lights indicate the console is frozen. Their troubleshooting is as follows:
- Unplug the console.
- Wait for 60 seconds, plug the console back, and turn it on.
- Reinstall the system software in Safe Mode if the issue persists.
Let’s expand this short troubleshooting and add more options.
Power Cycle the Console
Fixing the Blue Light of Death often requires entering safe mode. However, you won’t be able to enter the recuperation menu as easily.
Instead, you have to power cycle the console. It’s the step everyone should try as it erases random bugs and helps users enter Safe Mode.
- Turn the PlayStation off.
- Unplug all of its cables.
- Hold down the power button for 10 seconds to discharge its remaining power.
- Wait for 60 seconds before putting the cables back on.
Reset the Resolution
Resetting the resolution is a common solution user share on forums. However, it requires some tricks regarding your HDMI cable.
Here are the steps:
- Power cycle the console if you have not.
- Plug its AC cord only after the 60 seconds (only the AC cord).
- Press and hold the PS4’s power button for about 7 seconds. You’ll hear the first beep and then a second beep. The second beep indicates it started on Safe Mode.
- Wait until the Blue Light turns white. If it doesn’t, this solution didn’t work for you, as you won’t be able to do the following steps. If it does, move forward. However, you can try the above steps a few more times to make sure human error is negated.
- Turn on the TV.
- Plug the HDMI cable between the TV and the console after you see the white light.
- You should see a screen prompting you to plug in your controller. So, plug your controller through a USB cable.
- You’re in the Safe Mode mode. Select 2: Change Resolution.

- Click OK.
- Wait for the PS4 to restart.
- After the restart, the PlayStation should return to Safe Mode. If it doesn’t, repeat every instruction up to Step 7.
- In Safe Mode, choose 6: Initialize PS4. It will take you to the standard dashboard.
Now, you should test the PlayStation 4 by shutting it down and then on again to see if it works. Bear in mind this option doesn’t require an internet connection.
Factory Reset the Console Offline
The solution above may have three results. The first one is that it worked, so you don’t need to read further.
But if you never saw a white light and didn’t use Safe Mode or you Initialized the PS4, but then it shut off by itself or showed the Blue Light of Death the next time you turned it on, try re-installing its system software with a USB drive. The USB must have at least 6GB of free space.
This process erases your data. You would only want to do it as a last resort. Here are the steps to re-install the system software:
- Open a web browser on your PC
- Go to PlayStation’s official page.
- Scroll down and download the “PS4 Console Reinstallation File.” It downloads a file named “PS4UPDATE.PUP”
- Plug a USB drive on your PC
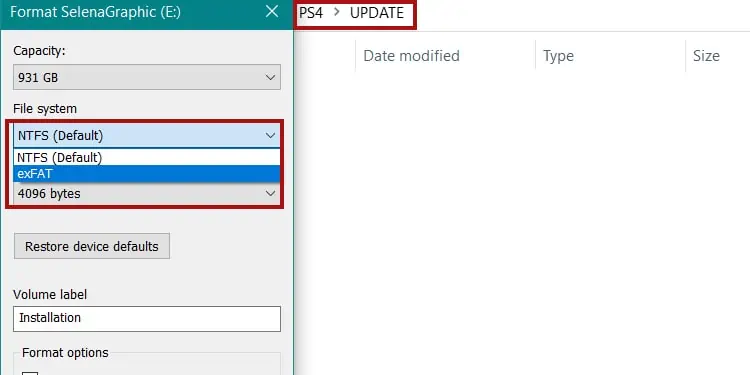
- Right-click the USB drive and press “Format“
- Click “exFAT,” “exFAT,” or “MS-DOS(FAT). Press Start to format the drive.

- Create a folder on the USB drive, and name it “PS4“
- Create a subfolder within PS4, and name it “UPDATE.” The folder names must be exact and without the quotation marks so the console can identify the files
- Place “PS4UPDATE.PUP” inside the UPDATE folder
Now, on to the next step, which is re-installing the software:
- Power cycle the console if you have not.
- Plug the PS4’s cables back.
- Plug the USB with the re-installation file into the console.
- With the system off, press and hold the power button. Release it after a second beep. The first beep sounds immediately; the second sounds about seven seconds later.
- Connect your controller to the console via USB.
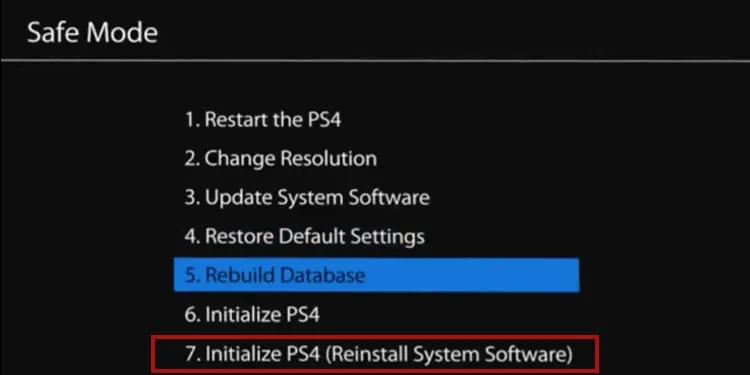
- Select Safe Mode option 7: Reinstall System Software

- Press “X” on Update from USB Storage Device
- Press “Ok.” It will reinstall the system software, so it may take a while. Wait for the process to finish, as it should take you to the console’s dashboard.
Either way, after the re-installation finishes, the console will start normally. See if this fixes the problem by re-starting the console.
Upgrade the TV’s Firmware
Another option, Sony recommends updating the firmware for your SmartTV. Generally, these are the steps you should follow:
- Press the Home or Menu button on your TV controller
- Go to the TV’s Options, Settings, or Configurations menu.
- Search for Software Update. It is commonly within a Technical Support sub-menu
- Update the firmware
There are many Smart TV brands, as well as various operating systems. Check your TVs manual, or check online to find specific instructions.
Remove the Hard Drive
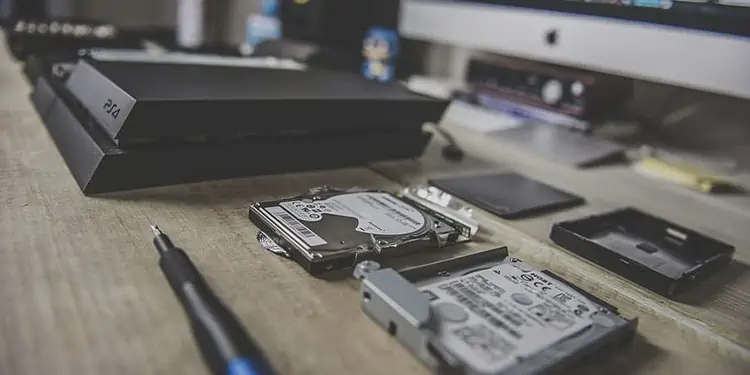
Another Sony recommendation is checking the HDD bay. You can slide the HDD cover in the arrow’s direction to remove it. Then, ensure it’s properly sealed and that the hard drive is properly secured and connected.
In particular, here are some tips:
- The hard-drive position is different on the PS4, the PS4 Slim, and the PS4 Pro. However, there’s always an arrow indicating where it is.Use a T10 screwdriver to open the drive-bay ports. Unscrew the bolts to slide the cage.

- You can replace the hard drive with a new one.
- A faulty hard-drive may cause slow gaming performance, clicking noises, and corrupted files. You may have experienced these issues before the PS4 Blue Light of Death.
Change the Cables
The next step is checking the AC power cord, HDMI cable, and HDMI ports for physical damage.
First, you can clean the dust and rust from the port with canned air and a microfiber cloth.
You can try using new cables and see if it solves the issue. This is particularly important if you see signs of damage in your cables.
Take the Console to Service
The PS4 Blue Light of Death could be the symptom of a dead CMOS battery, among other hardware issues.
In particular, the CMOS battery is a small piece that stores date data. Moreover, it feeds the CMOS cheap so the console can store hardware settings.
Now, changing the battery requires some hardware knowledge, so we don’t recommend you to open the console to remove it or change it.
Moreover, there could be other hardware damage within the PS4. That includes dust, rust, faulty cables, faulty boards, and similar. For example, overheating could be a problem. A professional may need to work on the console’s cooling systems to fix the issue.
So, if the solutions above don’t work, sadly, you’d have to take the console to a repair store.
Either way, read the follow-up solution to change the CMOS battery yourself.
Change the CMOS battery
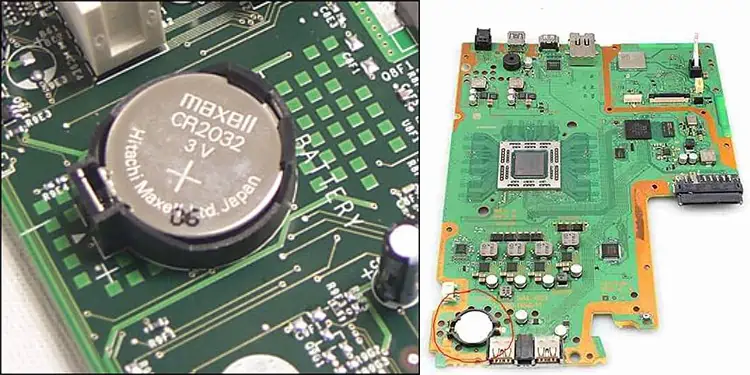
Removing and replacing the battery forces a reset of the CMOS chip, which causes a firmware reset. Therefore, it can breathe new life into a seemingly dead PS4.
Here are the steps:
- Buy a new CMOS battery.
- Turn off the console.
- Disconnect all of the PS4 cables
- Open the PS4 case
- Find the CMOS battery on the motherboard. It’s a coin-sized piece, a CR2032 battery.
- Gently remove the battery with a small flat-headed screwdriver. In essence, push the pin holding the battery and then lift the piece out of its socket.
- Wait for five minutes.
- Put the new CMOS battery back.
- Close the PS4
- Plug the console back on and wait for 10 minutes. It will charge the battery.
- Turn the PS4 back on

