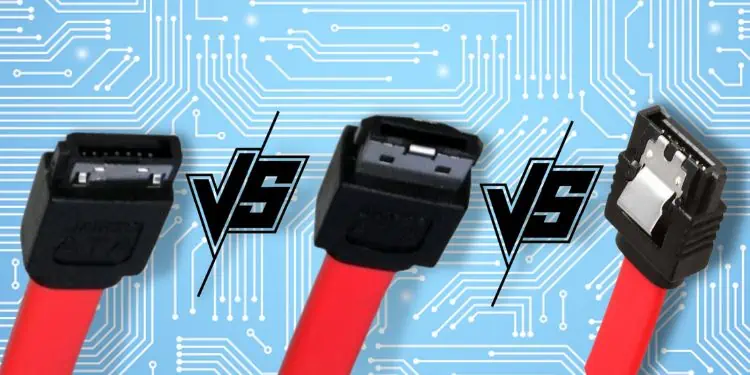
Serial Advanced Technology Attachment (SATA) is an interface that lets you connect your storage devices (HDDs, SSDs, and optical drivers) to the motherboard.
Basically, SATA is the replacement for PATA, which adopted parallel communication (carrying multiple bits of data). Moreover, they have become a de facto standard for both HDDs and SSDs today.
However, since its introduction, we have encountered several revisions, with the latest one being the SATA 3.5. Regarding the same, this article will guide you through the differences between these versions and whether or not to switch to the latest one.
What is SATA?
As the name suggests, the Serial Advanced Technology Attachment is based on serial communication. This means that data is transferred from the storage devices to the computer motherboard one bit at a time.
This is why data transmission using SATA is less susceptible to any interruptions or damages. Moreover, the higher data transmission rate is another reason why most users prefer them over other storage device interfaces.
SATA vs PATA
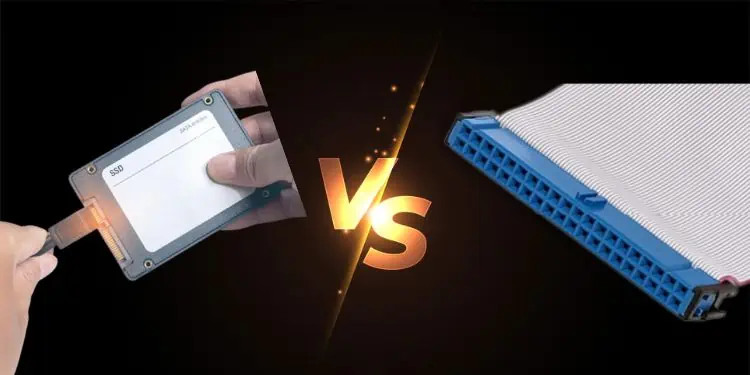
In the earlier days, we heavily relied on Parallel Advanced Technology Attachment (PATA), also referred to as IDE (Integrated Drive Electronics). Reportedly, they use a 40-pins configuration with around 40 or 80 conductor ribbon cables.
Apart from the bulky connector with vast sets of pins, their data transfer rate was also relatively low (up to 133 MB/s). Also, with the increasing RPM of the hard drives, PATA got out of favor and was eventually replaced by SATA.
Basically, the newer technology was better in terms of data transfer rate (150 MB/s), and the data corruption rate was also significantly reduced. Moreover, the data connector pins were also reduced from 40 to just 7.
Furthermore, SATA replaced the 4-pin Molex power connectors with much more powerful 15-pin SATA power connectors. The other improvements include the hot-swapping feature, less power consumption, and low-priced.
Please look at the table below to learn the fundamental differences between PATA and SATA:
| Factors | PATA | SATA |
| Mode of Communication | Parallel | Serial |
| Data Connectors | 40-pin type with bulky conductor ribbon cables | 7-pin configuration |
| Power Connectors | Molex (4 pins) | SATA connector (15 pins) |
| Data Transfer Speed (MB/s) | 60, 100, 133 (three versions) | 150, 300, 600 (three revisions) |
| Hot-Swapping | Unavailable | Available |
| Power Consumption | Comparatively high | Comparatively low |
| Cost | Comparatively high | Comparatively low |
Note: SATA and PATA are incompatible but can co-exist on the same machine having both the interfaces. Hence, if you wish to connect your PATA hard drive to a motherboard having only a SATA port, you require a PATA to SATA converter.
SATA Interface Architecture
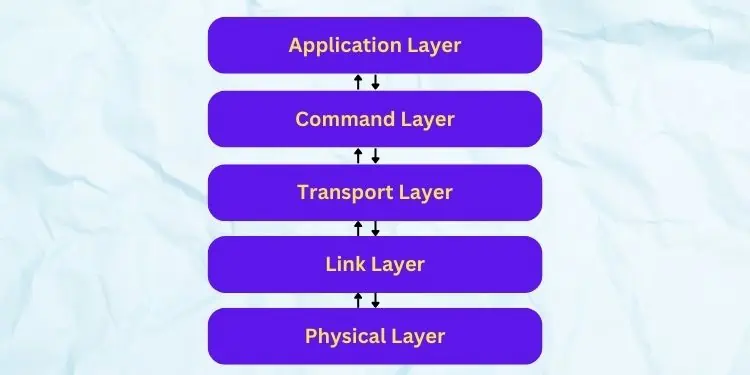
Regardless of the SATA bus interface type, the working mechanism remains the same. Well, it has a five-layered architecture – physical, link, transport, command, and application layers.
- Physical Layer: This layer ensures that the SATA devices are detected by the system. Moreover, it is responsible for link initialization using Out-of-band (OOB) signaling, bit-level encoding, and defining both the physical and electrical characteristics.
- Link Layer: After the link establishment in the physical layer, the Frame Information Structures (FISs) are transmitted over the SATA link here. Moreover, it is also responsible for reducing EMI and certifying data integrity.
- Transport Layer: Once the FISs are transmitted to the transport layer, it defines the format for each. Also, it appends a control header and instructs the link layer for further construction and transmission.
- Command Layer: As the name suggests, the command layer provides necessary commands to the transport layer for a series of actions to be implemented.
- Application Layer: The final layer of SATA architecture is the application layer, which interacts with the SATA devices. Basically, it represents the software that controls the overall ATA commands and ensures their proper execution.
SATA Revisions
Well, PATA was extensively used for almost two decades. However, even after SATA replaced them, the data transfer rate wasn’t still high to work best with storage devices having higher RPMs.
Hence, it was evident that users were looking to replace the first version of SATA as soon as possible. Thus, the SATA interface was revised multiple times to fit consumer needs.
Unfortunately, the Serial ATA Working Group isn’t working on a next revision further than 3.5. Hence, it’s very likely that this legacy protocol standard will be replaced by newer technology, possibly NVMe. To learn more about it, read our other article on the differences between SATA and NVMe.
SATA or SATA 1
SATA, SATA 1, or SATA-I was introduced in 2003. Well, the first-ever revision, ‘1.0a,’ was worked just to replace the Parallel ATA technology.
Moving on, they had an improved data transfer speed than PATA but were eventually replaced by the second revision, which was comparatively much faster. Also, as mentioned earlier, they introduced advanced power and data connectors that made connecting the storage devices to the circuit board easier.
Furthermore, SATA 1.0 had weaker motherboard ports and was easily breakable. In fact, most users were frustrated with the frequent loose connections and shaking issues when connecting to the sockets.
- Overall better technology than PATA
- Easier connection on both storage devices and motherboard ports
- Forward compatible with SATA 2 and 3
- Replaced by SATA 2 after just a year
- Slower and less secure than both SATA 2 and 3
- Weak connectors
- Rare to find in today’s date
SATA 2
Since SATA 1 was still slower and didn’t match the highest speed of some HDDs, a significant revision was done in 2004. This was named SATA 2 or SATA-II, and it has a better data transfer rate, bandwidth throughput, and additionally introduced NCQ implementation, which was missing in 1.0.
Further, this generation was revised twice (2.5 in 2005 and 2.6 in 2007) for further improvements on connectors, NCQ priority, NCQ unload, etc.
- Overall better than SATA 1
- Introduction to NCQ
- Backward compatible with SATA 1
- Forward compatible with SATA 3
- Replaced by SATA 3
- Lacks locking mechanism
SATA 3
In 2009, the Serial ATA International Organization introduced SATA 3, which replaced SATA 2. Thus, most modern motherboards come with SATA 3 ports. Nonetheless, some older ones still have SATA 2 headers.
As expected, the third generation came with a much higher data transfer rate. Among the various changes, the most noticeable is the lock mechanism that ensures the connectors do not come off quickly.
Furthermore, SATA 3 or SATA-III was revised five times, with each update adding new features – 3.1 (2011), 3.2 (2013), 3.3 (2016), 3.4 (2018), and 3.5 (2020). Basically, each revision added increased performance and better integration of the secondary storage devices.
- Best SATA generation
- Introduction to lock mechanism
- Backward compatibility with both SATA 1 and 2
- Slower and less secure than NVMe
- Soon to be replaced by the NVMe interface
What’s the Difference? SATA vs SATA 2 vs SATA 3
Now that you know about the three generations of SATA, it’s time to dive deep into the major differences between them.
Generally, SATA, SATA 2, and SATA 3 differ in header labels, data transfer rate, NCQ implementation, lock mechanism, data connectors, and power connectors. In this section, you’ll learn each of these factors in brief.
Data Transfer Rate
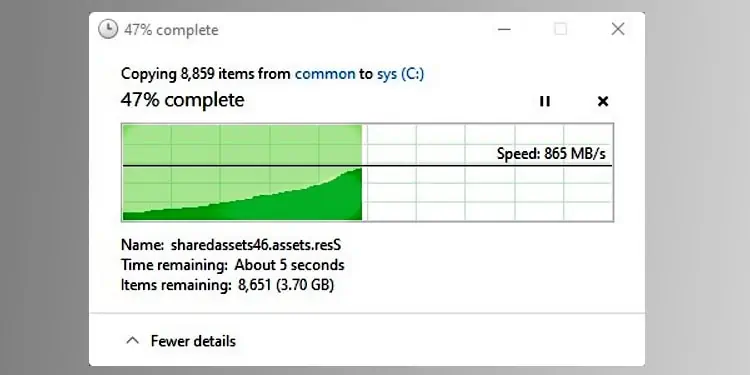
The data transfer rate determines the speed of the SATA interface. Basically, it can be defined as the amount of data moving from the HDDs or SSDs to the host computer.
Well, the data transfer rate is the most crucial difference between the three generations of SATA. Indeed, this factor helps us determine the fastest SATA version.
Reportedly, the first generation SATA (SATA-I) replaced PATA and has an uncoded data transfer rate of 150 MB/s (1.5 Gb/s). This is possible by the 8b/10b encoding, where an eight-bit word is converted to a 10-bit symbol.
Next, the second generation SATA, aka SATA-II or SATA 2, has a native data transfer rate precisely double of the first generation, i.e., 300 MB/s (3.0 Gb/s), also accounting for the 8b/10b encoding.
Lastly, SATA 3 also uses the 8b/10b encoding scheme and has a native data transfer rate of 600 MB/s (6.0 Gb/s). Hence, it’s pretty clear that the third generation is much faster than the other two revisions.
Appearance
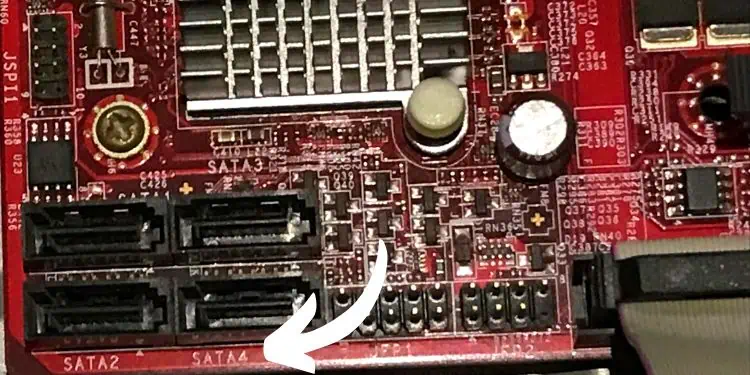
Moving on to its appearance, the SATA cables and connectors look precisely the same. Nonetheless, motherboard manufacturers produce different colored cables (red, blue, yellow, black, orange) to distinguish the different SATA generations.
However, there is a visible difference in the cable connectors. While SATA 1 and 2 look pretty identical, the addition of a lock mechanism in SATA 3 makes them unique from the former two.
Whether SATA 1, 2, or 3, you can connect all of them to the same motherboard header. Thus, the only way to identify the ports is by checking the port label.
For SATA 2, you can find indications like SATA 2_2, SATA2_5, SATA2_3, etc. Similarly, for SATA 3, you can find indications like SATA 3_3, SATA 3, SATA 3_5, etc. However, if you have a computer from the early 2000s, you’ll likely find the labels imprinted just SATA, meaning they belong to the first generation.
NCQ Implementation
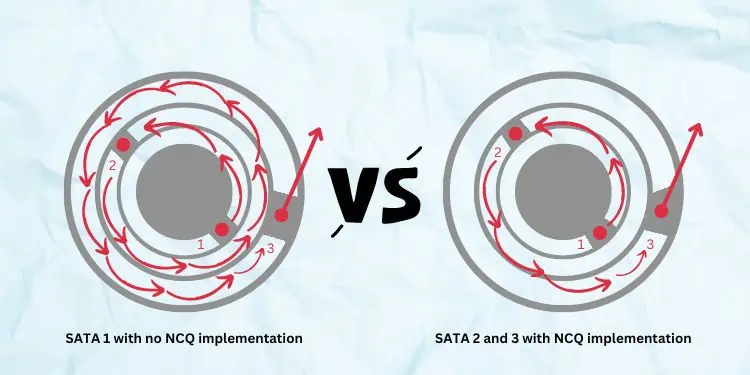
Native Command Queuing (NCQ) is one of the SATA features that ensures read/write head movements are significantly reduced so that they are executed in the best order possible.
In SATA 1, this feature wasn’t available, meaning there were unnecessary head movements. This resulted in poor performance, and the HDDs or SSDs used to wear off easily (although still better than PATA).
However, SATA 2 and 3 both utilize this protocol that allows the storage drives to self-determine the effective order. This significantly reduced the number of head rotations, and the same work was done much quicker than that of SATA 1 with no NCQ implementation.
Let’s look at the above illustration to understand this more quickly. In SATA 1, the drive head rotates three times to perform a task, taking a longer path. On the other hand, in NCQ implemented SATA 2 and 3, the drive head rotates just two times, taking a shorter route for the completion of the same task.
Data Connector
Although the SATA 1, 2, and 3 data connectors look all identical, the features definitely distinguish them from one another.
Well, there’s no noticeable difference between SATA 1 and 2. However, the SATA 3.0 revision started using two foil-shielded differential pairs that provided a significant advantage in the transmission line. Basically, this allows ease of routing cables and surprisingly reduces the cost too.
Power Connector
Unlike the data connectors, the Serial ATA Working Group, made quite a lot of changes in the power connectors. Well, the first revision was adopted in the 2.6 version that produced a slimline connector to be used by notebook optical drives and other smaller factors.
Moreover, the 2.6 revision also introduced the micro SATA and a separate microdata connector, which is significantly thinner. However, this was only intended for 1.8-inch hard disk drives.
Furthermore, revision 3.3 adopted PWDIS in its third pin allowing it to enter and exit the POWER DISABLE mode. This also made it compatible with SAS specifications.
Lastly, the earlier versions of SATA 1 also came with the Molex connectors to be compatible with the PATA cables. However, this was removed from the latter versions of SATA 1 and is no longer found.
Well, you can go through our other post that guides you on how to connect the SATA power cable.
Lock Mechanism
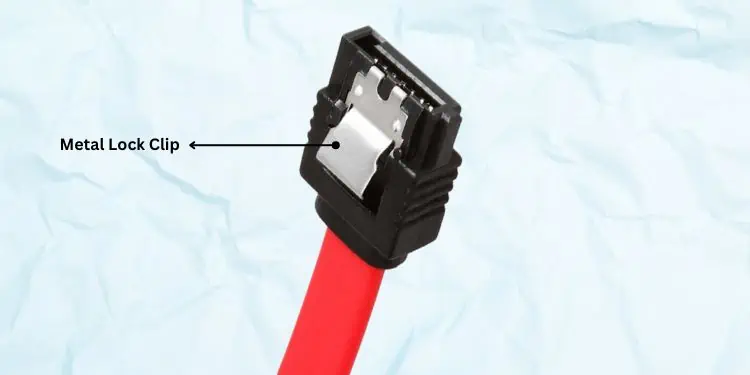
Well, the major problem with the SATA 1 data connectors was that they were easily plugged out due to a missing locking mechanism. Although SATA 2 improved the connectors, they still lacked locks that made the connection secure.
However, SATA 3 introduced special metal lock clips that ensure the cables do not plug out easily. Moreover, there are right- or left-angled connectors that also prevent accidental loosing of the cables.
As shown in the above figure, revision 2.0 didn’t come with the lock mechanism. On the other hand, there’s a small metal spring on SATA 3.0 that ensures the jack is securely attached to the motherboard and storage devices’ ports.
Similarities Between SATA, SATA 2, and SATA 3
As mentioned earlier, SATA 1, 2, and 3 have a similar working mechanism and adopt the same architecture. Moreover, the data and power connectors’ pin configurations also remain the same.
Firstly, the data connectors are 8 mm wide and have a total of seven pins – three grounds and four data lines (A+, A-, B+, B-). On the other hand, power connectors are relatively wider and have a 15-pin configuration – nine power lines, five grounds, and one for staggering activity. Interestingly, newer motherboards provide two to four of these SATA cables in their box.
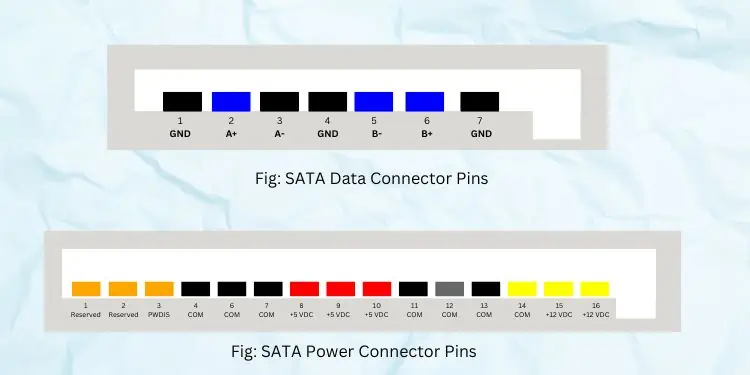
However, the pins of the slimline and micro power connectors are significantly reduced. Nonetheless, the working mechanism remains identical.
Moving on, all the SATA generations have an optional hotplugging interface. However, to enable it, you require a supporting host device and OS.
Lastly, all the SATA revisions are forward and backward-compatible. This means that you can use SATA 1 cable on SATA 2 and 3 ports, or SATA 2 cable on SATA 1 and 3 ports, and SATA 3 on 1 and 2 ports.
Caution: Despite the legacy support, the maximum speed capacity gets reduced due to the differences between the port and cable generation. For example, if you’re using a SATA 3 connector on SATA 2 ports, the storage device will be limited to the features of SATA 2.
Should I Switch to SATA 3?
Since SATA 1 or 2 can efficiently perform read and write functions on SATA 3 ports, you can still use them instead of switching to SATA 3. Nonetheless, you’ll be limited to plenty of features available in the third generation.
Likewise, you’ll also miss out on the lock mechanism on SATA 3 connectors if you still prefer using SATA 1 and 2 cables.
Moreover, using SATA 2 or 3 on HDDs is completely fine, as both support the maximum speed supported by most hard drives. However, SSDs usually have a rate of 500 MB/s, and to take complete advantage, we recommend using SATA 3.
Hence, if your motherboard only supports SATA 2, but you’re looking to add SATA 3 ports, you can easily do so using extension cards.
Thus, if you’re planning to upgrade to SATA 3, you can have a look at the final comparison chart below and decide for yourself.
| Factors | SATA 1 | SATA 2 | SATA 3 |
| Data Transfer Rate | 150 MB/s | 300 MB/s | 600 MB/s |
| Appearance | Port labels have just SATA | Port labels have SATA 2_2, SATA2_5, SATA2_3, etc. | Port labels have SATA 3_3, SATA 3, SATA 3_5, etc. |
| NCQ Implementation | No | Yes | Yes |
| Data Connector | 7-pin configuration | 7-pin configuration | 7-pin configuration and uses two foil-shielded differential pair cables |
| Power Connector | 15-pin configuration, earlier versions included both Molex and SATA connectors | 15-pin configuration, introduction to micro SATA, and slimline connectors | 15-pin configuration, PWDIS in its third pin |
| Lock Mechanism | Unavailable | Better than SATA 2 but lacks the metal lock | Metal lock ensures the proper connection between the plug and the socket |
| Legacy Support | Forward compatible with SATA 1 and SATA 2 | Forward compatible with SATA 3 and backward compatible with SATA 1 | Backward compatible with SATA 1 and 2 |
| Hotplugging Feature | Available | Available | Available |

