Whether you are looking to forward or re-edit a previously sent item to other people, you can find all of them in the Sent Items folder. However, you may sometimes fail to find them in the usual location.
This can happen if they have already been deleted, moved or archived. If you recently deleted the emails, you may still find them in the “Deleted Items” folder. Otherwise, you may need to restore them. Apart from it, your Outlook data/ profile also might have been corrupted.
Whatever the reason is, you can go through various solutions to solve the sent items disappearing issue and prevent such problems in the future.
How to Fix Sent Items Not Showing in Outlook?
If multiple email accounts are set up on your Outlook, you have to search for the sent mail under the correct email section, as each has a separate Sent Items folder.
Likewise, if you have a huge number of emails, use the search bar to find them quickly. Or you can also sort the items sent according to the date.
Configure Outlook Save Settings
In case you have disabled your Outlook settings to save the sent emails, they won’t appear in the Sent Items folder. Also, any emails you have forwarded are not saved there unless you have enabled the appropriate setting.
Here’s how to enable them both.
- Click the File menu at the top bar.
- Select Options in the bottom left corner.
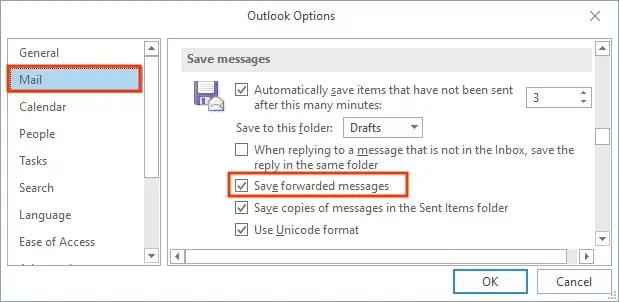
- On the next prompt, click the Mail tab from the sidebar.
- Scroll to the Save messages section and enable the Save copies of messages in the Sent Items folder checkbox.

- Additionally, enable the Save forwarded message checkbox to save your forwarded email in the Sent Items folder.
- Click OK to save changes.
- Restart the Outlook app and send a test message. See if you can find it in the Sent Items folder.
If you cannot find/access the above options in your Outlook application, they might be disabled by your administrator. Nonetheless, you can request them to enable the Save copies of messages in the Sent Items folder setting in the Outlook Group Policy.
Make Sure the Email Was Sent Successfully
Whether you lost the internet connection or your system shut down, the email message might not have been delivered and sent to the other person. When this happens, you can find them in your Outbox folder.
Nonetheless, you can enable the Outlook setting below to send emails as soon as your system restores the Internet connection. After the emails are sent successfully, you can view them in the Sent Items folder.
- Click the File menu and select Options.
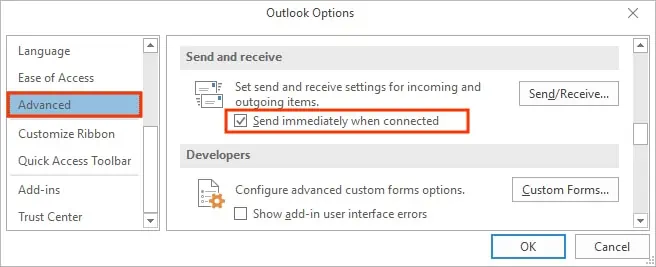
- Select the Advanced tab from the sidebar.
- Scroll down to the Send and receive section, and check the Send immediately when connected checkbox.

- Click OK to save changes.
Free up Storage Space on Outlook
By default, Outlook offers 15 GB of free storage space to your Outlook account, and for premium users (Office 365 subscribers), you have 50 GB of storage. Anyway, if you have reached your maximum limit, the sent emails or any other email you receive won’t be saved anymore.
A common sign is the “Mailbox Full” message prompt on your Outlook app. If you see this message, you should free up some storage space to save your email messages.
Check if You Have Applied Any Filter or Enabled the Autoarchive Setting
In case only some of your sent items appear and others are missing from Outlook, there might be a filter deleting or moving your emails somewhere else. So, consider removing such filters in your Outlook settings.
To adjust the filter settings,
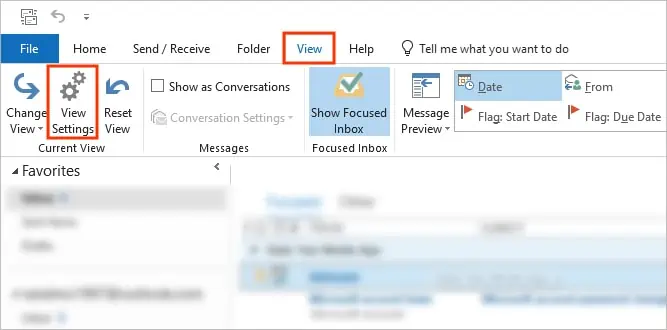
- Select the View tab from the top menu bar.
- Then, click View Settings in the top left corner.

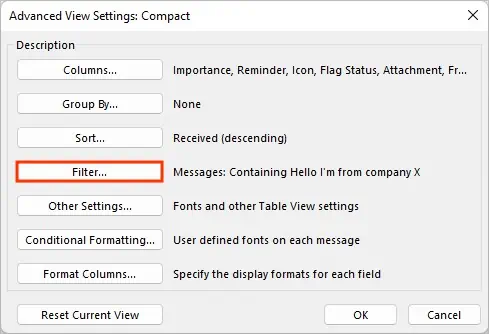
- On the Advanced View Settings Compact prompt, click Filter.

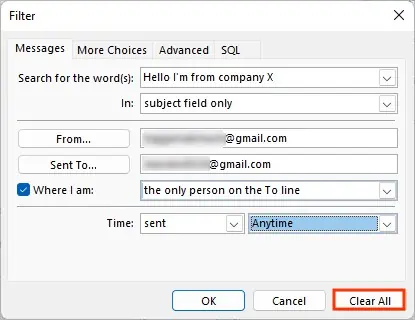
- Next, click Clear all to remove the filters.

On the other hand, check if you have enabled the auto-archive setting in Outlook. While it helps reduce the clutter, it can move or delete your sent items after a specific time.
To disable it,
- Click the File menu.
- Then, select Options.
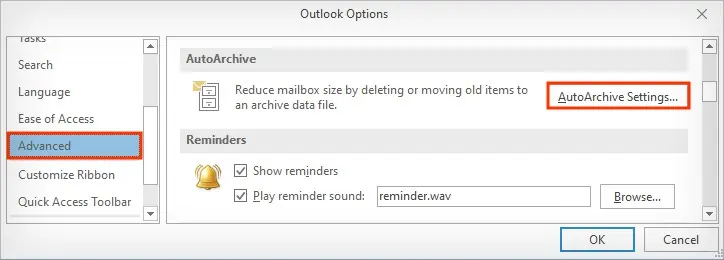
- Choose the Advanced tab from the sidebar.
- Under the AutoArchive section, click AutoArchive Settings in the right pane.

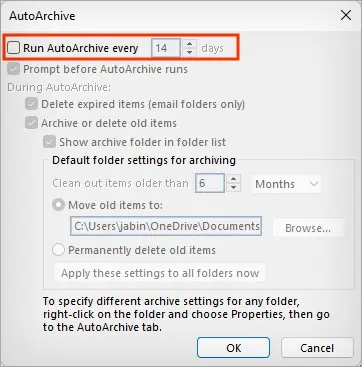
- Uncheck the Run AutoArchive every X days or make changes according to your preferences.

Extend the Time for the Sent Items to Stay in Outlook
Whether you are using cached exchange mode or an IMAP/POP account, they only store and sync your emails for a particular duration for offline use. And once the maximum time limit exceeds, Outlook stops keeping track of such emails.
Thus, if you are looking for such older messages in Outlook, you may not find them in your Sent Items folder. To extend the time Outlook keeps the mail,
- Click the File menu.
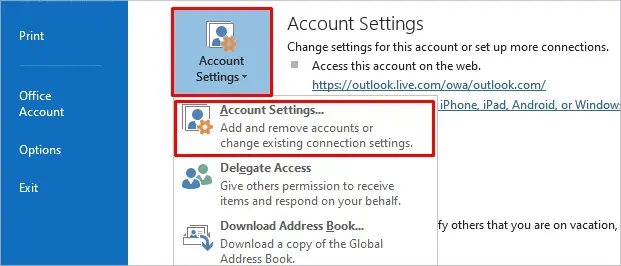
- Select Account Settings > Account Settings.

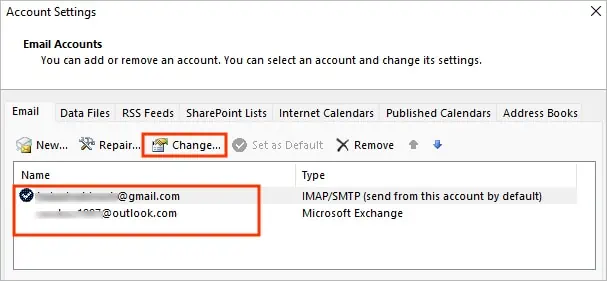
- Choose the email for which you want to extend the time and click Change.

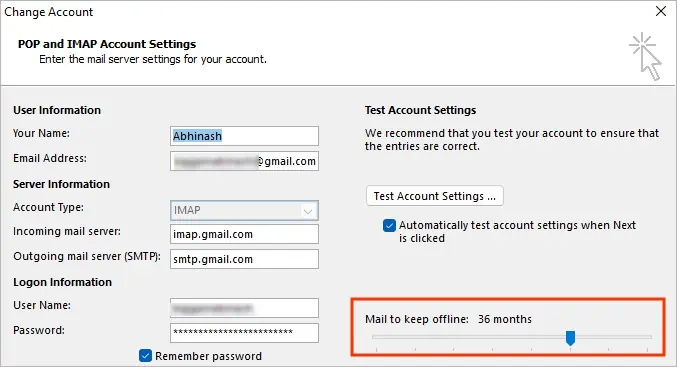
- Under the Mail to keep offline section, drag the slider towards the right side to extend the time limit.

- Click Next and follow the on-screen prompts.
Create a New Outlook Profile
If your problem isn’t resolved even after applying the above solutions, your Outlook profile might have been corrupted. So, consider creating a new profile or repairing your corrupt PST file.
- Click the File menu from the top bar.
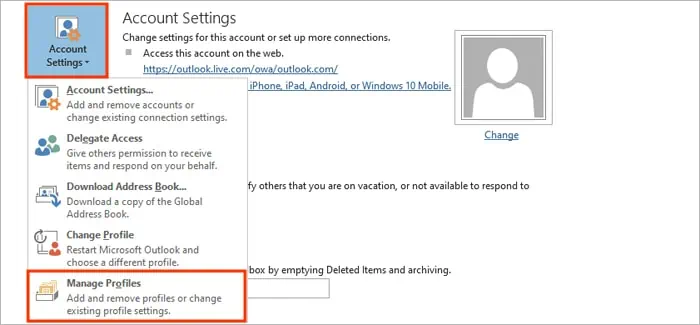
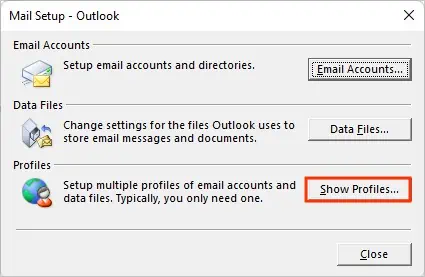
- Then, click Account Settings and select the Manage Profiles option.

- Next, click Show Profiles.

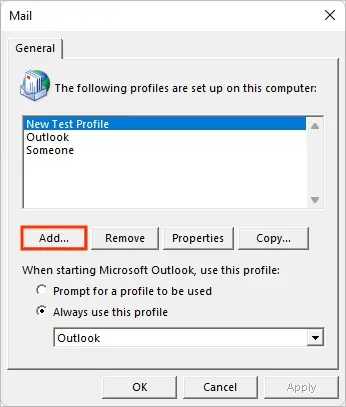
- Click Add and follow the on-screen instructions to create a new profile according to your preferences.

- After creating the profile, select the new profile and use the Always use this profile option.

