“Something went wrong and your PIN isn’t available” error happens when the PIN service malfunctions or conflicts with other windows services.
You can usually bypass this error if you use a password along with your PIN. Of course, if you can reset your PIN using a Microsoft Account, that’s even easier.
But these aren’t the only fixes and here are all the ways you can fix this issue.
What’s Causing The PIN Unavailable Error?
This error happens due to problems with the PIN service, which locks you out and prevents you from logging in.
Additionally, Windows 10 has a sign-in setting called ‘Require Windows Hello sign-in for Microsoft Accounts.’ If you enable something like Diagnostic Startup, for instance, that disables the services required for this setting to run and causes login errors like the PIN Unavailable error.How to Fix If Your PIN Isn’t Available
Before moving on to the fixes, here’s a simple reminder:
If you made any changes right before the problem started, try to remember and revert them if possible, as that can fix the issue.
Reset PIN at Login Screen
If your PC uses a Microsoft account, you can simply reset your PIN using that. You will need a working internet connection for this, though.
- Click on Set up My Pin below the error message.
- Enter your Microsoft Account credentials.
- If you have 2 Factor Authentication enabled, you’ll also need to complete a verification process.
- When prompted ‘Are You Sure You Want To Reset’, press Continue.
- If you get a no internet connection error despite having a working connection, it’s just a false warning. Press Retry and repeat the steps a few more times, and it should work.
- Set up your new PIN and login.

Login Using Another Sign-in Option and Reset PIN
If you use a password along with your PIN, you can simply use the password to log in instead. Alternatively, if you have a second Admin account that you can log into, you can do the same with this method as well. Once you’re logged in, you can reset or remove the PIN as you prefer.
- From the left side of the login screen, select the admin account and login.
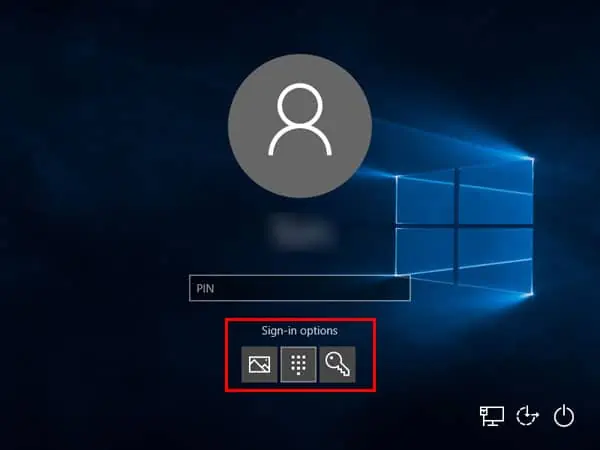
- Alternatively, press Sign-in options and click on the password button.

- Enter your Password and log in.
- Once you’re logged in, press Windows + I to access Settings.
- Open Accounts and click on Sign-in Options from the left.
- Click on Windows Hello PIN on the right and press Remove.
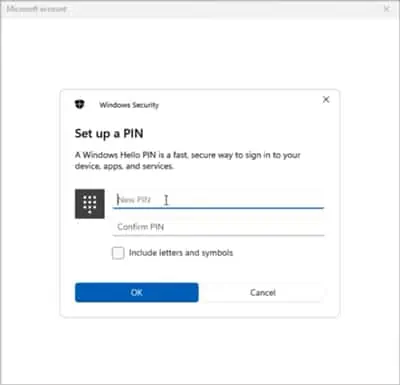
- Afterward, press Add to create a new PIN if you want.
Disable Fastboot and Enable TPM in BIOS/UEFI
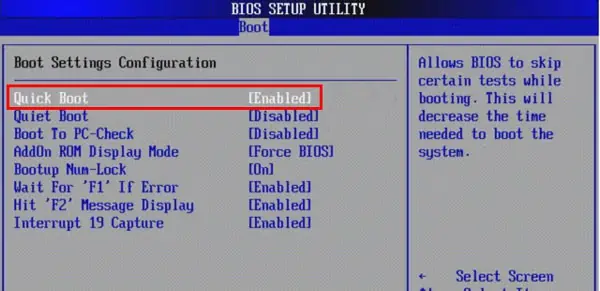
Fastboot is a utility that uses information stored in the cache to boot your PC quicker than usual. However, if this cache is corrupt, it can cause problems like the PIN unavailable error.
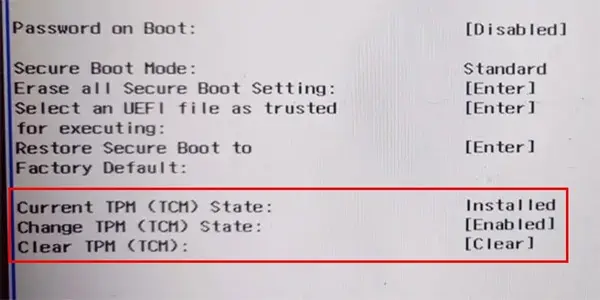
TPM (Trusted Platform Module) is a chip that encrypts your system and secures information such as your PIN in the form of cryptographic keys. If this is disabled, that could be causing the PIN error.
Depending on your chipset manufacturer, you’ll need to press F2/F10/F11/F12/DEL keys when booting to access BIOS/UEFI settings. Some newer models also have the option to access UEFI Firmware settings from winRE (Recovery Options). Either way, once you’re in BIOS/UEFI, follow the steps below:
- Open Boot settings and look for the Fast Boot option.
- Disable Fast Boot.

- Restart your PC and check if you can sign in using your PIN now.
- If you still can’t sign in, enter your system’s BIOS again.
- Navigate to the security tab and look for the TPM option.
- Enable TPM.

- Restart your PC again and check if you can sign in now.
Troubleshoot via Windows Recovery Environment (winRE)
Press and hold the Shift key on the login screen and click Restart. Keep holding shift until your PC boots into winRE. If this method doesn’t work, you can instead reboot 3 times to open Recovery Options manually.
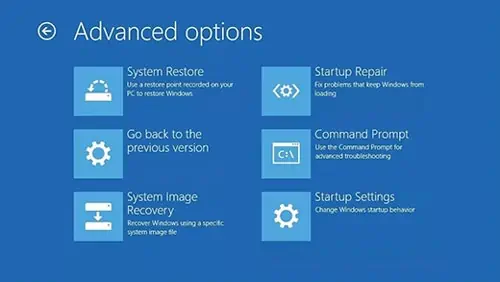
In winRE, navigate to Troubleshoot > Advanced Options and try out the solutions listed in the order below.
Safe Mode
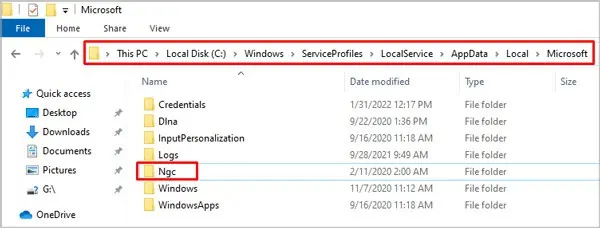
You can remove your PIN by renaming or deleting the NGC folder by booting into safe mode. This folder is where all the info related to your PIN settings is stored. Keep in mind that you will need to enter your password to boot into safe mode, though.
- Select Startup Settings in winRE.
- Press 4 or F4 to Enable Safe Mode and press Restart.
- Once you’ve booted, press Windows + E to launch File Explorer.
- Click on View and make sure to show hidden items.
- Navigate to:
C:\Windows\ServiceProfiles\LocalService\AppData\Local\Microsoft\NGC - Select the NGC folder and rename it to ngc.old or simply delete it.

- Restart your PC and boot normally. You should be able to log in without a PIN now.
System Restore
If you have a stable system restore point from before this problem started, you can use that to restore your system to the backup’s state. To do so:
- Select System Restore in winRE.
- Pick the appropriate System Restore point and click on Next.
- Follow the instructions on-screen to complete the process.
Startup Repair
As the name suggests, the Startup Repair tool is used to fix errors that occur at startup and can help fix the login error as well. To use it:
- Select Startup Repair in winRE.
- The tool will try to diagnose and correct any errors. Once that’s done, restart the PC if it doesn’t do so automatically.
Uninstall Update
If the PIN unavailable issue started after a Windows Update, uninstalling the latest update can fix it. To do so:
- Select Uninstall Update in winRE.
- Choose Uninstall Latest Feature Update and follow the instructions on the screen.
- Restart the PC and check if you can sign in.
- If you can’t, repeat the same steps but Uninstall Latest Quality Update this time. Quality updates are generally important security updates, so remember to reinstall them later via Windows Update.
Change Values in the Registry Editor
You can use the winRE registry editor to disable password-less (PIN) login. To do so:
- Access winRE using the same steps as the solution above.
- In the advanced options screen, open Command Prompt.
- Type regedit and press Enter to launch the Registry Editor.
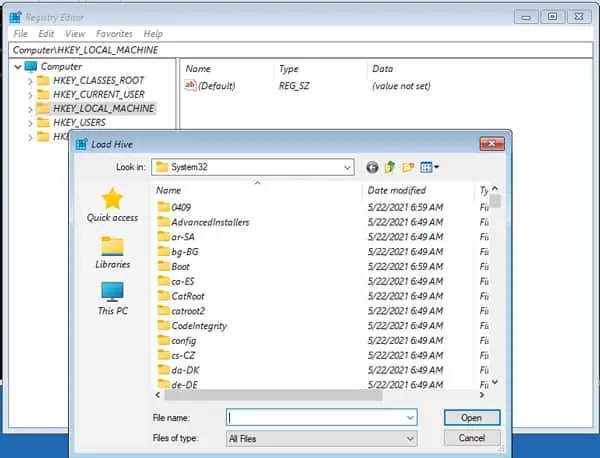
- Select HKEY_LOCAL_MACHINE and click File > Load Hive from the menu.

- The hive files will be in C:\Windows\System32\config
Note: Replace C: with whatever drive your OS is installed on. - Load the SOFTWARE hive. Name the file zsoftware. This will give you a new listing under HKLM.
Fix 1
- Navigate to:
HKEY_LOCAL_MACHINE\zsoftware\Microsoft\WindowsNT\CurrentVersion\PasswordLess\Device - Change the value of DevicePasswordLessBuildVersion from 2 to 0. This will turn off the Require Windows Hello for sign-in setting.
- Reboot your PC.
- You should be able to log in using your password now. If you receive an incorrect password despite using the correct one, check fix 2 below.
Fix 2
To validate your password online, you will need to enable network access and a few login services for Microsoft Accounts. Open winRE registry editor again but load the SYSTEM hive as zsystem this time.
- Navigate to:
HKEY_LOCAL_MACHINE\zsystem\ControlSet001\Services - Edit the value of Start key for each service listed below. The services are listed with their registry names and descriptions.

- Set the following services to Manual startup (Start = 3):
- lmhosts (TCP/IP NetBIOS Helper)
- Netman (Network Connections)
- VaultSvc (Credential Manager)
- Wecsvc (Windows Event Collector)
- WbioSrvc (Windows Biometric Serviced)
- wlidsvc (Microsoft Account Sign-in Assistant)
- Set the following services to Automatic startup (Start = 2):
- Dhcp (DHCP Client)
- EventLog (Windows Event Log)
- EventSystem (COM+ Event System)
- LanmanServer (Server)
- LanmanWorkstation (Workstation)
- NlaSvc (Network Location Awareness)
- nsi (Network Store Interface Service)
- SamSs (Security Accounts Manager)
- Restart your PC.
Reset Your PC
If nothing else helps, you can reset your PC as a last resort.
- Access winRE using the same steps as before.
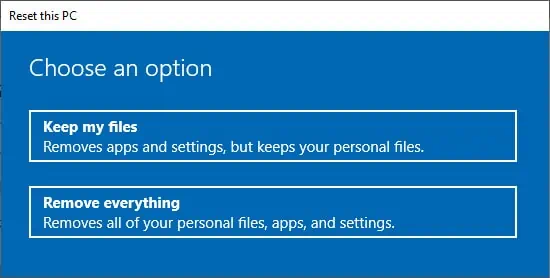
- In the advanced options screen, select Reset Your PC.

- Choose to keep your personal files.
- Follow the steps on-screen to complete the procedure.


