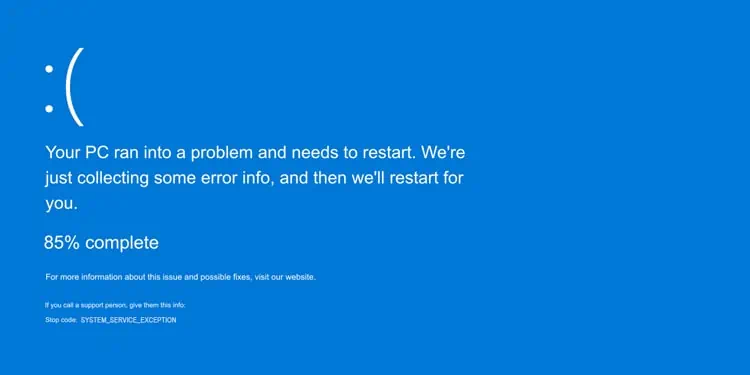
According to Microsoft, the System Service Exception stop code indicates that executing code had an exception, and the thread that was below it, is a system thread.
When the error affects the system services, Windows identifies this as a bug and displays the Blue Screen to prevent further damage. System services are responsible for controlling and managing the functionality of the Operating system and other applications. Any programs, drivers, or incompatible hardware can interfere with these services to cause the BSOD.
Once you identify the responsible processes, programs, or drivers, you can easily solve the error by repairing, stopping, or removing them. So, we have compiled a list of all the possible causes and their working fixes to solve this Blue screen error in your system.
What Causes System Service Exception BSOD
Here are the major issues that cause the system service to malfunction and display the Blue Screen of Death.
- Faulty or Outdated hardware drivers, especially GPU drivers
- Security services such as third-party antiviruses
- Error in web camera or its driver
- Improperly seated or damaged RAM
- Overclocking GPU or CPU
- Malware and faulty third-party programs
- Damaged Operating System
Most Frequent System Service Exception BSOD
BSOD is not uncommon in Windows, and we have been seeing the error from the time of Windows XP. The System_Service_Exception also appears time and again but because of different errors. Let’s go through the most frequent ones.
- 0x0000003b – Paged Pool or Memory Error
- Dxgkrnl.sys, Dxgmms2.sys – DirectX and Graphics Driver Error
- Win32kbase.sys, ks.sys – System Drivers Error
- Asmtxhci.sys – USB or Peripherals Controller Error
- Ntfs.sys – File System Driver Error
- Rtkvhd64.sys – Audio Controller Error
- Igdkmd64.sys – Intel Graphics Driver Error
- Nvlddmkm.sys – Nvidia Driver Error
- Registry.sys – Registry Error
- tm.sys – New hardware, software or peripheral error
How to Fix System_Service_Exception BSOD
It really helps our case if the BSOD displayed the error name alongside the stop code. But when a Blue screen shows up, our system restarts immediately after it collects the error info. Sometimes, there may not be sufficient time to note the name or even stop the code that caused the BSOD.
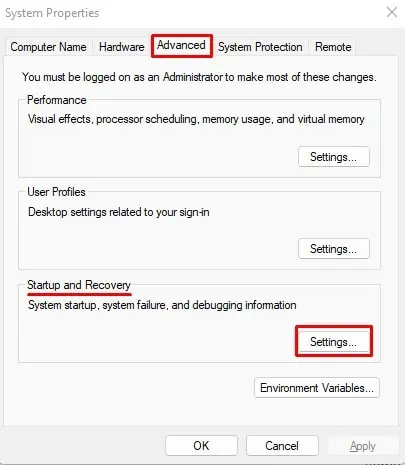
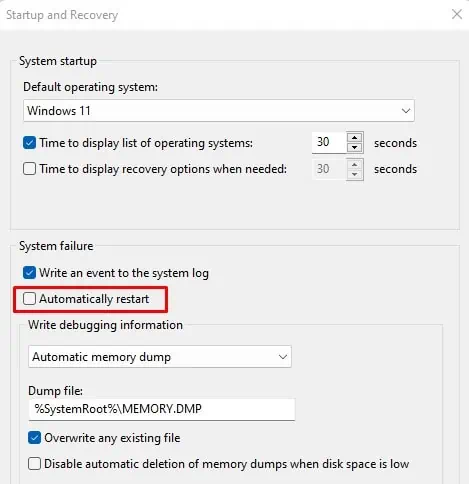
So, if your system restarts after the Blue screen, you should disable automatic restart to view the details next time.
- Press Windows + ‘R’ to open the Run dialog box.
- Type
systempropertiesadvancedto open the Advanced tab of System Properties. - Click on Settings under Startup and Recovery.

- Uncheck Automatically Restart and click OK.

Now that you have noted the error details, let’s move on to fixing the BSOD problem.
Open in Safe Mode
Safe mode opens your computer with minimal programs and drivers. So, if some third-party drivers are interfering with your system, then booting on the Safe mode will fix the BSOD.
Let’s see the way to do it.
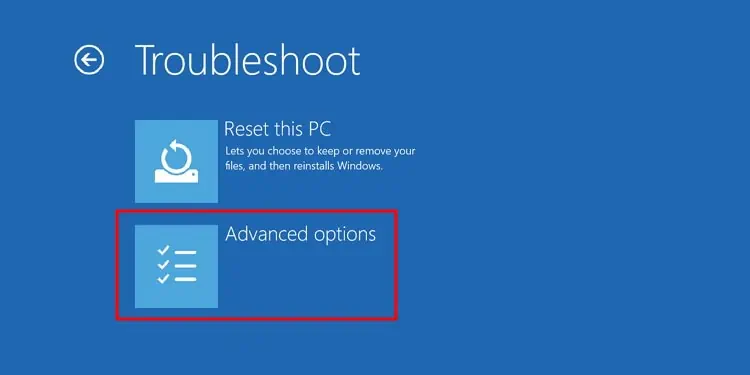
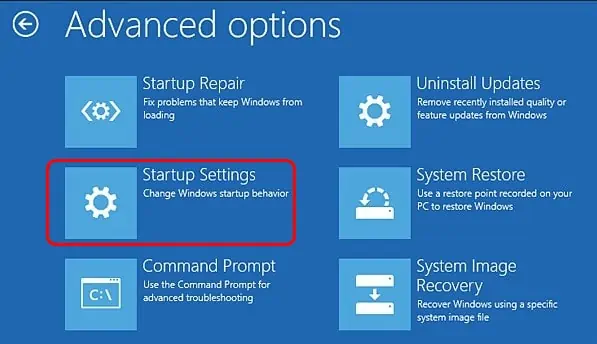
- Power off your System directly by pressing the power key. Do this three times to boot the system in the Recovery environment.
- Go to Troubleshoot.

- Select Startup Settings in the Advanced option.

- Click Restart.
- When the system reboots, press 4 or F4 to enter Safe mode.
Once you are in Safe mode, observe if the BSOD appears. If it does not show up, you can try removing the third-party programs and drivers that may have caused the error.
But if the Blue screen appears again in Safe mode, there may be OS or even hardware errors whose fixes are given below.
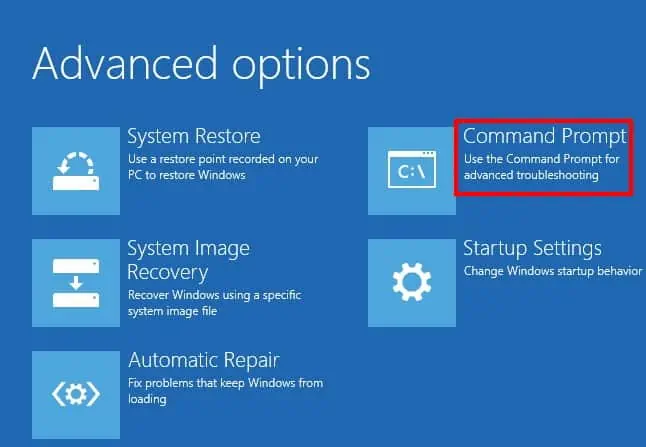
Similarly, if you are not able to access the Command prompt from the desktop, you can boot into recovery mode and navigate to Troubleshoot>Advanced options>Command Prompt.
Update or Reinstall Drivers
Most of the time, outdated or corrupted drivers are the main culprit for a BSOD, and updating them fixes it. The System_Service_Exception error mostly occurs due to the graphics card driver, USB driver, network driver, and audio driver.
You can fix this error by updating the drivers or reinstalling them. We have provided two different methods here.
Using Device Manager
If the file driver-related error names mentioned above appear on your Blue screen, look at the cause and update that particular driver. Let’s see how you can do it.
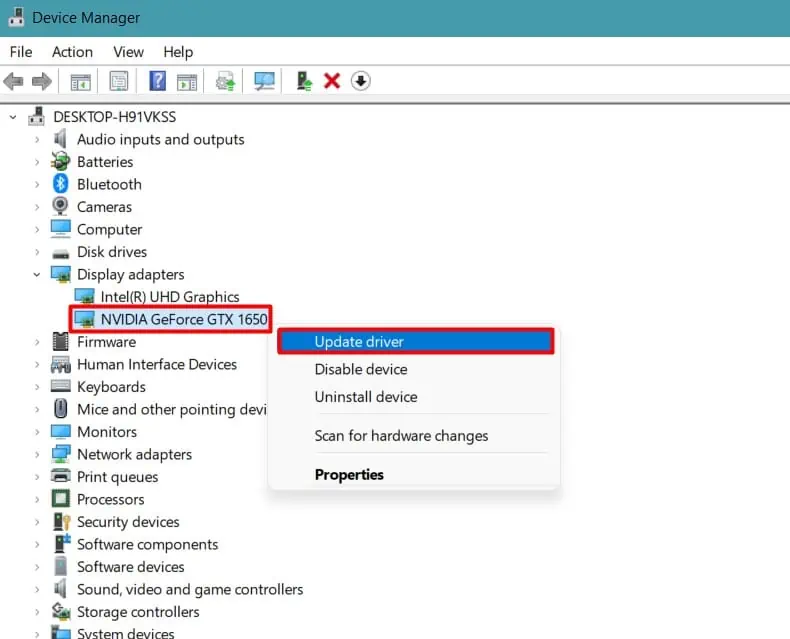
- Press Windows + ‘R’ and type
devmgmt.mscto open Device Manager. - Double-click on the particular device to expand the options.
- Right-click on the device and click Update Driver.

- Choose Search Automatically for the drivers and follow the instructions.
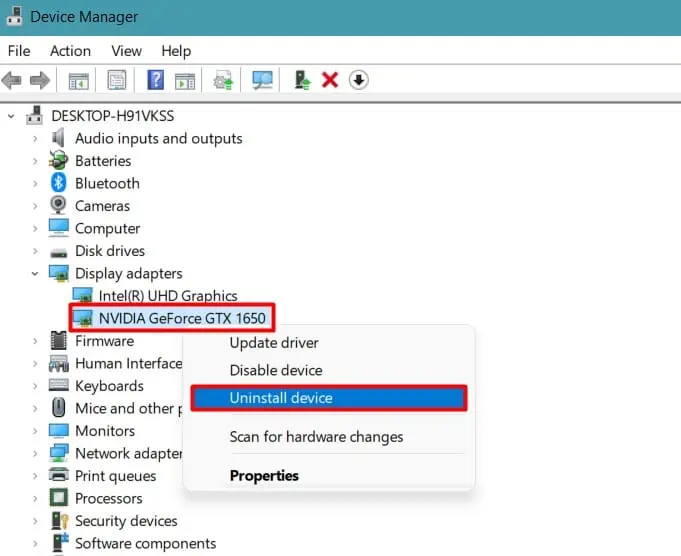
You can also uninstall the drivers if updating does not work.
- Right-click on the device and click Uninstall Driver. If it is a third-party driver and you do not need it, you can simply keep it uninstalled.

- If the driver is necessary, go to the manufacturer’s website and download the latest version compatible with your system.
- Install the driver by following the instructions accordingly.
Using Windows Update
If no particular error name shows up, you can update all the drivers manually or through Windows update.
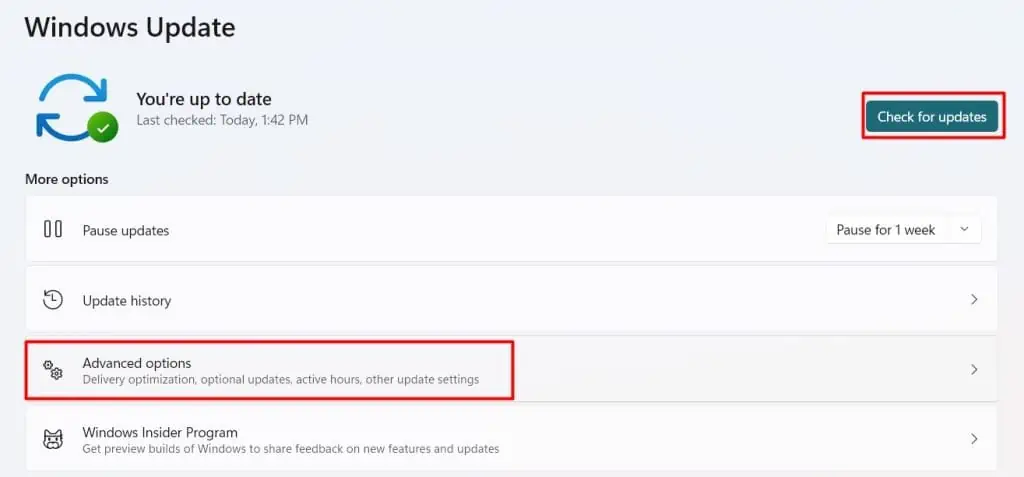
- Press Windows + ‘I’ to open Settings.
- Go to Windows Update and click Check for updates.
- If new updates are available, click Download and Install.
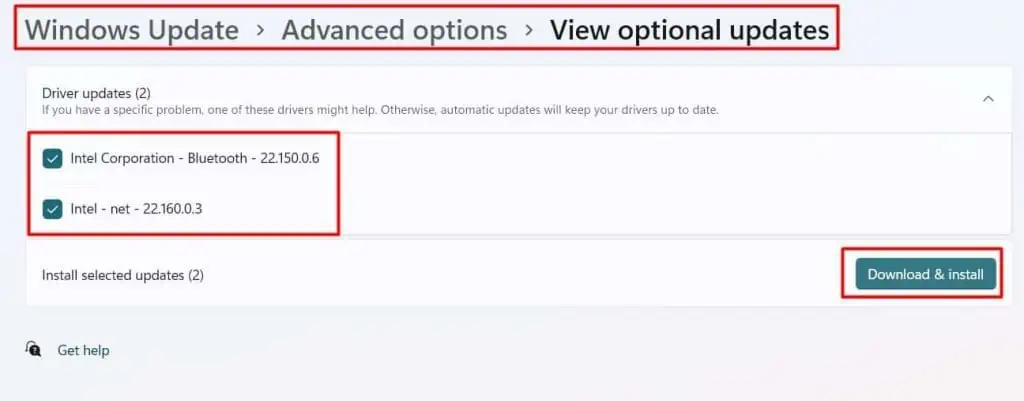
- Also, find Advanced Options.

- Go to Optional Updates and install all the updates from the list.

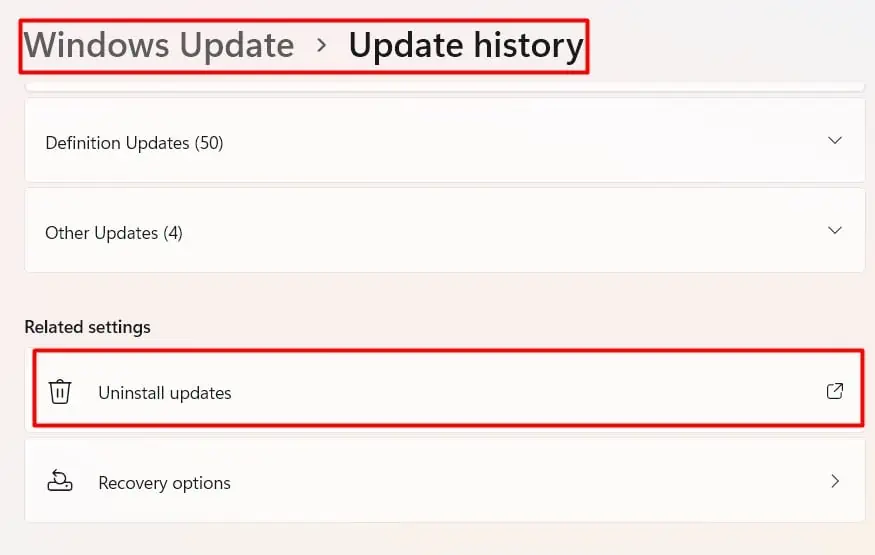
Sometimes, the Blue screen appears after installing new updates. In such a case, you can uninstall the updates to fix the issue.
- On the Windows update page, go to Update History.

- Click on Uninstall Updates.

- Select the new update or the particular one and click Uninstall.

Run DirectX Diagnostic Tool
The Blue screen with the error name dgxmms2.sys is mostly due to the graphics driver or the DirectX service. If you have already updated the graphics driver, you can re-install or update DirectX on your system.
Let’s see the way to check any DirectX-related errors and rectify them.
- Press Windows + ‘R’ and type
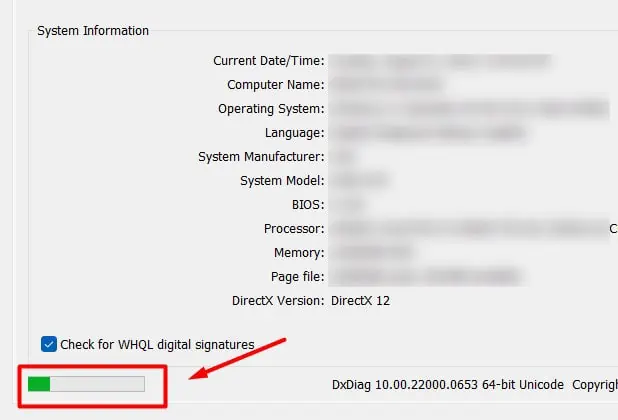
dxdiagto open DirectX Diagnostic Tool. - The diagnostic process will start automatically. Let the process finish.

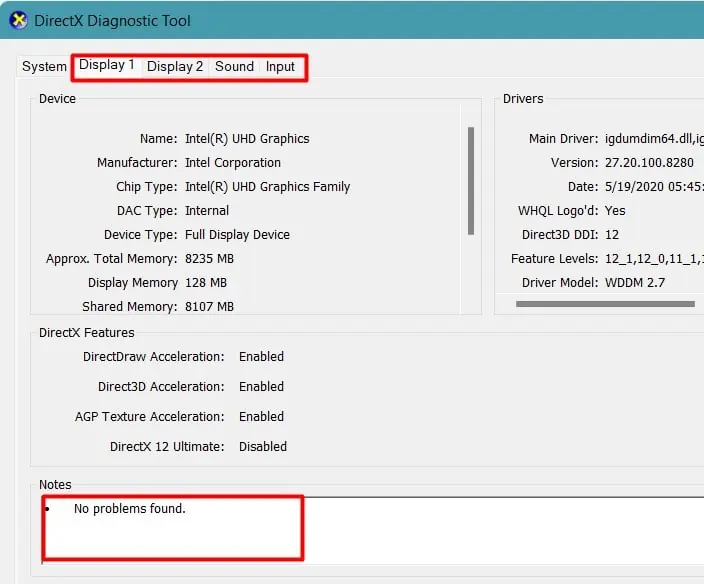
- Click Next to go to the Display menu and look at the Notes section. It will display the errors if any.

- Check if there are any errors in Audio and other sections by clicking Next.
- Go to the Microsoft website and download the DirectX End-User Runtime Installer.
- Open the program and install it by following the instruction.
This installer will replace all the necessary files for DirectX up to version 11 but not for 12. The DirectX 12 is directly integrated into the Windows OS and updating the drivers and performing windows updates will automatically install it.
Remove Third-Party Antiviruses and Software
Antiviruses run their own system services silently in the background to provide security and protection. If these services suffer from some issues, then you will see the System_Service_Exception BSOD.
For instance, if you will see AvgStm.sys error name in the said BSOD, then your AVG antivirus is the culprit. Farflt.sys, avipbb.sys, etc., are a few more such errors.
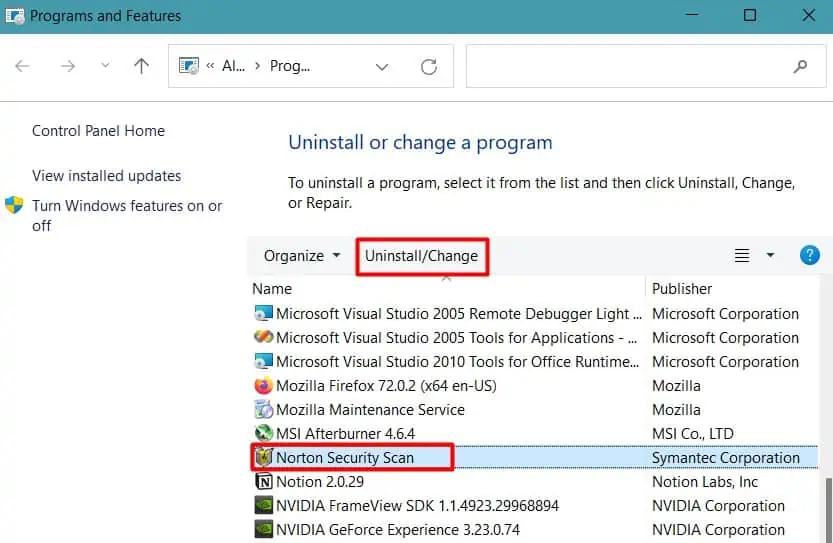
You should uninstall them to solve the problem.
- Press Windows + ‘R’ and type
appwiz.cplto open Add or Remove Programs. - Select the antivirus and click Uninstall.

- Select the option to delete all the settings and cache while uninstalling.
When you see System_Service_Exception (tm.sys) error, this generally occurs due to any changes in hardware or software. So, you can remove that hardware, its drivers, or any software if newly installed. See if the problem resolves now.
Perform Virus Scan
Malware is one of the frequent causes of malfunctioning the system processes, services, programs, and even hardware. So, it is probable that malware may have damaged some system services, causing the BSOD in your system.
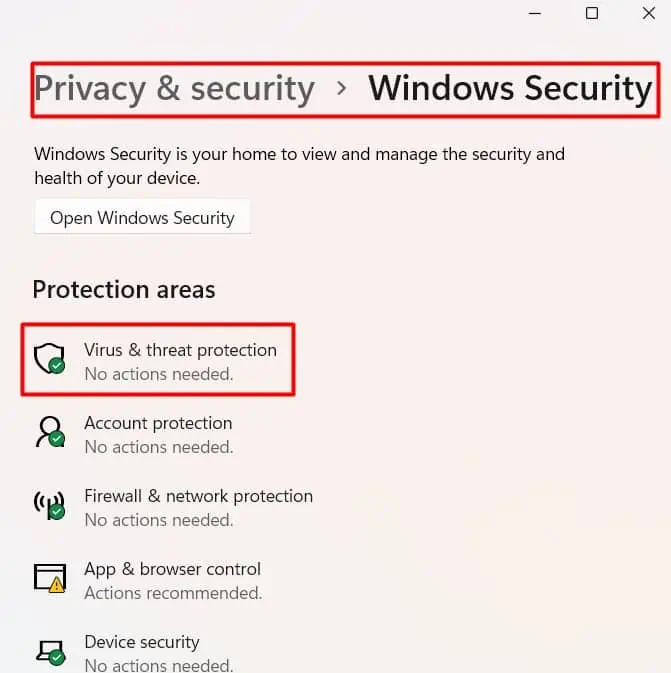
You should perform a full virus scan on your PC using the built-in Windows Defender tool.
- Enter
ms-settings:windowsdefenderin the Run dialog box after pressing Windows + ‘R’. - Click on Virus and Threat Protection.

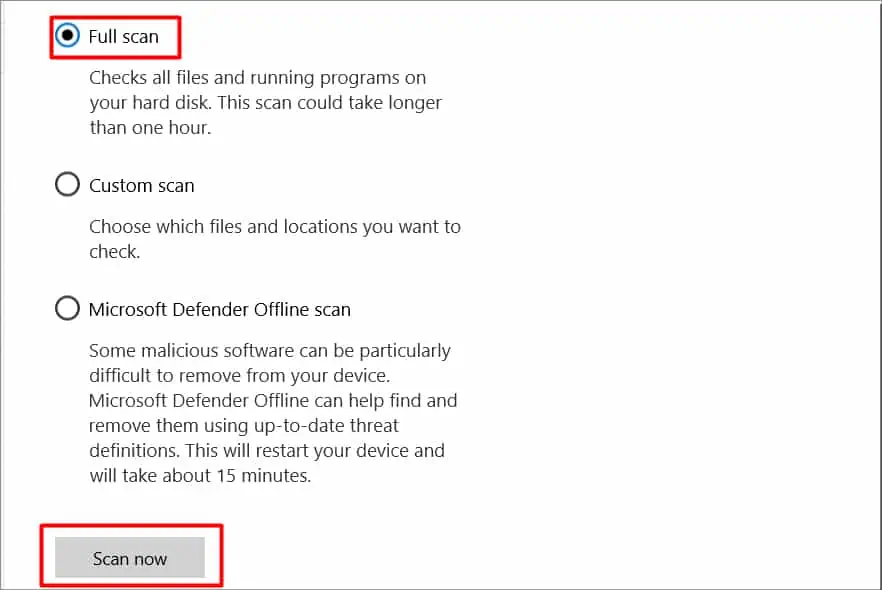
- Go to Scan options and select Full scan.
- Click Scan now to scan your PC of viruses and malware.

See if the Blue screen still appears.
Disable External Hardware
When you see a ks.sys error name alongside the BSOD, it is usually due to external hardware and its drivers. Most of the users have found the issue fixed after they have disabled the webcam.
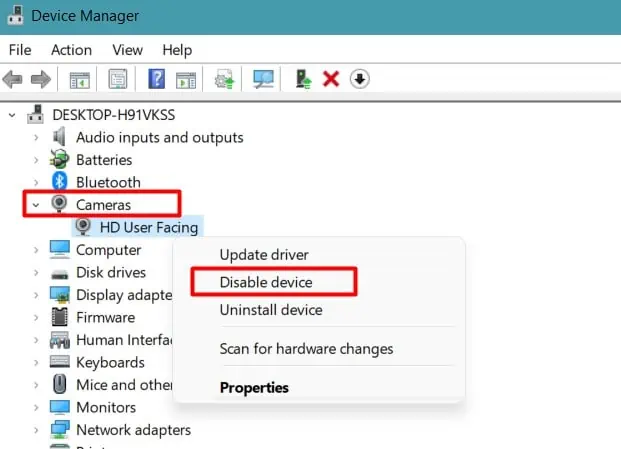
You can either remove the hardware or disable it through Device Manager.
- Press Windows + ‘R’ and enter
devmgmt.mscto open Device Manager. - Find the device. For instance, you will find the Web camera under Camera, Imaging Devices or Sound, video, and game controllers.
- Right-click on the device and select Disable device.

Run the system for a while to see if the Blue screen appears again.
Disable CPU and GPU Overclock
If you are a heavy PC user or an explorer of computer technology, you may have overclocked your system. Overclocking your CPU and GPU exerts an additional load on the system. Over time, it overheats the system as well as interferes with drivers, programs, and their proper functioning.
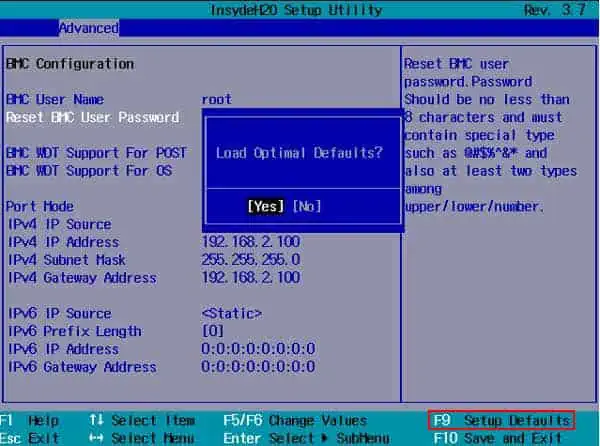
You should revert the settings back to default and disable overclocking to fix the BSOD error. You can do this either by resetting your BIOS or by removing the software used for overclocking.
- Restart your system and press the respective key repeatedly to go into the BIOS page. Most of the systems have F2, F12, Delete, or ESC keys assigned for the purpose.
- Press F9 or the associated key to load default settings.

- Save the settings using F10 and restart your system.
- If you overclocked using software such as MSI Afterburner, follow the instructions in the earlier section to uninstall them.
Examine whether the error has gone away.
Turn off Scalable Link Interface (SLI) and NVIDIA Surround
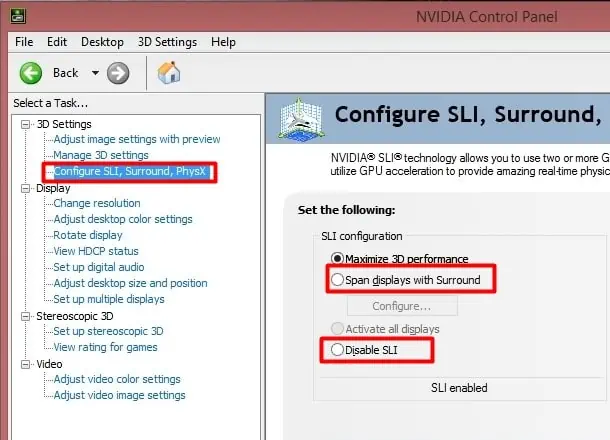
If you have multiple NVIDIA GPUs, you must have enabled SLI to integrate all of their capacity. Similarly, you may have used NVIDIA Surround to use multiple displays. But, if there occurs any issue in their system services, you will see the System_Service_Exception BSOD.
Normally this error should be fixed if you update your NVIDIA drivers to the latest version. But when you are not able to update the drivers, you can disable these services to solve the Blue screen error.
- Right-click on your desktop and select Nvidia Control Panel. You may have to click Show More Options in Windows 11.
- Expand the 3D Settings option and click on Configure SLI, Surround, PhysX.
- Click Disable SLI and uncheck the Span displays with Surround option.

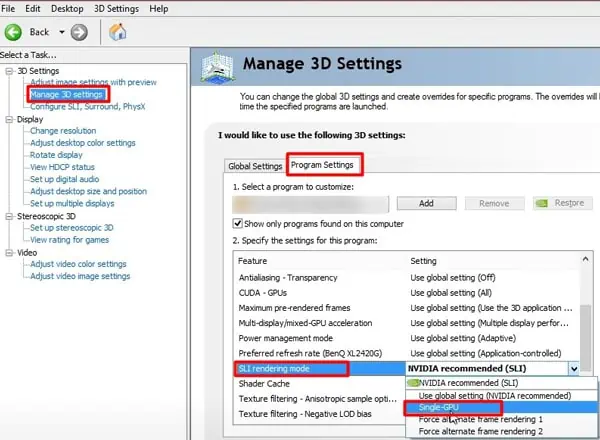
- If you do not find the Configure SLI menu, you can go to Manage 3D Settings and set SLI Rendering Mode to Single GPU.

See if this solves the problem.
Disable Hardware Acceleration
Hardware Acceleration improves the performance of the CPU by using other system resources such as GPU. But if the Hardware acceleration feature has some error, then it may cause the dxgmms2.sys BSOD error.
So, disabling it may fix the issue.
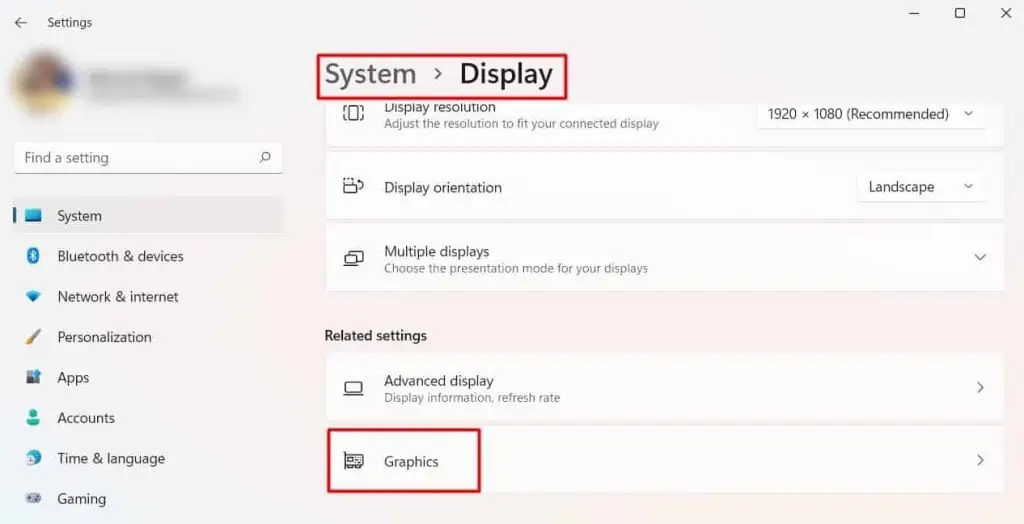
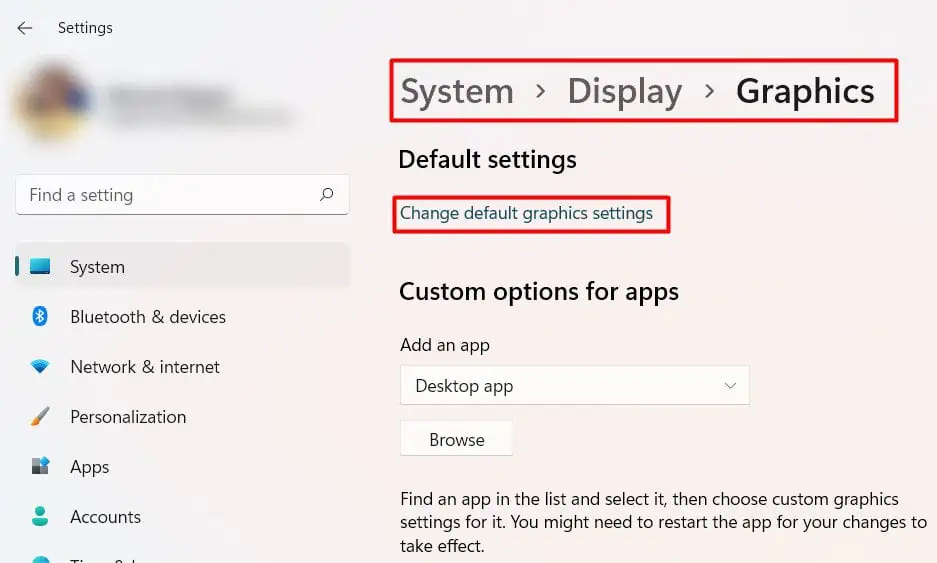
- Press Windows + ‘I’ to open Settings.
- Go to Display and find Graphics Settings.

- Click on Change default graphics settings.

- Toggle the bar under Hardware-accelerated GPU Scheduling to Off.

You should find the Blue screen problem fixed.
Repair Corrupt System Files
The system services that regulate your PC’s operation may malfunction if the system files get corrupted by any means.
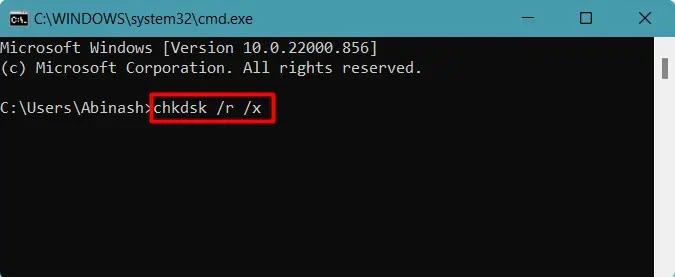
You should run system scans to look for such damages and repair them. Let’s see the way to perform the SFC scan, DISM scan, and CHKDSK scan to fix the file and disk errors.
- Press Windows + ‘R’ to open the Run dialog box.
- Type
cmdand press Ctrl + Shift + Enter to open the Command prompt with administrative privilege. - Run
DISM online /cleanup-image /restorehealthcommand to start DISM scan. It will fix the DLL cache files by downloading healthy ones from Windows update.
- Run
sfc /scannowcommand to perform the SFC scan that uses the healthy DLL files to replace the corrupted ones.
- Restart your system.
- Furthermore, run
chkdsk /r /xto perform a CHKDSK scan for fixing any disk errors.
Restart your system to see if the Blue screen still persists.
Check and Reseat RAM
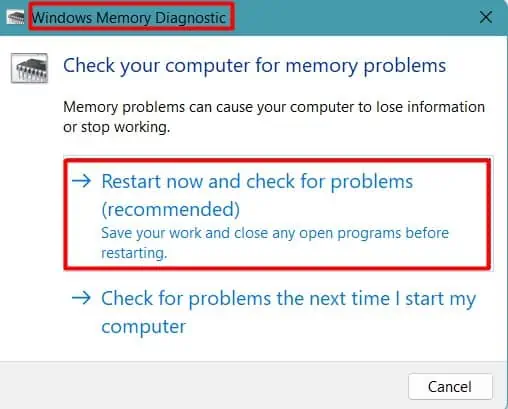
The most common 0x0000003b System_Service_Exception BSOD occurs usually by an error in the system’s memory. So, you should check if the RAM has some faults using Windows Diagnostic tool.
- Press Windows + ‘R’ and enter
mdschedto open Windows Memory Diagnostic. - Click Restart now and check for problems. Your system will restart and look for errors.

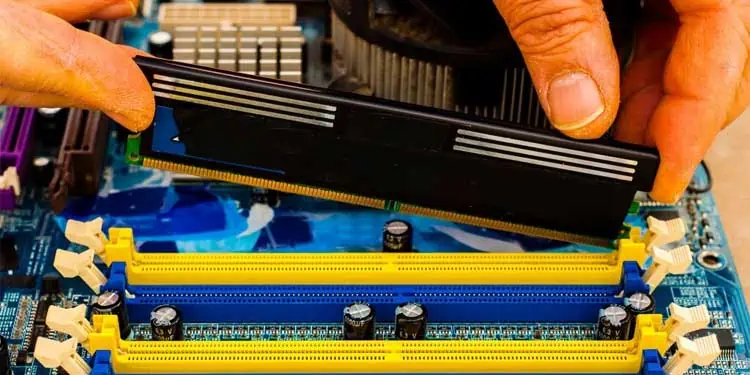
- If it shows any error, disassemble your system and get to the RAM.
- Press the lock to remove the RAMs.

- Clean the system properly to free it from dust and dirt.
- Check each RAM by using one at a time-varying the slots if you have more than one RAM stick. You can also try a spare RAM to see if the Blue screen appears while using that as well.
- Reseat the functioning RAM properly.
Check if the BSOD still occurs.
Perform System Restore
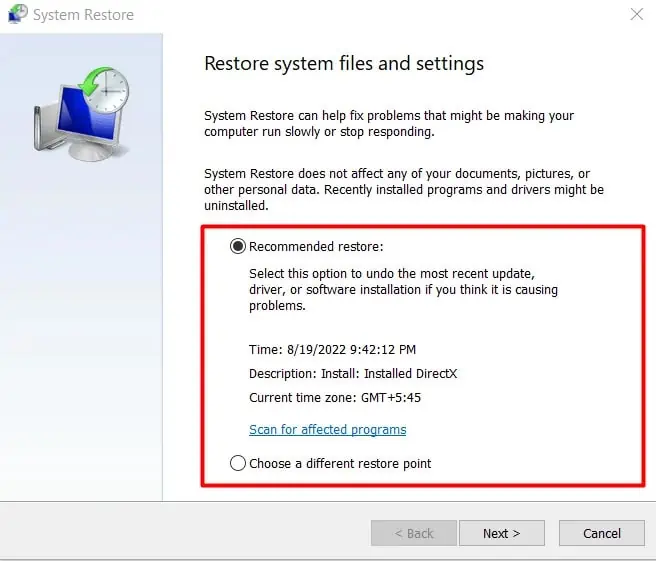
Sometimes we may not find the actual programs or drivers that are causing the issue. In such a case, you can take your system back to its healthy point by using System Restore. Your PC creates healthy restore points every week or before any drivers or updates are installed.
Let’s see how you can restore your system.
- Press Windows + ‘R’ and type
rstrui.exein the Run dialog box. - Use either Recommended restore or a different restore point.

- Follow the instructions and click Finish.
See whether the problem is still there or solved.
Reset or Reinstall Windows
It is the last resort when your system displays BSOD without any hardware faults.
Most of the time, resetting your Windows fixes the problem. Let’s see how you can do it.
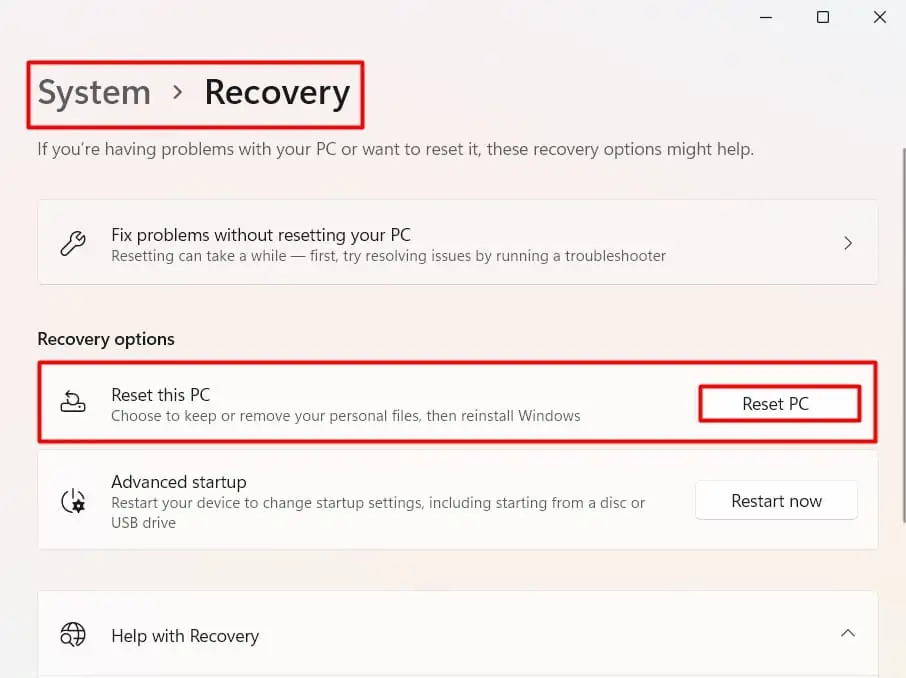
- Press Windows + ‘I’ to open Settings.
- Find Recovery and click on Reset PC.

- Choose either Keep my Files or Remove Everything.
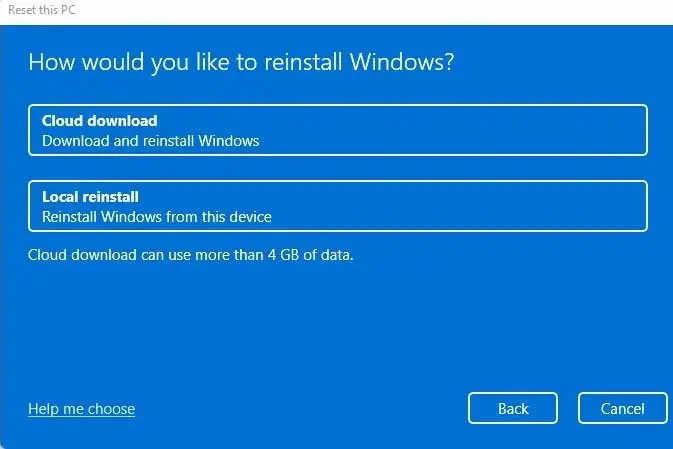
- We recommend conducting a Cloud Reinstall if you have an internet connection. This will download a healthy Windows file from Microsoft instead of using the image file made from your PC.

- Follow the instructions to complete the process.
But if the issue is more severe, then you will have to reinstall a fresh OS on your PC.
Advanced Fixes
Generally, reinstalling and updating the drivers fix most of the System_Service_Exception BSOD in your system. However, the Blue screen sometimes may not always show the exact cause for the issue.
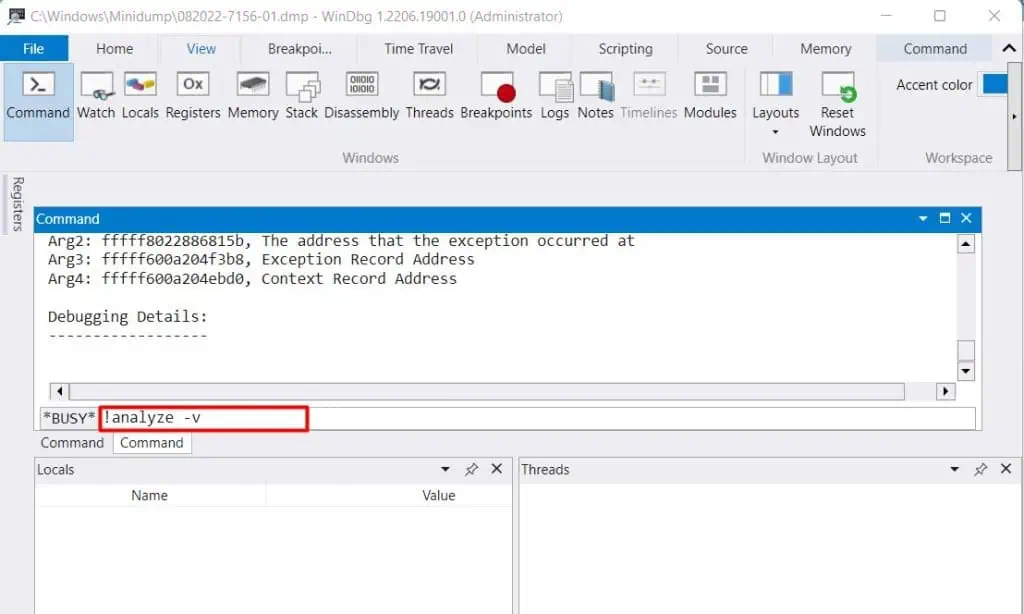
In such cases, you can look into the dump files to find the culprit. Whenever a system crashes with a Blue screen, it takes some time to collect the error details and store them in dump files. But, you will need a special tool called WinDbg and type a few commands to view the files.
Let’s see a way you can view the dump files.
- Download WinDbg application from the Microsoft store in your system and install it.
- Enter WinDbg in the Windows search bar and right-click on WinDbg Preview. Select Run as Administrator.
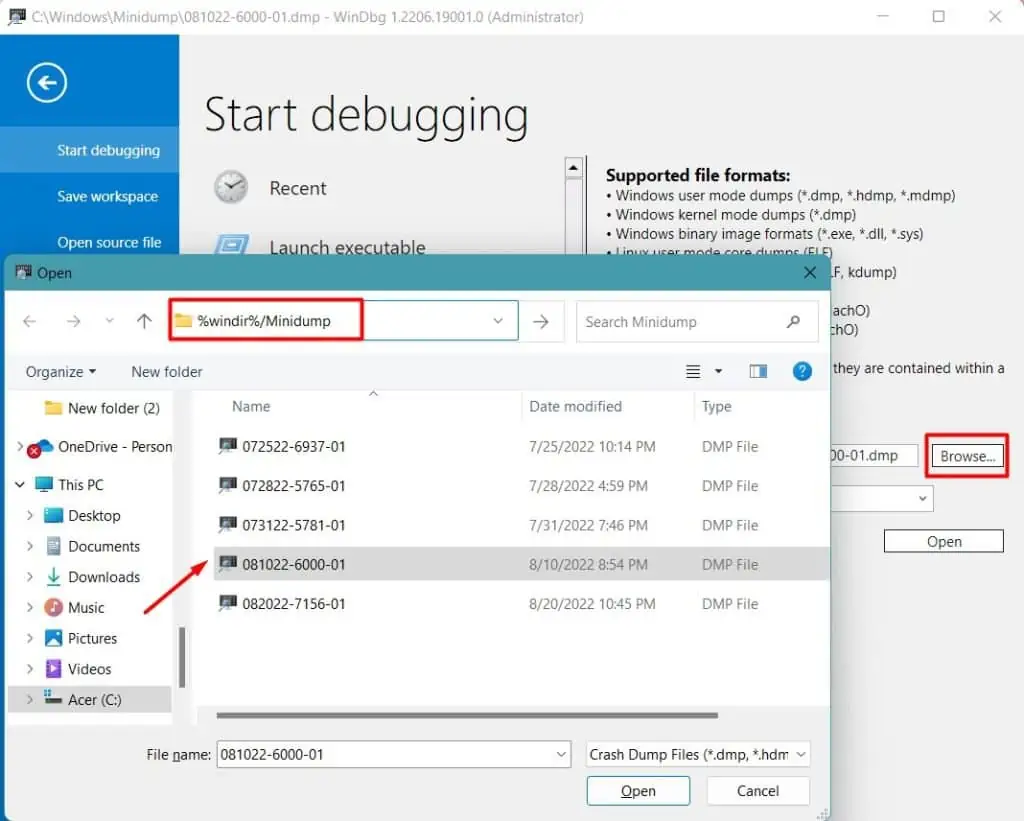
- Press Ctrl + ‘D’ and enter the
%windir%\Minidumpcommand in the address bar to get into the Minidump folder.
- Select the recent dump file. The program will take a few minutes to load the file.
- Type the command
!analyze -vin the command terminal at the bottom. If you do not see the terminal, go to the View menu and click Command.
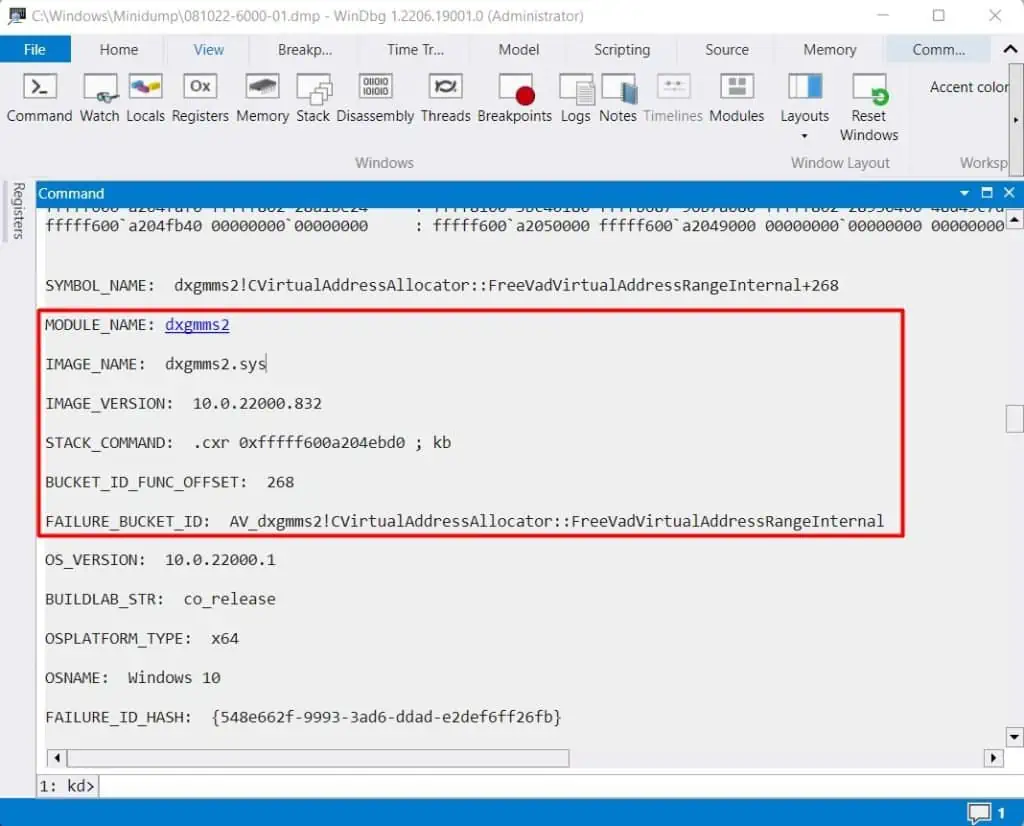
- After the analysis is complete, search Module Name and look at the details to find the cause. You can search for the details on the internet if it does not provide a clear picture.

Remove the program or stop the services that are shown to be the issue. You can also run Driver Verifier and look at the dump files to find the faulty drivers.

