All devices including computers contain a unique identification number that helps the manufacturer track the ownership and warranty information of the device. While most technology companies use the term, Serial Number, to refer to this identification, companies like Dell, HP, and so on call it a Service Tag.
Mac computers show the serial number directly on the Mac information window, About this Mac. But devices that use the term, service tag, target Windows and Linux as the main operating systems.
In such systems, you will need to use the BIOS/UEFI settings or a Command-line Interface to get this information. Some devices will also have a few other ways to locate the serial number.
From the Packaging or Stickers
The quickest way to locate the system service tag is by checking the packaging for the motherboard or the laptop. They usually contain stickers with barcodes that show the service tag or the serial number. You may also find the service tag on the device’s warranty form.

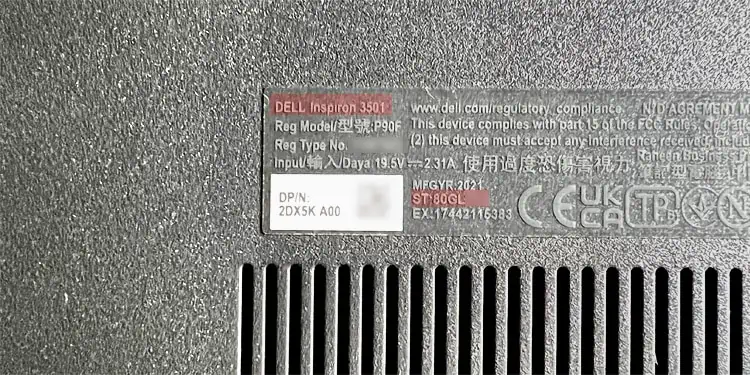
Most laptops also come with stickers on the bottom panel where you can find this information. You will usually find them near the model name and next to the Service tag, ST, S/N, Serial, and so on.
Using Command-line Interface
Another method to check the serial number or service tag is through the built-in Command-line Interfaces like Command Prompt and PowerShell.
You need to use a Windows Management Interface (WMI) class command WMIC on Command Prompt to get the service tag. The WMI is an interface that you can use to access various hardware and software data on Windows.
- Open Run by pressing Windows + R.
- Type
cmdand press Enter to open Command Prompt. - Type
wmic bios get serialnumberand press Enter.
You can also use a Common Information Model (CIM) class cmdlet, Get-CimInstance, on PowerShell to get the same information. The CIM classes are actually the parent classes for the WMI classes, so they will help give the same information.
Get-WMIObject cmdlet with the same attributes to get the same result. But this cmdlet is becoming deprecated, so it may not be available in the future.- Open Run.
- Type
powershelland press Enter to open Windows PowerShell. - Type
Get-CimInstance -ClassName Win32_BIOS | Format-List SerialNumberand press Enter.
If you have a Linux OS, you can use the command sudo dmidecode -s system-serial-number on the Terminal to get the service tag number.
Through BIOS or UEFI Settings
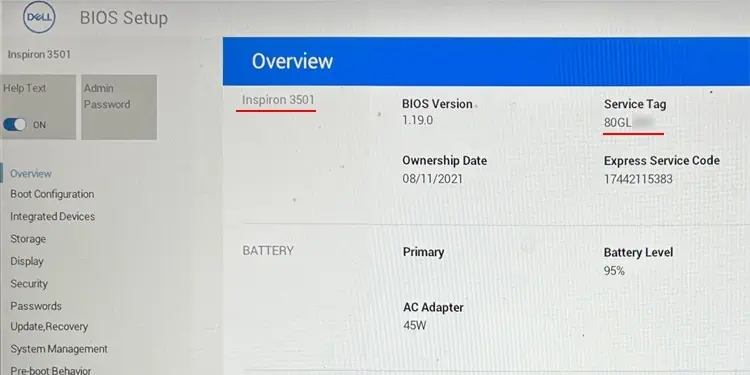
You can also find out the serial number or the service tag on the BIOS Setup Utility or the UEFI Firmware Settings. This interface lists out some important details of your motherboard or system board, which also includes the system service tag.
- Power up or restart your computer. As soon as you see the manufacturer’s logo, keep pressing the BIOS key repeatedly to get to the BIOS or UEFI settings. You can also use the steps below to access the UEFI Firmware settings:
- Click on the power button on the login screen or the Start menu.
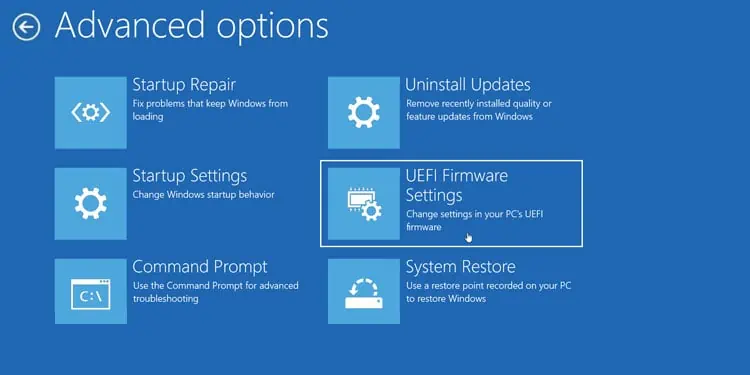
- Press and hold Shift and then click on the Restart button. Click Restart anyway if necessary. It will lead you to Advanced Startup options.
- Here, select Troubleshoot > Advanced options > UEFI Firmware Settings > Restart.

- You can find the serial number inside the Main, System, System Information, Overview, or a similar tab.

Using Official Support Apps or Websites
Most motherboard or laptop manufacturers also provide dedicated support applications that help diagnose issues or update the device drivers. Such applications also usually show your device’s information, including the serial number.
Even if such applications are not available, you will usually be able to check out the serial number through the official online support website. They will provide services or certain mini-apps that help the browsers automatically detect your device and list out all of its necessary information.
Both of these processes depend on the individual device’s manufacturer. So, you will have to check out official sources if you need any help.


