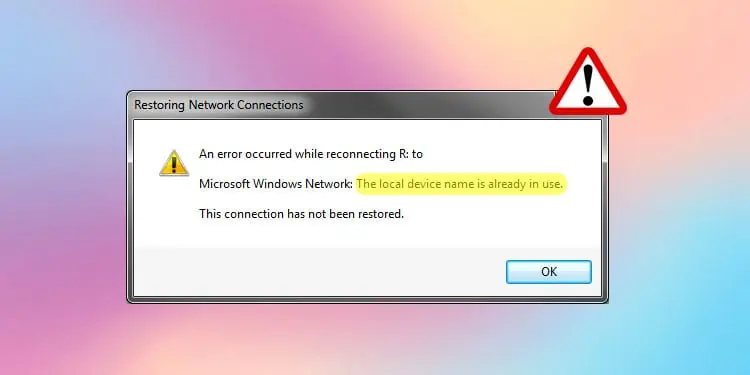
Your colleague captured the company’s event photos last night and shared them on the network drive. You went to access it, but sadly, you encountered The Local Device Name Is Already In Use error!
This error pops up in two scenarios:
- You tried to share something in the network.
- You tried accessing something that was shared in the network.
Anything can go wrong and cause the issue. A major reason you might face this issue is the improper drive mapping and assignment of drive letters.
In this article, I will guide you through a list of causes and fixes that you can apply to solve the error mentioned.
What Causes This Error?
Before moving on to the fixes, I would like to point out some causes of this error.
- Turned off Network Discovery
- Disabled file sharing
- Insufficient storage on the server
- Incorrect drive mapping
- Improper assignment of drive letters
- Crashed services
Fixes : “The Local Device Name Is Already In Use”
File and printer sharing over networked computers have their own perks. However, not to mention, it does not work as per your expectations every time. You may face The Local Device Name Is Already In Use error and get perplexed about what to do next. Don’t worry! Solving this error is not that tedious and time-consuming.
I have compiled a list of eleven fixes here to sort out this error. Let’s dive straight into them.
Change the Advanced Sharing Settings
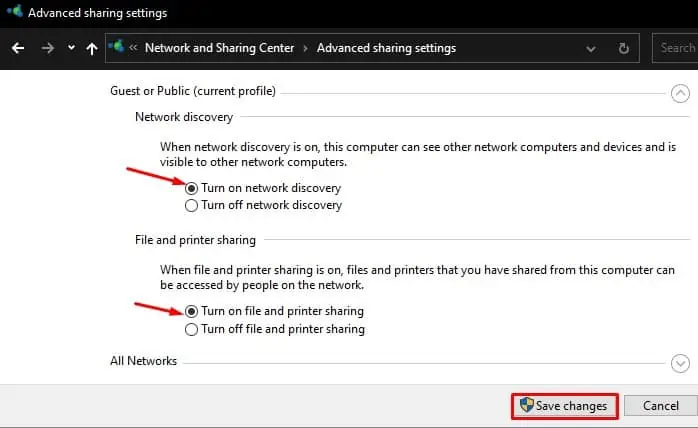
The first thing you must do to avoid the error is to turn on the network discovery. If network discovery is turned off, your device is not visible on the network. You should also turn on file and printer sharing so that you can access shared files and folders over the network.
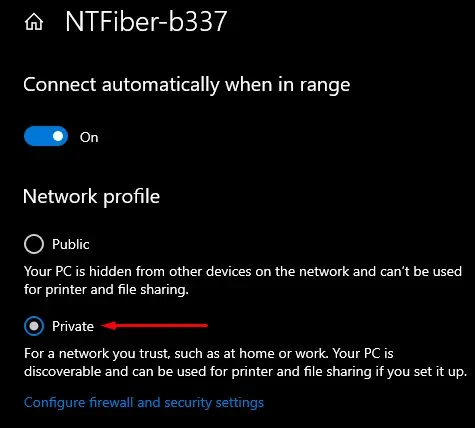
But make sure that you turn on this feature only on private networks. Else you are vulnerable to the attacks.
Follow the steps listed below:
- Hit
Windows + Rkey to open the Run dialog box. - Type
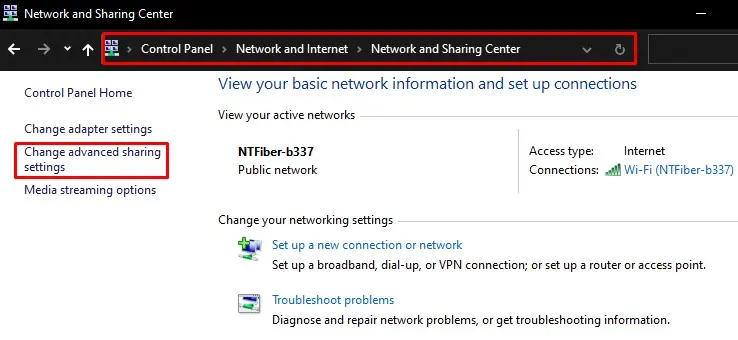
controlin the text field and press Enter to open the Control Panel. - Navigate to Network and Internet > Network and Sharing Center.
- Select Change advanced sharing settings from the left section.

- Check the Turn on network discovery, and Turn on file and printer sharing options and save changes.

- Next, press the
Windows+Ikey to open Settings - Click the Network & Internet tab.
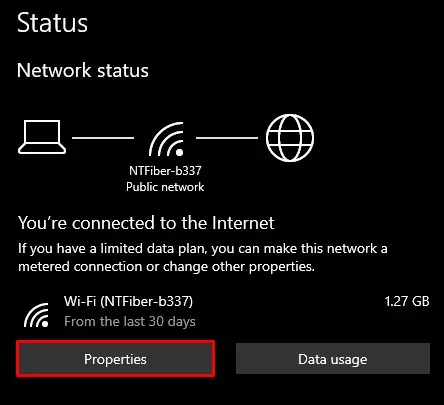
- You will see your active connection in the Status window. Click the Properties button.

- Set the Network profile to Private.

Allow File and Printer Sharing in Firewall
A Firewall is an in-built security mechanism in Windows that sets policies for users over the Internet. It filters your Internet traffic and protects you from any kind of harm. By default, it is disabled by the firewall. This may be causing the error. Try enabling it from the firewall to see if it solves the problem.
Follow these steps:
- Open Control Panel
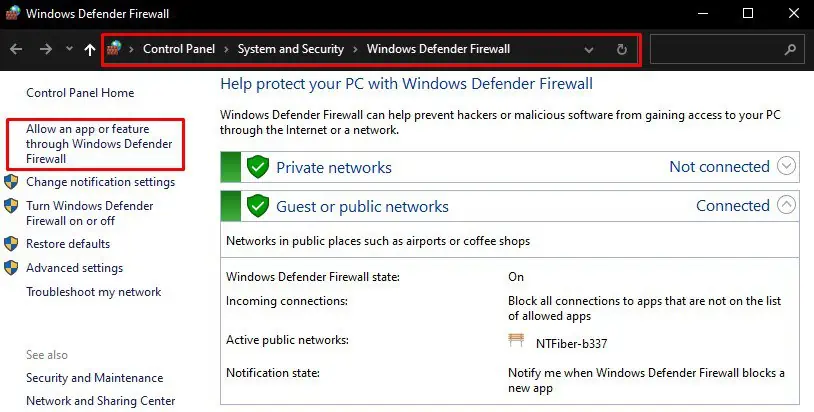
- Navigate through System and Security > Windows Defender Firewall
- Click on Allow an app or feature through Windows Defender Firewall option in the left pane.

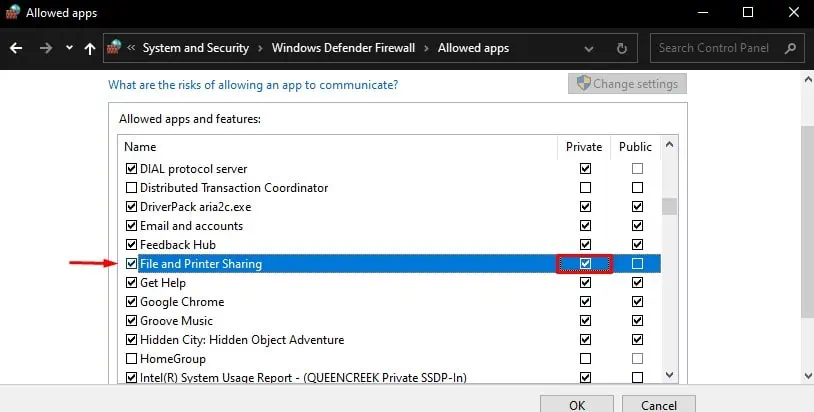
- Click on the Change settings button.
- Search for File and Printer Sharing option and check the box under Private.

- Click OK and save the changes.
Replace Hostname With Its IP Address
Whenever you try to connect to the host computer, your device retrieves the host’s IP address using the Name resolution process. But sometimes, when it fails or crashes, your device cannot connect using the hostname. Therefore you need to replace hostname with the IP address and check if it solves the error.
Follow these steps:
- Press the
Windows+Skey to open the Windows search box and typecmd. - Right-click over the Command prompt and run it as administrator.
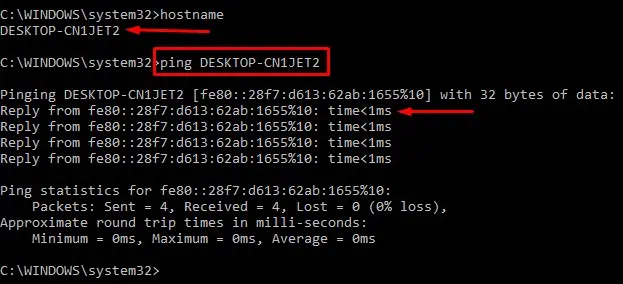
- Type
ping hostnamein the command window. Replace hostname with your host computer’s name. It will show you the IP address of your host computer. If you want to know the hostname, typehostnamein the command window and press Enter.
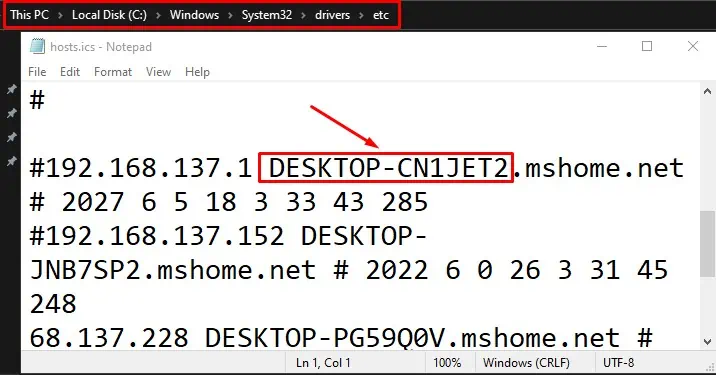
- Then, navigate to the folder
C:\Windows\System32\drivers\etc - Find the hosts file in the folder and open it with notepad.
- Replace the hostname with the host’s IP address that you got in step 3 and save changes.

Restart your PC to see if the error is resolved.
Restart the Workstation Service
Windows makes use of a protocol called SMB (Server Message Block) to allow file sharing over the network. But when the workstation service in your PC is disabled or not running, SMB cannot function, and you can not have access to network shares. You need to restart the workstation service and see if the problem is solved.
Follow these steps to restart the workstation service:
- Run Command prompt as an administrator.
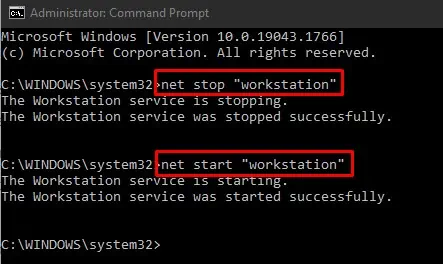
- Type the commands below. Consider pressing the Enter key after each command:
net stop "workstation"net start "workstation
- Exit the command prompt.
Try to access the network resource you were trying to and see if the issue persists.
Restart the Remote Desktop Services
Remote desktop services allow a user to remotely connect to a virtual desktop and access files and applications from the host. When this service crashes, you are restricted from accessing the host computer. You can see the error if it’s the case. So follow these steps to restart the remote desktop services:
- Hit the
Windows + Rkey at once to open the Run dialog box. - Type
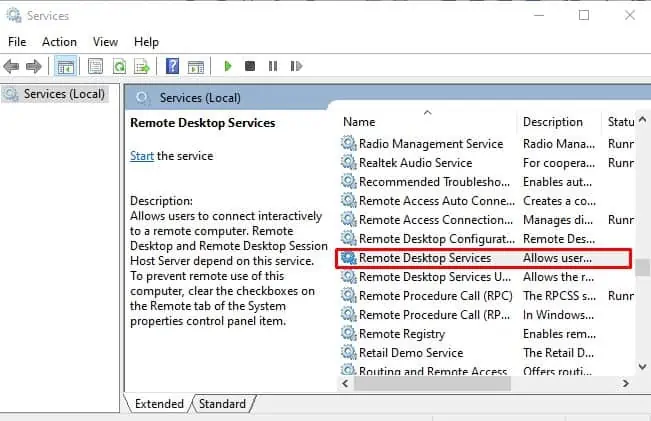
services.mscin the search box and hit Enter to open the Services application. - Find Remote Desktop Services from the list of services.

- Right-click over it and select the Restart option. OR Double-click it, Click Stop, and then Start button.
- Exit from the Services application and see if the error is solved.
Turn Off Your VPN
If you want to stay anonymous and surf the Internet, VPN is for you. Your identity is not disclosed to others when you use VPN. However, when you are on the networked connection, VPN may prevent you from accessing the network drive. You may face the titled error when you have an active VPN connection. Consider turning off the VPN and checking if it solves the error.
To turn off or remove a VPN connection, follow these steps:
- Press
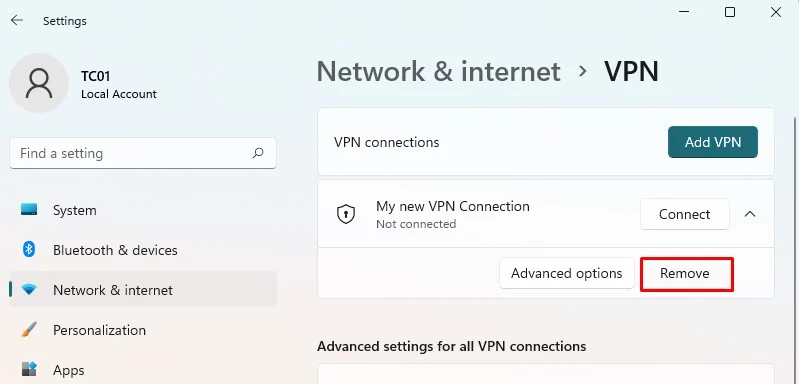
Windows+Ikey to open Settings and click the Network and Internet tab. - Under the VPN menu, click the Disconnect button next to the VPN profile.
- To remove the VPN profile, click the Remove button.

If you are using third-party VPN applications, the process of turning it off can be different. Refer to their user manual.
Check the Drive Mapping
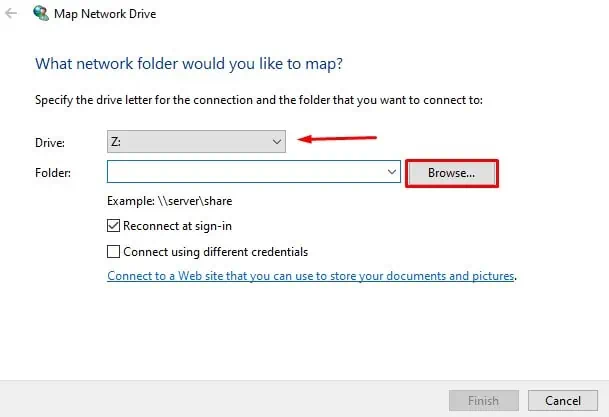
Mapping simply means you are giving access to your local drive to the computers in the network. After mapping, you can access the drive of other user’s as if it is yours. Misconfiguration in the drive mapping may sometimes lead to the error. You should remap the drive and see if it solves the problem. Follow these steps:
- Press the
Windows + Ekey to open File Explorer. - Click This PC from the left section.
- In This PC window, click the Computer button in the top left corner.
- Click on the Map network drive button.
- A new Map Network Drive window will open. Here you need to assign a drive letter and browse the folder you want to connect to.

- Click the Finish button.
Reinitialize Your Web Browser
It is also found that your web browser is sometimes responsible for causing the error. Reinitialize the browser and see if it solves the issue. Follow these steps:
- Open Command prompt with administrator privileges.
- Type these commands in the command window. Press the Enter key after each command.
net stop “Computer Browser”net start “Computer Browser”
- Exit Command prompt.
If your browser was interfering with the network settings and causing the issue, it should be resolved now.
Assign Proper Drive Letters to the Drive
Each drive in Windows is assigned a letter to uniquely identify them and avoid any conflicts. When you have a drive with unassigned letters or probably duplicate drive letters, it can cause an issue while accessing the network-mapped drive.
Follow these steps to properly assign the drive letters:
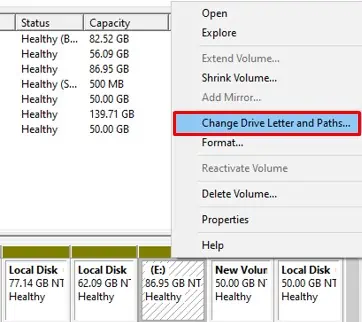
- Right-click on the Start button and select the Disk Management option.
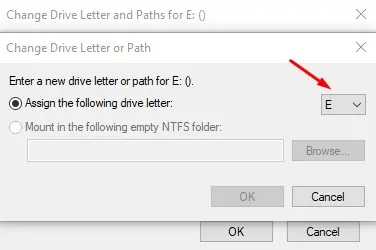
- In the disk management window, you will see partitions in your drive. Right-click on the partition and choose the option Change Drive Letters and Paths

- In the next window, click on the Change button and assign a unique letter from the list.

Check Free Space on the Server Computer
To access the mapped network drive, there must be at least a few GBs of free space on the server computer’s root drive. You can delete unnecessary and duplicate files to free up some space. Make sure there is enough space to get rid of the error.
Modify Registry Settings
Modifying the registry settings is the last fix you can apply to solve the error. Registry editor allows playing with the configuration of your software and hardware resources. But before you tweak the registry settings, create a backup of your registry.
You need to tweak two keys in the registry editor to prevent the error. They are discussed below:
Delete MountPoints2 Key
The MountPoints2 key in the registry stores information about removable devices installed in your system. Many users addressed that they fixed the error after deleting this particular key. Follow these steps to delete it:
- In the Windows search box, type Registry Editor and open it.
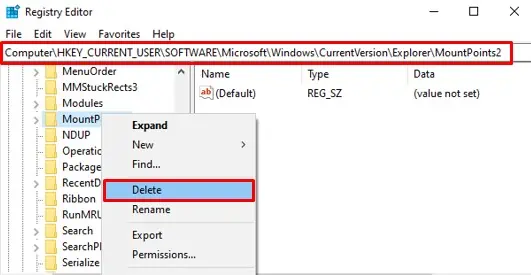
- Navigate to the path:
HKEY_CURRENT_USER > Software > Microsoft > Windows > CurrentVersion > Explorer - Inside the Explorer folder, find the MountPoints2 key. Right-click over it, and from the context menu, select the Delete option.

Change the Value of ProtectionMode Key
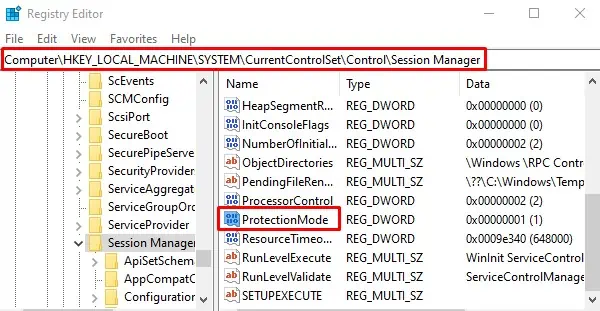
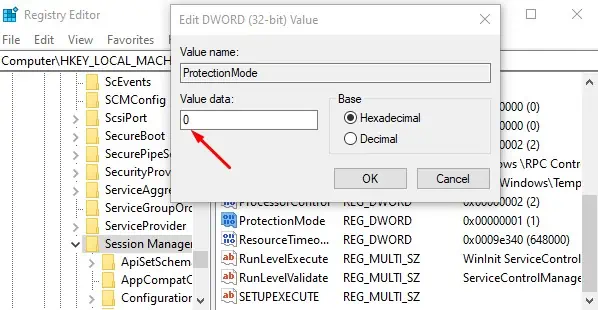
When the ProtectionMode key is activated, the networked drives are not visible to the users in the network. By default, the value of this key is set to 1. Its value must be set to 0 so that it won’t interfere with the shared drives.
Follow the steps below to change its value.
- In the Registry Editor, navigate to the path:
Computer\HKEY_LOCAL_MACHINE\SYSTEM\CurrentControlSet\Control\Session Manager - In the right section, search for the ProtectionMode key.

- Double click over it and change the Value data to 0.

- Save the changes and restart your computer.
You should not face the error once you have gone through all the fixes mentioned in this post.

