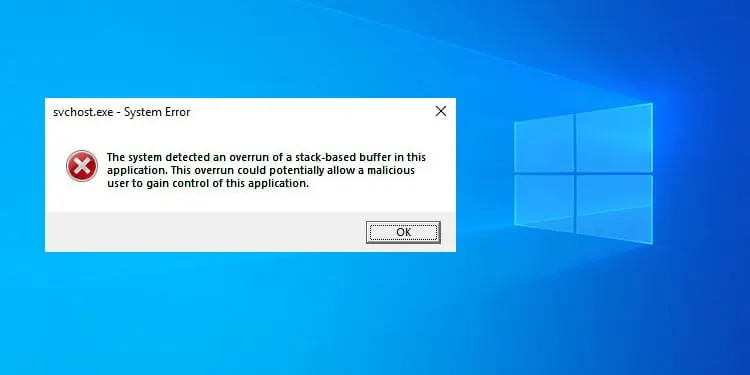
While opening any application or even when being idle, you can receive the error saying, “The system detected an overrun of a stack-based buffer in this application. This overrun could potentially allow a malicious user to gain control of this application.” Which simply means your buffer memory is overflowing.
Your computer has dedicated RAM spaces to store temporary data. Such spaces are called buffers. Limited stack-based buffers are allocated for different applications. If applications excessively fill the buffer space, the data overflow.
Excessive data may overwrite already prevailing data within the RAM. The system figures out this overrun or overflow of data, and the error is shown to prevent further data corruption.
Probable Causes of the Issue
The error is the most common result of a programming bug. Endless loops from applications pointed to the buffer easily overflow from it. But some other reasons causing the error are:
- Corrupt System Files
- Misconfigured Registry
- Virus and Malware
- Buffer Overflow Attacks
How to Fix “The system detected an overrun of a stack-based buffer in this application” Error?
Begin with restarting your computer to halt the ongoing process that caused the error. If it’s an application-specific temporary buffer overrun, the error message won’t show up on restart. However, recurrence of the error after restarting doesn’t assure problems being in the system. Applications with enabled startup permission can cause such problems to reappear.
If the error persists, move on to the below-mentioned solutions:
Sign in As a New User
The problem can be user-specific. Changes in the registry for a user can result in a buffer overrun. The first fix you can try is to sign in as a new user. It will also help in narrowing down the cause of the problem.
Go along the given steps:
- Open Settings from the search bar.
- Go to Accounts.
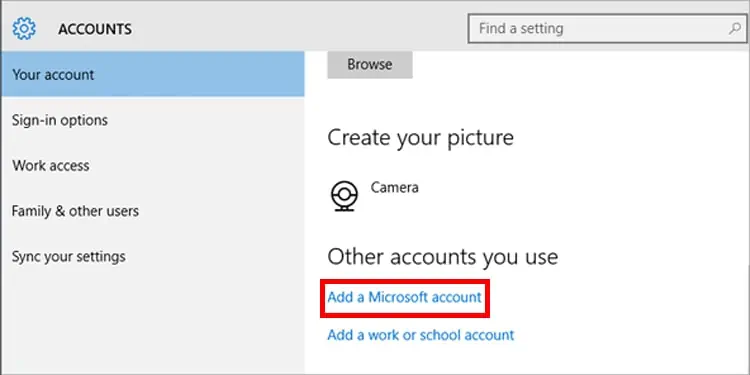
- Click on the Add account button.

- Click the I don’t have this person’s sign-in information.
- Select Add a user without a Microsoft account.
- Enter a new username and password, if necessary.
- Click on the Next button.
- Now, press Alt+F4 keys.
- Select Sign out from the dropdown.
- Wait for the start-up screen to appear.
- Select the newly created user from the bottom-left corner.
Now, as soon as you sign in, check for the issue.
Edit the Registry for The Current User
HKEY_CURRENT_USER consists of the specifically configured entries of the user. Corrupted or misconfigured keys can cause problems to the buffer. If logging in as a new user vanished the issue, this solution will solve the issue for the problematic user.
Login through the user account, which was receiving the error message. Then, follow the given steps to change the registry value:
- Press the Windows key + R keys on the keyboard to open the Run command.
- Type
regedit, hit Enter, and then click on the Yes button. - Copy paste the following location on the address bar:
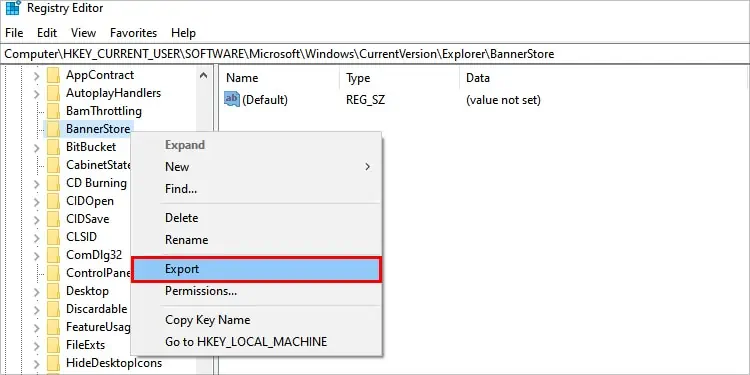
HKEY_CURRENT_USER\Software\Microsoft\Windows\CurrentVersion\Explorer\BannerStore - Right-click the BannerStore registry folder.
- Select Export and put it on any location with any name.

- Save to create the registry’s backup.
- Now, right-click on the registry folder again, then Delete it.
- Click Yes on the confirmation dialog box.
Run SFC and DISM Command
If some pieces of code from another application corrupt the Windows system and image files, issues can occur in the buffer stack. Windows has its own inbuilt commands to fix such errors automatically. SFC(System File Checker) command repairs the system files, whereas DISM(Deployment Image Servicing and Management) troubleshoots imaging files.
Follow the below-mentioned steps to execute the commands:
- Search for
cmdin the search bar. - Right-click on Command Prompt and select Run as administrator.
- Click on Yes.
- Type
sfc /scannowand hit Enter.
- Run the command
DISM /Online /Cleanup-Image /ScanHealth
- If any problem is detected, proceed with
DISM /Online /Cleanup-Image /RestoreHealth.
- Reboot your PC.
Startup Repair
A probability with the buffer overrun issue is that it can crash Windows. Moreover, if the issue hampers the booting process of windows, you can try to resolve it with Startup Repair. To do so, force restart your PC three times and enter the Windows Recovery Environment. Then follow:
- Select Advanced Startup Options.
- Click on Troubleshoot > Advanced options
- Select Startup Repair and follow onscreen instructions.

This process may either end repairing your Windows or will show it can’t repair. If you end up with the later one, proceed to reset or reformat your computer.
Clean Boot
This method of fixing involves pinpointing a particular application causing the issue. I have already mentioned that applications can fill the buffer stack unnecessarily. Figure out whether any app is doing so or not by performing a clean boot.
- Press Windows + R keys, which opens the command prompt.
- Type
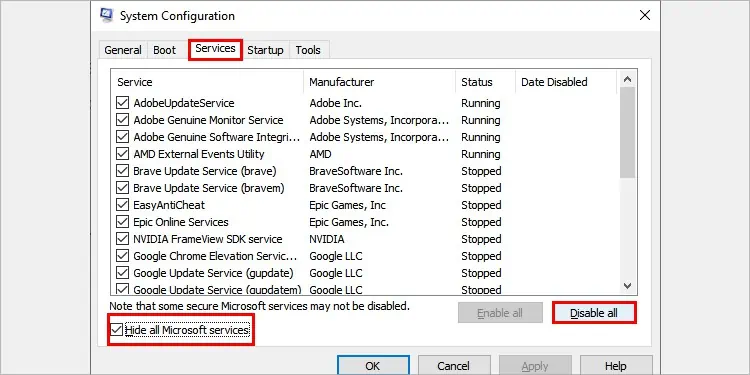
msconfigand hit enter. - Open the Services tab
- Tick mark the box for Hide all Microsoft services.
- Select all the services if they aren’t selected already.
- Click on the Disable all button and Apply, then Ok.

- Now, Go to the Startup tab and click Open Task Manager.
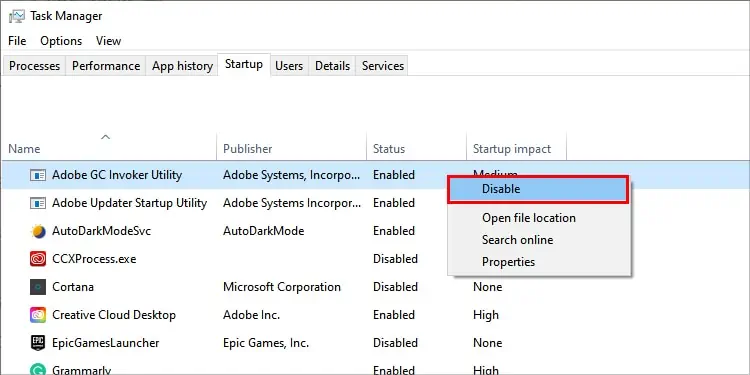
- Right-click on the applications with the status Enabled, individually.
- Choose Disable, which changes their status to Disabled.

- Once all the applications are Disabled, reboot your computer.
Upon restart, check whether the error message is appearing or not. If it isn’t, then probably one of the application’s services was writing excessive data to the buffer stack. Now, to know which of the services is causing the problem, tick the services and click the Enable all button located left to Disable all one by one.
Notice on restart of which service the issue recurs. Proceed to delete and reinstall the application associated with the faulty service.
Search and Clean Virus/Malware
Malware can also be made to cause errors in the program and cause a buffer overrun. Buffer overflow can be exploited as malicious attacks in modifying application functions or corrupting data. To fix the problem, scan using the built-in Windows Virus and Threat Protection feature.
Follow the steps below:
- Open the run command as above.
- Type
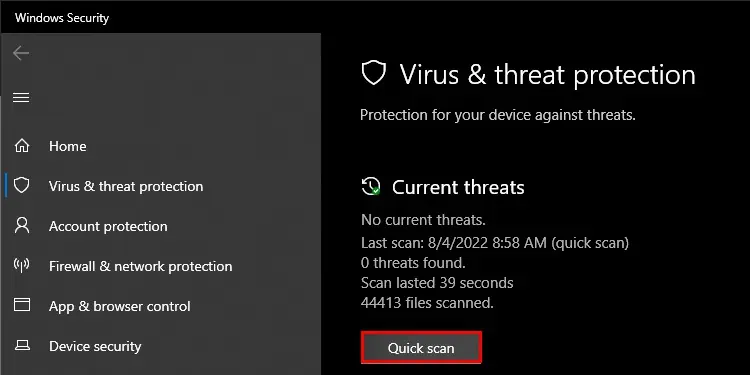
ms-settings:windowsdefenderand hit Enter. - Go to Virus and Threat Protection under the Protection areas section.
- Click the Quick Scan button.

Windows will automatically scan for viruses and malware. You can follow along with the on-screen steps to remove such threats.
You can also use third-party anti-virus software to detect and clean malware.

