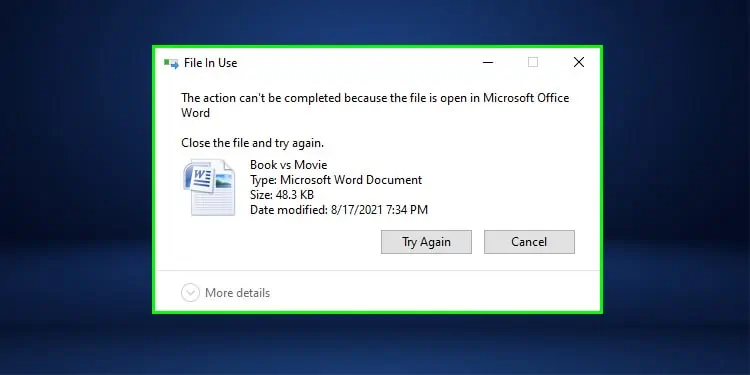
The error “This action cannot be completed because the file is open” pops up when you’re trying to delete, more, or rename something from your hard drive. This indicates the process of the file that you’re trying to modify is running in the background and to remove the file, you must properly close the file/application.
This error is quite common on Windows and until you’ve solved this problem, you will not be able to modify the desired file from your computer. In today’s fix, we’ll be listing a number of solutions that you can apply to troubleshoot this problem and delete the files from your computer.
Causes of “This Action Cannot Be Completed Because the File Is Open” Error
The error won’t go away as long as the process using the file is not closed properly. To modify the file from your computer, you must close the application and then try to make changes to the file. If you have closed the file and the error is still popping up, here are a few common causes behind it:
If you’re trying to delete a system file, you are likely to run into this issue. The system files cannot be modified on Windows straight away because while the OS is working, the files too will be in use.
Some of such files may be modified by changing configuration via registry editor, group policy editor or elevated command prompt/ power shell.
In order to delete, move or modify such files, the drive with OS will have to be unmounted.
Even after closing some files/applications, they keep running in the background or on some other process. For instance, if there’s a movie running in the media player and you’re trying to delete the movie file, you’re likely to run into this issue. First, you’ll need to close the file properly before sending it to the recycle bin.
Windows explorer sometimes gets a bit messy and keeps the application running in the background. And hence, users cannot seem to modify the file. If this is the case, a fairly straightforward fix is to simply restart Windows properly.
Thumbnails in your memory cache, which are created by Windows, are also a leading cause for this issue. In such a case, deleting the cache files is required to fix the issue. Doing so would remove the thumbnails from the cache and the file/application would no longer be in use.
Strangely, the preview panel in Windows could also be a cause of this problem. If the preview panel is enabled, which is true in most cases, this error could appear. When you select a file to modify from the folder, it will show a preview on the window, making the system think that the file is already in use. Disabling the preview panel is likely to fix the issue as well.
Sometimes trying to delete a file that is marked as dangerous or is going through a scan could also lead to this issue. Before proceeding to any complex troubleshooting steps, we recommend letting the scan complete or if not running, scan the system with antivirus and try again.
Fixes for “This Action Cannot Be Completed Because the File Is Open” Error
The “This action cannot be completed because the file is open” error is easy to fix and won’t take up much of your time. Here, we have listed the best possible solutions to permanently fix this issue:
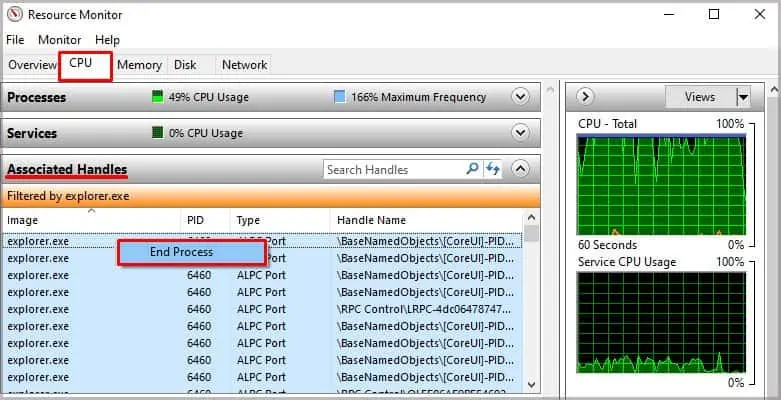
Close the File Through Resource Monitor
If you’re running into this error, it is most likely that the file you’re trying to modify is in use and not closed properly. Before proceeding into complex troubleshooting steps, use the resource monitor to close the file. For instance, if you’re trying to modify an ‘MS Word’ file, perform these steps:
- Press “Windows + R” to open Run.
- Type ‘
resmon’ and hit Enter. - Navigate to the ‘CPU’ tab.
- In the search bar alongside Associated Handles input the file name you are trying to delete.
- Select all the processes using the file while holding CTRL.
- Right-click the selection and select ‘End Process.’

Now the file won’t be in use anymore and it will be closed properly. Try to modify the file and hopefully you don’t have to do anything else. If the error still persists, continue reading for more possible fixes.
Restart Windows Explorer
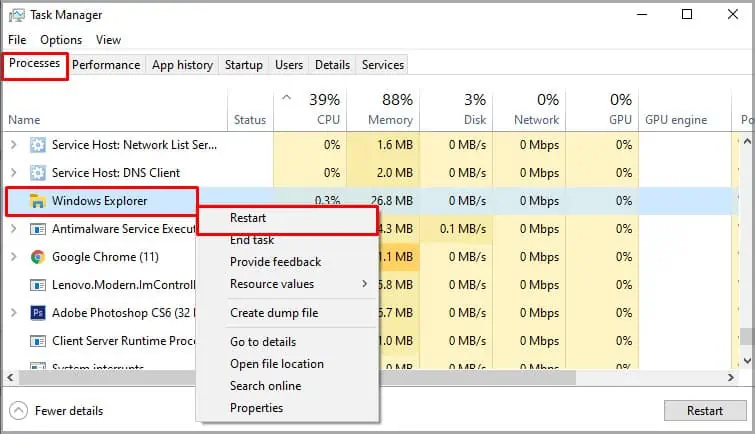
One of the most common culprits behind this problem is Windows explorer. It often gets glitchy and forces the Windows to run into random problems. The “This action cannot be completed because the file is open” error could also be caused by it as well. In such a scenario, the best thing is to restart Windows Explorer. To do so, follow these instructions.
Windows 10
- Open Task Manager (Press CTRL + Shift + Esc).
- Click on ‘More Details.’
- Locate and select ‘Windows Explorer.’
- Right-click on ‘Windows Explorer’ and press ‘Restart.’

Windows 7
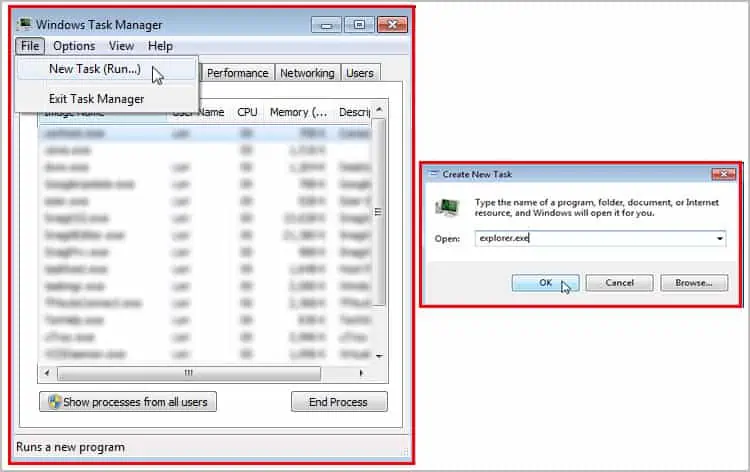
- Press CTRL + Shift + Esc to open Task Manager.
- Click on ‘Processes.’
- Locate ‘Explorer.exe’ and select it.
- Right-click on it and select ‘End Process.’
- Now, click on File > New Task.
- Type
Explorer.exeand hit Enter.
Reboot in Safe Mode
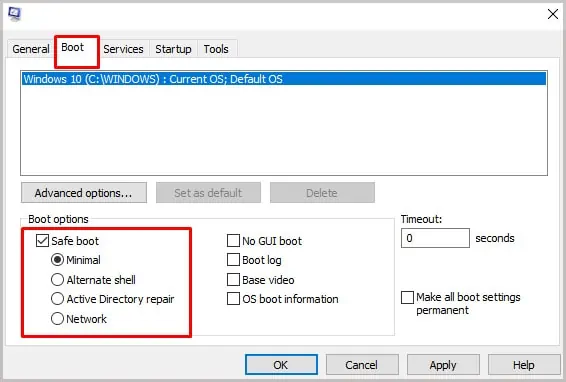
Rebooting the system in safe mode could also be a potential fix to this problem. Using safe mode, the computer loads and runs just the basics of drivers, DLLs, and applications required to operate the system. Once you have booted in the safe mode, you’re likely to be able to modify the desired files. To boot in safe mode, follow these instructions:
- Press ‘Windows + R’.
- Type ‘
msconfig’ and hit Enter. - Click on the ‘Boot’ tab and check the box for ‘Safe Boot’ and click on ‘Apply.’

- Reboot the computer and now try to modify the desired file while in safe mode.
Deleting Temp Files
The temporary data stored on your hard drive could also be the culprit behind this error. While temp files are necessary to enable your system to run fast by fetching the data as per required by the application, they also are known to be notorious as they hog a lot of disk space.
Temp files also could stay active and latch on to a process even after closing the application, causing the issue.
Also, temp files are also a nice host for programmers to decoy their malicious source code. Cleaning temp files from time to time is highly recommended.
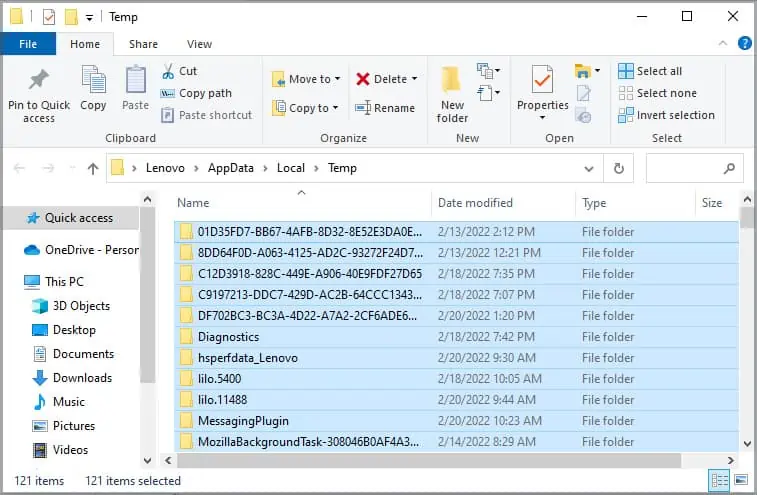
To delete the temp files, perform these steps:
- Press ‘Windows + R’ on your keyboard.
- Type
%temp%and hit Enter. - Press “CTRL + A” to select all the files and press “Shift + Del” to permanently delete these files.

End COM Surrogate Process (For Windows 10&11 )
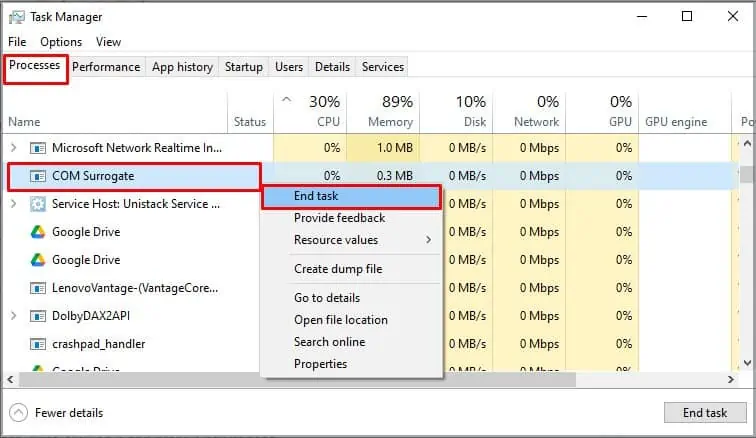
COM Surrogate is a Windows extension that is responsible for handling various media items including thumbnails. It is only available on newer versions of Windows (Win10 & Win11). And this extension could also be the reason why you’re running into this error. Fortunately, users can disable this extension. To do so, perform these steps:
- Press ‘CTRL + Shift + Esc’ to open Task Manager.
- Click on ‘More Details.’
- Find the “COM Surrogate” process, right-click on it and press ‘End Process.’

Remove/Disable Thumbnails Using Disk Clean Up
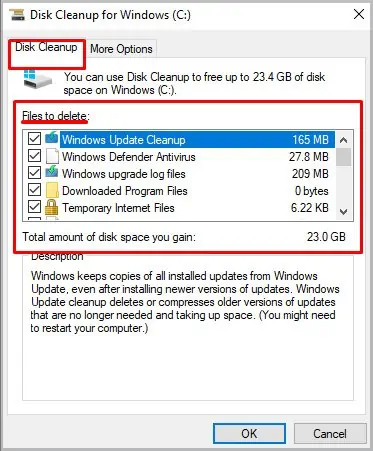
The thumbnail of the file you’re trying to use could be running in the cache and causing this problem. Fortunately, using the disk clean-up to remove the junk thumbnails will clear the file from its cache and users will be able to modify the file. To perform a disk clean up, perform these steps:
- Press the start button and type ‘Disk Cleanup.’
- Open the ‘Disk Cleanup’ application and select the drive where Windows is installed.
- Wait for the system to gather information, afterward, from the ‘Files to delete’ section, uncheck all the boxes except ‘Thumbnails.’

- Press ‘Ok’ and wait for the task to finish.
Once the task is completed, try to modify the file. Furthermore, if the error isn’t fixed, continue as below.
Using Group Policy Editor
Group policy editor (gpedit) is a feature of Windows available in all versions except the Home edition. However, since it is a free tool and a core component of Windows, it is integrated into all editions.
Windows uses group policies to manage features, functions, and permissions as well as the security of the OS. This tool, gpedit, access the policies and lets us change and set rules as per our requirements and tailor the OS for the best possible user experience.
If you use the Home edition of Windows, copy the following in an elevated Command Prompt (CMD) and execute the command.
FOR %F IN ("%SystemRoot%\servicing\Packages\Microsoft-Windows-GroupPolicy-ClientTools-Package~*.mum") DO (DISM /Online /NoRestart /Add-Package:"%F")

FOR %F IN ("%SystemRoot%\servicing\Packages\Microsoft-Windows-GroupPolicy-ClientExtensions-Package~*.mum") DO (DISM /Online /NoRestart /Add-Package:"%F")
Once gpedit has been enabled, proceed as follows.
- Press Windows + R
- Type ‘
gpedit.msc’ and hit Enter. - Expand the ‘User Configuration’ folder from the editor.
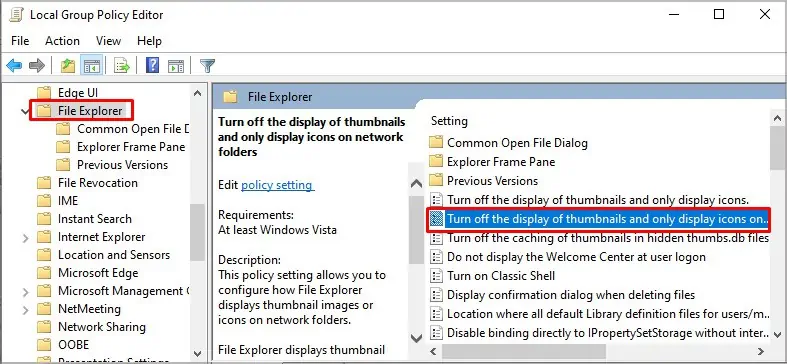
- Expand the Administrative Templates > Windows Components > File Explorer (Windows Explorer on Windows 7).
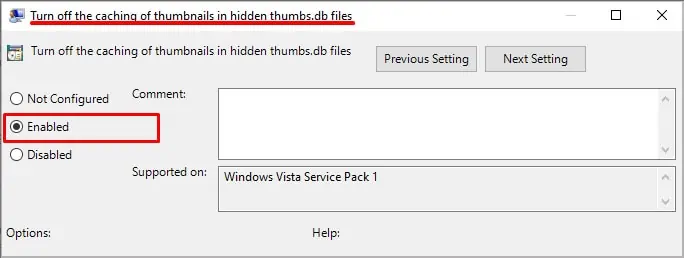
- On the right side of the window, locate and double-click on ‘’Turn off caching of thumbnails in hidden thumbs.db files.”

- Check the box for ‘Enabled’, click on ‘Apply’, and close the window.

Disable the Preview panel
Disabling the preview panel is a potential fix that worked for many users. Disabling this option won’t load the file in the preview window and hence, the file won’t be in use anymore. To disable the preview panel on your file explorer, perform these steps:
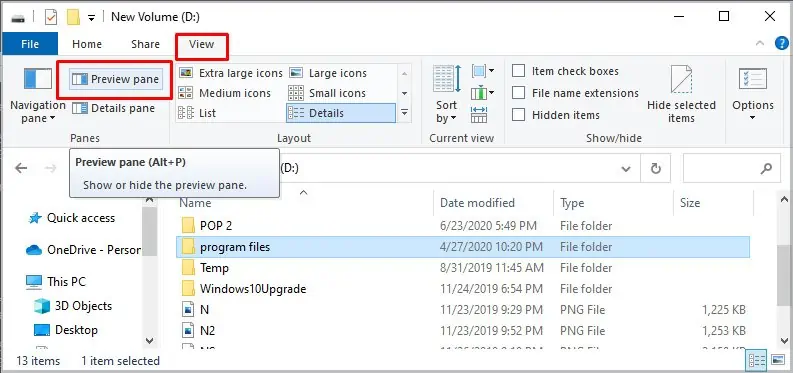
- Go to any folder.
- Click ‘View’ on the top of the folder and click on ‘Preview Pane’ to disable/enable it.

Similarly, an alternative method is to open a folder and press ‘Alt + P.’
Modify the file Using Command Prompt
Long before Windows, CMD was used to modify the data. And if you’re running into errors when you’re trying to modify files, using Command Prompt (CMD) is an easy fix. Here’s how you can use CMD to modify the files.
Delete
If you want to delete a specific file but are not able to do so because of the error, use CMD to delete it. Follow these steps to delete the file through CMD:
- Press the start button and search for ‘CMD.’
- Right-click on CMD and press “Run it as Administrator.”
- Type the drive name where the file is stored. For example, if the file is located in E drive, type,
E: - Now, locate the path of the file. For example, if there is a text file called ‘one’ is located inside the ‘Example’ folder, use this command to delete the file:
Del E:\Example\one.txt
Rename
To rename the file on your computer using CMD, perform these steps:
- Open CMD with Administrator privileges.
- Navigate to the folder where the file is stored.
- Find the name of the file that you want to rename.
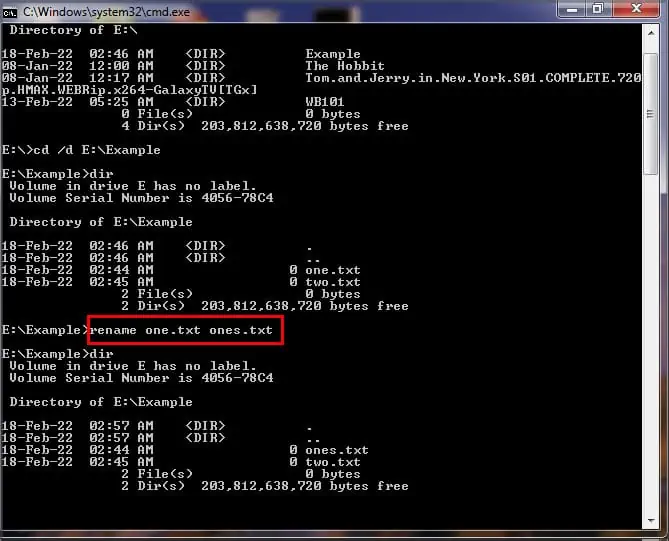
- Afterward, type “Rename (file name) (new name)” and press Enter.

In this case, we changed the file name of one.txt to ones.txt:
Remove Via Anti-Virus
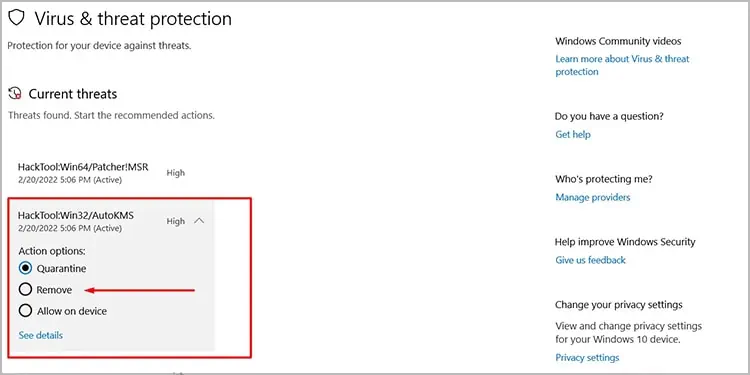
A file that is quarantined by the anti-virus software application installed on your computer could also make Windows think that the file is in use. And hence, the “This action cannot be completed because the file is open” error will appear. It is worth a try to remove the quarantine file through Windows Defender to keep your data safe.
See the steps below to see how you can remove the quarantined files:
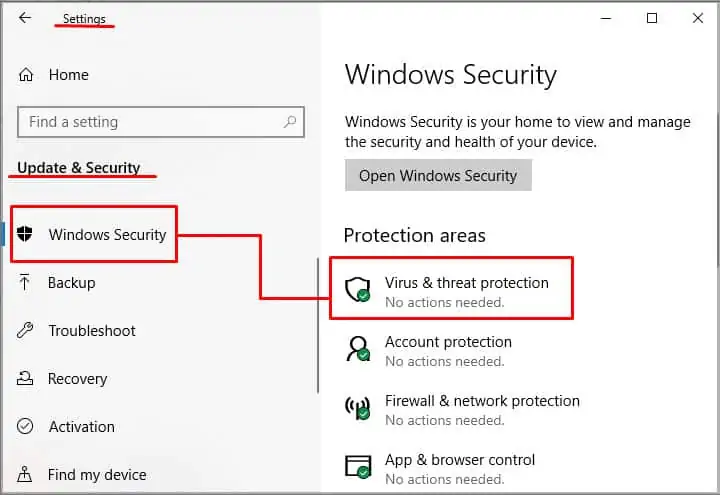
- Go to “Settings”
- Click on “Update & Security.”
- Click on Windows Security and Select ‘Virus & Threat Protection.’

- Under Current threats, Select the Quarantined file.
- Click on Start Actions.
- Remove the Quarantined file.

Perform a Clean Boot
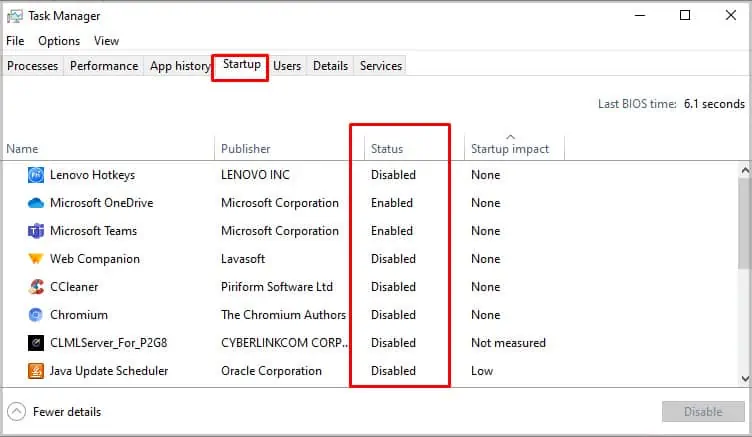
The file that you’re trying to modify could be opened in some other 3rd-party application and sometimes it is hard to tell which application is using the file. In such a case, the best fix is to disable all the non-essential applications at start-up and perform a clean boot. To perform a clean boot, follow these steps:
- Open Task Manager (CTRL + Shift + Esc).
- Navigate to the ‘Start Up’ tab and uncheck the box for all the applications except Microsoft essential services.

- Press ‘Apply’
- Reboot the computer and then try to modify the file.

