Turning on the PC remotely is a useful feature for anyone. It breaks the habit of leaving your computer on all the time.
If you’re like me, you might have one of your computers set up in your home as a file-sharing server. Consider the energy consumption of keeping a PC on standby at all times. Using this feature will undoubtedly lower your energy bills.
To turn on your PC, you must have a WOL or Wake-on-Lan compatible PC. There are some workarounds if you don’t have one. Continue reading to learn how to turn on your PC remotely.
What Is the Wake-on-LAN Feature?
Wake-on-Lan is an industry-standard protocol for waking computers up using their network adapter. Wake-on-Lan helps you to keep your devices on low power mode instead of an always-on state.
Once WOL is enabled, the PC enters a ‘wait mode’ when it shuts down. A magic packet from a different network device can now be sent to this PC to turn it on. The magic packet should contain the mac address of the PC that is in wait mode.
Normally, magic packets are sent over the entire network through the broadcast address. Thus, if a hacker with your mac address information can try to turn on your PC by sending in magic packets, this is why WOL is kept turned off by default for security reasons.
Using WOL
Enable BIOS Option
Check your manufacturer’s website to see if your motherboard supports the Wake on LAN feature. Normally, the option is somewhere on the Network or Power settings inside the BIOS menu.
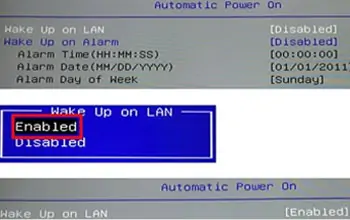
To Enable WOL in BIOS options, follow these steps:
- Shut down your computer
- Turn it back on and spam these following ESC, F1, F2, F8 or F10 buttons as it beings to turn on.
- With that done, a BIOS menu will appear on your screen.
- Navigate to network or power tab.
- Turn on the Wake on Lan feature.

- Press the button for save and exit.
Once enabled, your network adapter will keep drawing power from the source to enter a low power waiting mode. If on a laptop, this can drain your battery if the device is not plugged in. Remember that for WOL to work; the system needs to have a connected power source at all times.
Enable Magic Packet in Windows
- Do a right-click on the Start Menu and select Device Manager.
- Select Network adapters to expand the list.
- Do a right-click on the ethernet controller and select Properties.
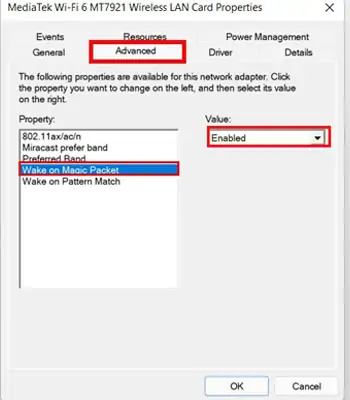
- Go to the Advanced tab.
- Select the Wake on Magic Packet option.
- Change the picklist to Enabled.

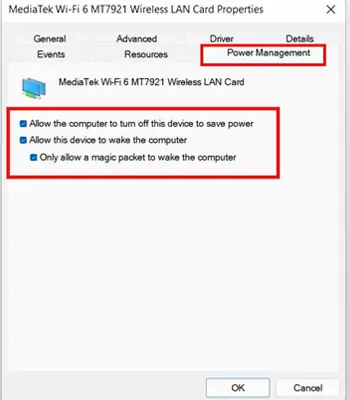
- Go to the Power Management tab.
- Turn on the following options:
- Allow this device to wake the computer.
- Only allow a magic packet to wake the computer.
- Select OK.

Get Adapter Configurations
Some of the steps below may need you to enter the PC mac address or IP address, or both.
- Do a right-click on the Start menu and select Windows Powershell.
- Type
ipconfig/allto list all network adapters. - Look for something called an ethernet adapter.
- Make a note of IPv4 address and Physical address.
From the Same Network
- Download and install Wake on LAN.
- Turn on the PC to be turned on for the first time only.
- Open the application on a second PC on the same network as the first PC.
- Select Start Scanning to scan the network and detect your PC.

- Once it finds the first PC, turn off the machine.
- Select the PC name and click on Wake up.
From Outside Network or Internet
- Make note of your home public IP address.
- Make note of your PC mac address that you want to turn on.
- Open your router configuration page.
- Locate the port forwarding setup.
- Set up a port forwarding rule with port 7 or 9 for UDP protocol.
- Enter the broadcast address 192.168.1.255 as the forwarding address. Note that most routers may not support forwarding to the broadcast address.
- Enter the mac address noted in the previous step.
- Once configured, use the public IP address on the WakeMeOnLan application as described above.
Setup Remote Access On The Second PC
- Normally, this PC could be
- An always-on server
- Low power single board computer such as Raspberry pi
- Old pc running off from AC supply 24/7
- Use RDP to log into this PC from an outside network.
- Open the WakeMeOnLan application and click on the Wake-up button.
Use Teamviewer
- Open Teamviewer.
- Log in or create an account with Teamviewer to assign the PC to your account.
- Click on the Extras menu.
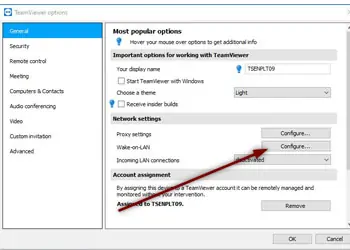
- Select Options.
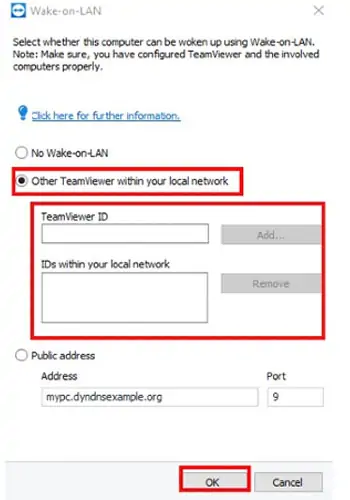
- Under the General section, select the Configure button next to Wake-on-LAN.

- Select TeamViewer IDs within your network option.
- Enter the TeamViewer ID of the PC that you want to turn on remotely.

- Click on the OK button.
- Now, go to the Computers & Contacts from the left navigation pane.
- Expand the Offline list.
- Select the PC name that you want to turn on.
- Click the Wake-up button.
Use Android Phone
- Make sure WOL is enabled on your PC.
- Download Wake On LAN from the Play Store.
- Tap the plus icon at the bottom-right corner.
- Select your PC and tap Add device.

- Once the scan finds your PC, tap it for selection.
- Give a friendly name and select Add to Bookmarks.

Once Added, Tap on the PC Name to Turn It on.
Using Ios Device
- Make sure WOL is enabled on your PC.
- Download and install this app from the app store. You don’t need a jailbroken device for this.
- Make note of your PC mac address and IP address.
- Open Mocha WOL and add a new configuration with details from Step 3.
- Once added, tap on the Wake up to turn on the PC.
Without Using WOL
Using IR Remote
- Go to Simerec and order one of the PCS 1 components.
- Disconnect the AC power in your PC.
- Drill an unobstructed hole on the front of the top for the IR receiver.
- Place the IR receiver end of the PCS 1 module.
- Disconnect the PC power button and connect it to the 2 pin connector on the module.
- Plug the end of the twisted-wire pair from the module to the 2-pin power switch connector on the motherboard.
- Once the wiring is verified, plug back in the AC power.
- On PCS 1, press the button to light up the LED.
- Press a button on the IR remote and aim at the receiver. The LED should turn off and turn back on after about 2 seconds.
- Repeat the previous step three times or more until the LED starts flashing.
- Finally, press the button again to power on the PC.
Using Arduino
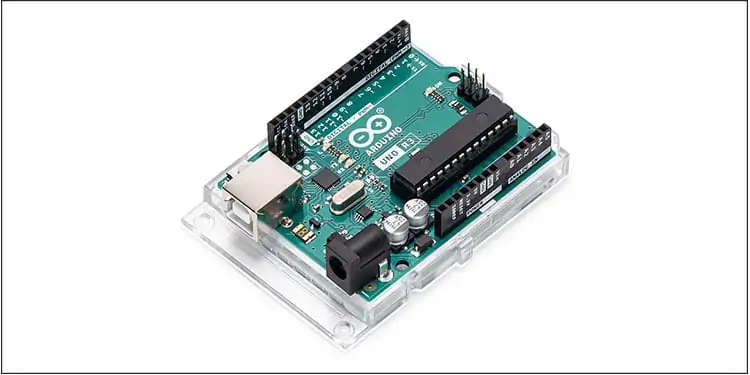
- Open your PC casing and locate the +5v standby pin on the motherboard. Refer to your motherboard schematic diagram for the correct location.
- Connect that pin to the 5v pin in your Arduino using a jumper wire.
- Locate a ground pin from the schematics diagram similar to Step 1.
- Connect the ground pin to the GND pin in your Arduino using a jumper wire.
- Locate and unplug the two wires coming from the power switch to the motherboard.
- Connect one of the pins from Step 5 to the Arduino GND pin. Connect the other one to Arduino pin 13.
- Open Arduino IDE on the second PC and paste the following code referred from this link.
- Compile and upload the code to the Arduino hooked up to your PC.
- Once done, open the serial monitor from Arduino IDE.
- Set the baud rate to 9600 baud.
- Type ‘H’ on the keyboard and press Enter. Your PC will now turn on as if you had pressed the power button.
Frequently Asked Questions
How to Enable the WOL Feature in MacOS and Linux?
Use the following steps to enable the WOL feature.
For MacOS
- Go to the Apple menu and select System Preferences.
- Select Energy Saver.
- Go to Power Adapter.
- Check Wake for network access to turn WOL on.
For Linux
- Open terminal.
- Route
- Gets the name of default network interface, e.g. eth0
- Sudo ethtool eth0
- To confirm WOL is supported on eth0
- Sudo ethtool -s eth0 wol g
- Enables WOL on
How to Turn a PC on Using Linux?
Linux has a command-line tool that can send magic packets to turn a PC on.
- Make note of the mac address of the PC.
- Connect your Linux device using ethernet.
- Sudo apt-get install etherwake
- Installs etherwake tool
- Sudo etherwake -i eth0 FF:FF:FF:FF:FF:FF
- Sends magic packet through eth0 interface to the specified mac address.


