If you recently installed Ubuntu, you might’ve been surprised to find that all the WiFi options were missing. Even if you install the correct drivers, issues with the WiFi Adapter can lead to the same problem.
The WiFi Adapter and Driver are just two common culprits. In your case, the problem may be something else entirely and figuring out exactly what can be tough.
As such, we’ve detailed the main reasons why the WiFi doesn’t work on Ubuntu, as well as how you can fix it in this article.
Why Is Your Ubuntu WiFi Not Working?
- Wireless adapter driver is missing / disabled
- Incorrect driver is installed
- Wireless adapter isn’t working
- Corrupt DNS cache
- Problems on ISP’s end
How to Fix Ubuntu WiFi Not Working?
We recommend trying the solutions in the order listed below. The first few solutions are for Ubuntu-specific problems, whereas the latter ones deal with WiFi issues in general. And, as a general rule of thumb, restart your router before you begin troubleshooting, as that alone often fixes the issue.
Fix Ubuntu 22.04 WiFi Bug
When Ubuntu 22.04 was released a few months ago, users reported a multitude of WiFi issues, from slow download speeds and frequent disconnections to not being able to connect to WiFi at all. As it turned out, the problem was actually with the 5.15 Kernel that was in use at the time.
Do note that bugs like this have affected numerous Ubuntu versions in the past, not just 22.04. As such, the fix shown below can be helpful for other versions as well.
Update Kernel
This bug has been patched in the latest kernel versions. You can update the kernel version by executing the following commands in the terminal:
sudo apt-get update
sudo apt-get dist-upgrade
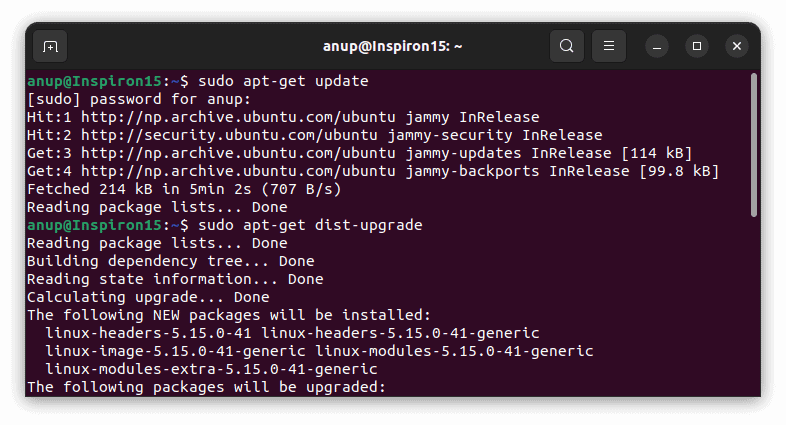
Alternatively, you can also run the update-manager –d command to force update using the Software Updater utility.
Revert Kernel
Some users reported that updating the kernel version didn’t fix the issue either, and they had to revert to an older version instead. Here’s how you can do the same:
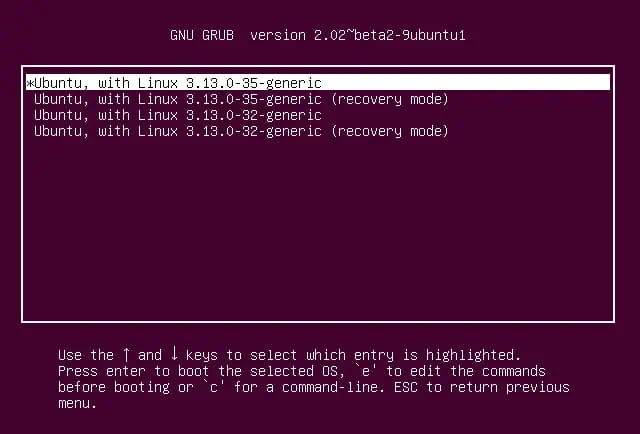
- Hold Shift when booting to enter GRUB.
- Select Advanced Options for Ubuntu.
- Select the Kernel Version to use. Most users have had success with version 5.13.

Workaround the Bug
Finally, if you don’t want to mess with the kernel at all, you can also try a simple workaround that involves checking the OpenSSL configuration file and restarting WPA. Do note that we recommend the previous two methods as restarting the WPA supplicant for this workaround enables unsafe handshake. With that said, here are the steps to do so:
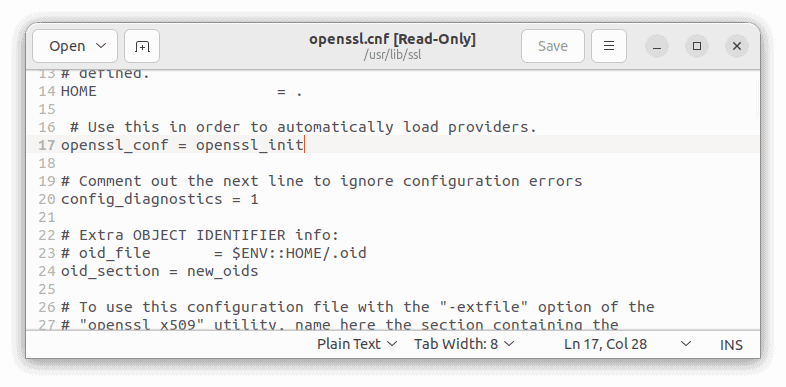
- Navigate to
/usr/lib/ssl/and open theopenssl.cnffile. - Make sure the following lines are present in the config file:
openssl_conf = openssl_init
[openssl_init] ssl_conf = ssl_sect
[ssl_sect] system_default = system_default_sect
[system_default_sect] Options = UnsafeLegacyRenegotiation
- Next, execute the following commands to restart WPA:
sudo pkill wpa_supplicant
wpa_supplicant
Install / Use WiFi Driver
Linux, being the hands-on system that it is, usually only includes the core necessities during the installation, and everything else is up to you to customize. One way to ensure the WiFi packages are included is to use WiFi during the installation.
In the case of Ubuntu, generic WiFi packages are at least present. However, they won’t be enabled by default if they are proprietary, which can cause WiFi-related options to be missing entirely from your system. If you have an Ethernet connection available, fixing this issue is very easy:
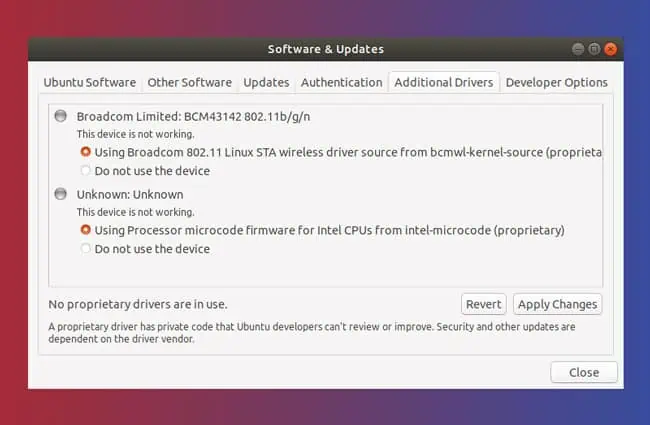
- Go to Show Applications > Software & Updates.
- Switch to the Additional Drivers tab.
- Select your preferred driver source for the wireless adapter and press Apply Changes.

- After the driver is installed, the WiFi should be available.
Offline package installation is also possible if you have no way to connect to the internet on your current device. Here’s how you can install the WiFi drivers from a Ubuntu ISO:
- On another device, download the ISO of your current Ubuntu version and copy it to a USB.
- Connect the USB to your Ubuntu device and copy the ISO file to the home directory.
- Execute the following commands to mount the ISO image:
sudo mkdir /media/cdrom
cd ~
sudo mount -o loop ubuntu-* /media/cdrom - Open Software & Updates again and enable the Installable from CD-ROM option.
- Switch to the Additional Drivers tab, select the driver and apply the changes.
Some users were able to fix the missing WiFi options by restarting the Network Manager. You can do the same with the following commands:
To start NetworkManager: sudo systemctl start NetworkManager.service
To restart it: sudo systemctl restart NetworkManager.service
To run it at boot: sudo systemctl enable NetworkManager.service
Fix Wireless Adapter Issues
If your wireless adapter is disabled, not recognized, or not working at all, then that could also be the reason for the WiFi issue. Here’s how you can diagnose and fix the issue in such cases:
- First, use the
nmcli devicecommand to check if the wireless adapter is connected. If it’s not listed or connected, your wireless adapter isn’t working properly. Skip ahead to Step 4 in this case.
- Next, execute the
rfkill listcommand and make sure the WiFi Adapter isn’t blocked via the BIOS.
- If it is blocked, use the
rfkill unblock allcommand. Additionally, if your device has a physical wireless switch, make sure it’s not turned off either. - Next, use the
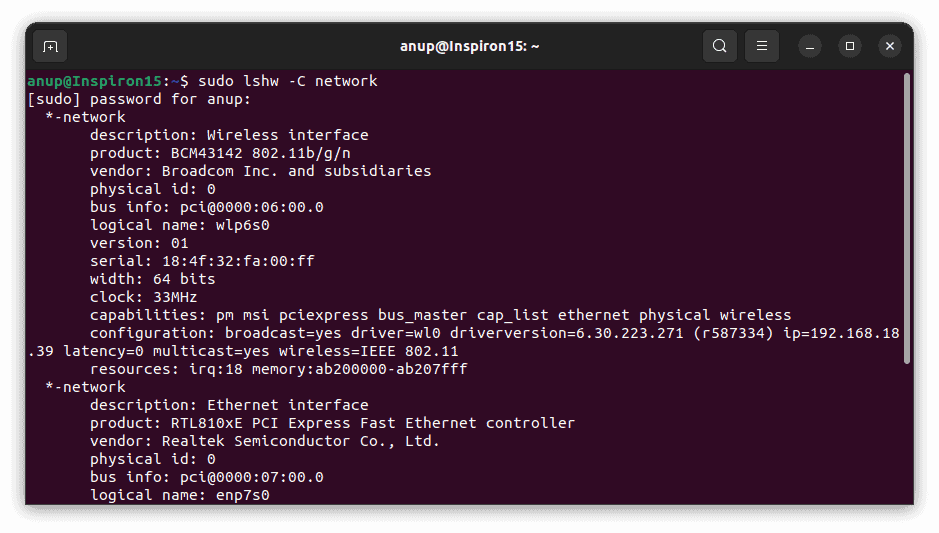
sudo lshw -C networkcommand to identify your wireless adapter type and take the appropriate steps, as shown below.
- If no wireless devices are listed, your wireless adapter isn’t working. Try reseating the wireless adapter and make sure the connection isn’t loose. If that doesn’t help, the adapter might just be dead.
- If a wireless device is listed, that means your adapter is working but not recognized. This is likely because the drivers for it are missing. Once you install the correct driver for your adapter, the WiFi will start working properly.
In my case, my laptop has a Broadcom Wireless Adapter, or BCM43, to be specific. Let’s use it as an example. First, I removed the preinstalled drivers with the sudo apt remove broadcom-sta-dkms bcmwl-kernel-source command. As I had an Ethernet connection available, I used sudo apt install firmware-b43-installer to install the drivers.
Let’s say you have a different adapter or can’t use Ethernet. In such cases, you should use another device to download the correct driver for your adapter and Ubuntu version. You can copy the file to your Ubuntu device with a USB stick and install the driver using the deb file.
Fix General WiFi Issues
It’s possible that your WiFi problems aren’t due to a bug or a dead adapter but something much simpler. Here are some things to consider on the software end:
- Ensure your device isn’t in airplane mode. Enabling and disabling it has also helped some users.
- If you’re facing WiFi issues on a specific account, go to WiFi Settings and ensure the Make Available to other users option is enabled.
- If you’re facing WiFi issues after changing the password, go to WiFi Settings > Forget Connection and reconnect with the new password.
- If you can’t find a specific WiFi, it may be hidden. Either enable SSID Broadcast via router settings or use the Connect to Hidden WiFi option via WiFi Settings.
It’s also possible that the issue is on the hardware side of things. Here’s what you can do in such cases:
- First, if you’re using a USB Adapter, try using a different port and make sure the connection isn’t loose.
- If the WiFi is constantly disconnecting, make sure it’s not due to weak signal strength. You can ping your router to check this. Move closer to the router if this is the case.
- It’s possible that the issue isn’t specific to your Ubuntu device. Check if the WiFi is working on another device to confirm this. If it’s not working, it could be a physical issue with your router or some issue on your ISP’s end. Reach out to your ISP and confirm that there isn’t a service outage.
- If you’re having trouble connecting to a public WiFi such as a school network, there may be too many devices connected to the router right now. If possible, restart the router. Otherwise, keep trying, and you should be able to connect soon enough.
Renew IP Address / Flush DNS
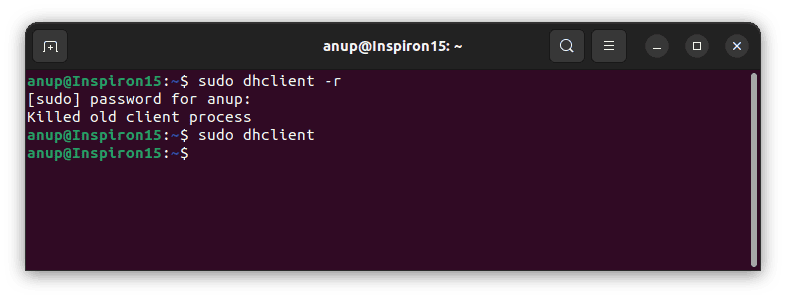
A corrupt DNS cache could be preventing you from accessing certain websites, which gives the impression that the WiFi isn’t working. The same goes for a misconfigured IP Address as well. In such cases, you can use the following commands to renew your IP and clear the DNS cache:
sudo dhclient – r
sudo dhclient
sudo systemd-resolve --flush-caches
Related Questions
Is My Ubuntu WiFi Not Working Because It Was Hacked?
If the connection problem occurs continuously for several hours, it’s unlikely that the WiFi is hacked. Hackers kick users out of the network to sniff handshake packets, but the packets would be available in abundance in an hour or two at max. However, if you’ve tried all possible fixes and the WiFi still doesn’t work, it’s definitely something to consider.
In such cases, you can change your router and WiFi passwords to something strong as a start. We have a detailed article on securing your WiFi if you’re interested in reading further on this topic.
Do I Need To Update the Router Firmware to Fix My WiFi?
While using outdated firmware for your router isn’t ideal, it’s highly unlikely that it would cause your WiFi to stop working entirely. If you’d like to try updating the firmware anyway, the linked article will be of help.

