If your computer USB ports stop functioning, you will have a hard time getting your peripheral devices to work. Especially if you are on a desktop PC, everything from navigating the Operating System to launching an application requires a working USB port in order to connect the peripheral devices.
Besides this, something as simple as entering the motherboards BIOS is going to be troublesome.
Here’s our compilation of possible causes and fixes you can perform to address the issue of the USB port not working.
What Stops a USB Port From Working?
Before we start fixing things, let us discuss what can stop a USB port from working. Here’s a list of common reasons you have a dead USB port.
- Physical damage
- Driver disabled
- Dust settled on USB ports
- Outdated Windows/Drivers
- USB power settings
- Misplaced or loose I/O connectors
- Bent USB headers on the motherboard
- Faulty USB device
- USB port heating issue
How to Fix USB Ports Not Working on Windows
Now that we know what causes the USB port to stop functioning, here are solutions explained in detail to fix these issues.
First, you need to know where the issue lies, and that is either the USB port or the USB device. Try plugging the device in other ports as well. If none of the ports work, try using another PC to check the USB device.
It is known that dust can cause issues in the hardware. So, if the USB ports are dusty, it is recommended that you use a can of compressed air to remove dust and debris from the port.
If it still does not respond, it is highly possible that the device itself is faulty. If the USB device works on another PC but not yours, you can conclude that the PC you are using has faulty USB ports.
Disable USB Power Settings
If you are a Windows user, its power setting will stop power supply to certain components that are not in use. So, there is a chance that the PC will now supply power to the port even when you insert a device.
However, you can easily disable this setting by following the mentioned steps.
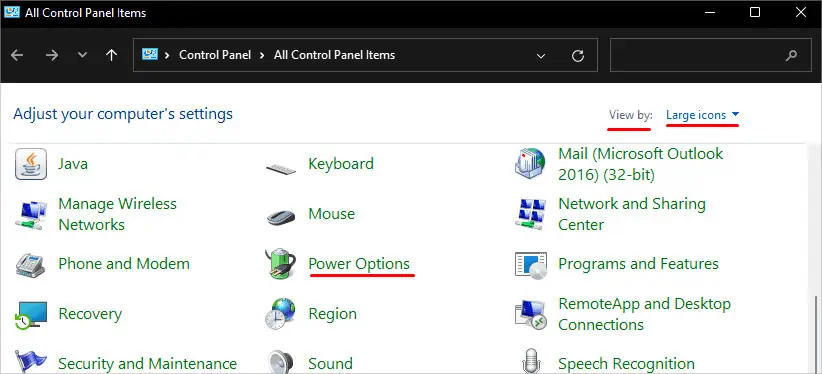
- Press the Windows key and open the Control Panel.
- Make sure that you set View by to Large icons.
- Select Power Options.

- Under Choose or Customize a power plan, select Change plan settings on the selected power plan.
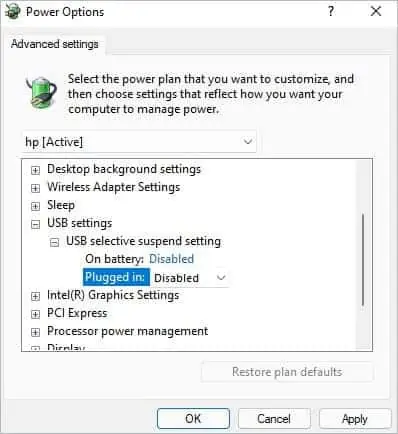
- Click on Change Advanced Power Settings.
- Expand USB settings by clicking on + sign.
- Again, expand USB selective suspend settings.
- Change Enabled to Disabled.

Once you change the Power settings, we also need to disable this setting from Device Manager. Please follow these steps to disable this option.
- Press the Windows + X key simultaneously and select Device Manager.
- Expand Universal Serial Bus Controller.
- Double-click on any one of the drivers to open its properties.
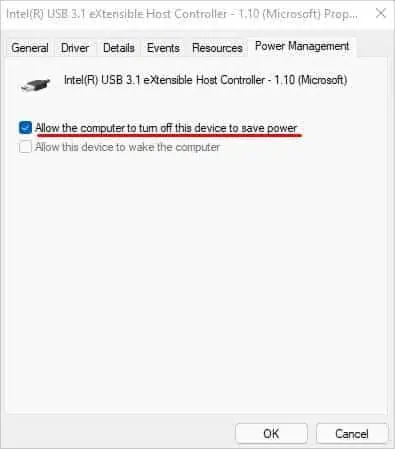
- Click on the Power Management tab.
- Uncheck Allow the computer to turn off this device to save power.

- Click on OK.
- Repeat this step for all drivers inside Universal Serial Bus controllers.
Update/Roll Back Driver
If you have an outdated driver, it will have issues communicating with the OS. Therefore, it is always recommended to keep your driver up-to-date.
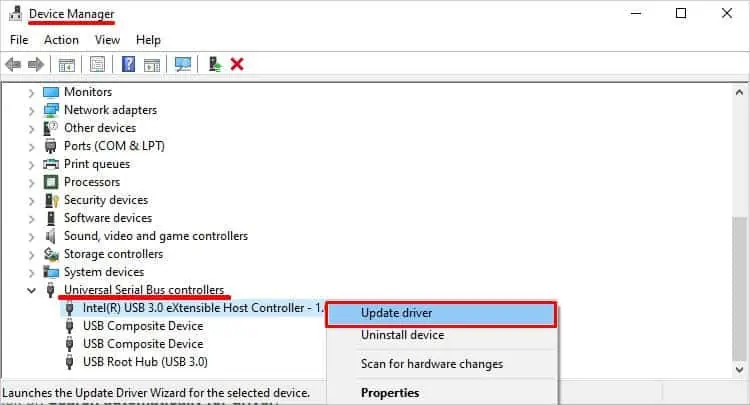
Here’s how you can update USB driver:
- Press Windows key + X.
- Select Device Manager
- Expand Universal Serial Bus Controller and USB Connector Managers.
- Right-click and Update all listed drivers.

- Click on Search automatically for driver.
Now, Update all drivers inside the Universal Serial Bus controller and USB Connector Managers. Then, restart your computer.
Sometimes, a driver update is also known to bring errors to your computer hardware. So, if the PC starts to have issues with USB after a driver update, we can roll back a driver. This will install the previous stable version of the driver.
Follow these steps to roll back a driver update.
- Open Device Manager.
- Expand Universal Serial Bus controllers and USB Connector Managers.

- Right-click on the drivers you want to roll back and select Properties.
- Go to the Driver tab and click on Roll Back Driver.

Uninstall and Reinstall the USB driver
If updating/rolling back the USB drivers doesn’t work, you can always uninstall and reinstall them. If you have a corrupted driver file, reinstalling a driver will work for you. Uninstalling the driver will remove any corrupted data and replace all your components inside a driver file.
To uninstall a driver, please follow these steps.
- Open Device Manager.
- Expand Universal Serial Bus controllers and USB connector Managers.
- Right-click on any one of these drivers and select Uninstall Driver.

- Click Uninstall.
Then, Uninstall all drivers listed inside the USB controller and USB Connector Managers.
Now, to reinstall these drivers, open Device Manager, right-click on top of the list and select Scan for hardware changes.
Update Windows
Similar to updating drivers, you also need to keep your Windows up-to-date. An outdated Windows will also have a lot of issues, such as detecting hardware. Therefore, if you have problems with USB drives, updating Windows can fix their issues.
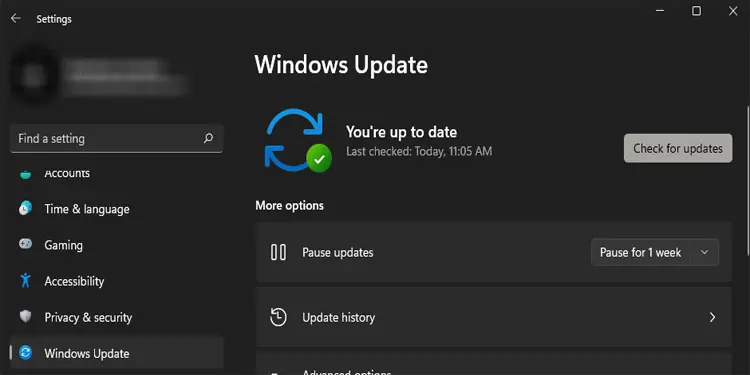
- Press the Windows key and open Settings.
- Select Windows Update (Update & Security > Windows Update for Windows 10)
- Now, on the right panel, click on Check for updates or Install Now.

- Once the installation is complete, restart your PC to check if the USB ports work.
Uninstall Recent Windows Update
Similar to a driver update, Windows can also bring some bugs and issues with it. So, if the USB ports on your system start to malfunction after a Windows Update, you might want to uninstall recent Updates.
You can follow these steps to uninstall the recent Windows update.
- Press the Windows + I key to open Settings.
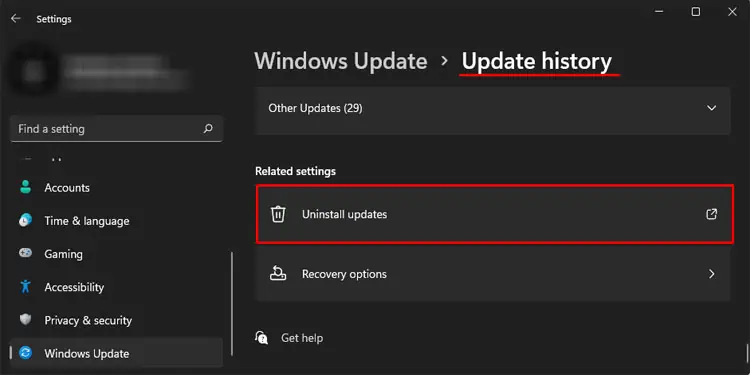
- Go to Windows Update (Update & Security > Windows Update in Windows 10) > Update history.
- Scroll down to Uninstall Updates.

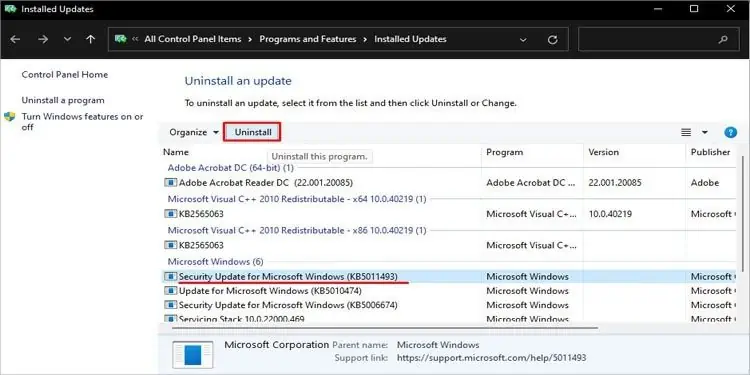
- Here, click the latest Microsoft Windows update and click on Uninstall.

- Once the Uninstall is complete, restart your computer.
Check for Bent Pins on USB Headers
If you are just turning on a PC that you just built and some of your USB ports are not responding, USB header pins may be bent or damaged. When building a PC, the cable from the front panel USB ports needs to be connected to the USB header in your motherboard.
If any of these pins are damaged, there is a high chance that this is the reason the USB port on your desktop is not working. Check the USB header on your motherboard for any bent pins.
If the header does not have any bent pins, make sure that you insert the cable to the USB header correctly.
How to Fix USB Ports Not Working on Mac
Now that we are done with the solution to Windows, let us see what can we do on a Mac to solve a faulty USB port.
Similar to the issues with USB ports on Windows, Mac computer’s ports may also contain dust and debris that can stop it from working. So, you should start off by cleaning the dirty ports first.
If it still does not fix the issue, you can try the following fixes.
Update Mac OS
Mac OS updates both the system and driver simultaneously when we update the software. You can follow these steps to update both the OS and driver.
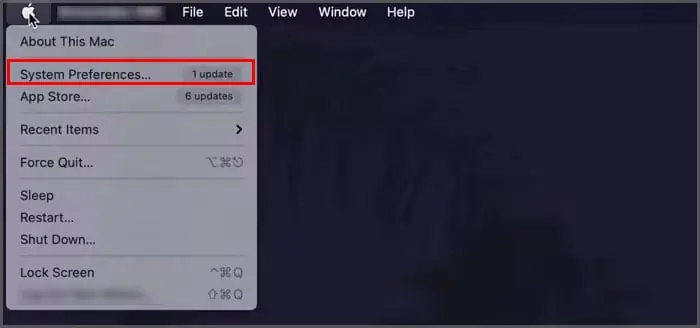
- Click on the Apple logo on the top-left corner.
- Click on System Preferences.

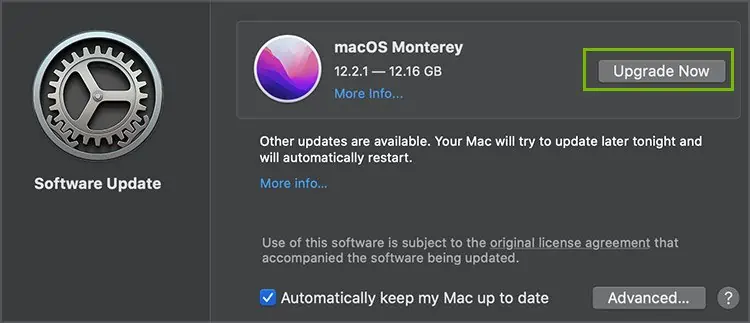
- Select Software Update.
- Click on Upgrade Now if you have any pending updates.

Reset System Management Controller
If you are using a MacBook, you can reset the System Management Controller or the SMC. Resetting the SMC can fix issues with Mac’s power management and issues with malfunctioning hardware such as the USB port.
Please follow these steps to reset the SMC.
- Turn off the Mac.
- Hold Shift + Control + Option and the Power button for ten seconds.
- On releasing these keys, the Mac’s SMC will reset.
Once you reset the SMC check if the USB ports detect a USB device.

