One display screen is sufficient for most users. But a second monitor drastically improves productivity for gaming, simulations, video editing, or similar purposes. It also becomes much more convenient if you want to use multiple apps simultaneously.
Normally you need to invest in a monitor to extend your screen, but what if you have a spare laptop? If you have a Chromebook that you can transform into a secondary screen, using it is the most economical method.
Using a Chromebook as a second monitor is not as easy as using Windows or Mac laptops. So, we have created his article to help you out in this process.
Should You Use Chromebook as Second Monitor
A Chromebook does not have video input. So, you can only use some server clients that use remote desktop access to emulate Chromebook as a mirroring or extended screen.
The apps work through wired or wireless connections. Wireless interference can cause lags and delays for such connections. You can even experience delays in wired mode as the cables you use are not optimized for video transfer.
So, if you need a second monitor for tasks where delays are undesirable, such as gaming, it’s better to invest in a separate monitor. But for casual uses, if you already have a Chromebook, you can use it as a second monitor.
How To Set Up Chromebook As A Second Monitor
As mentioned earlier, since Chromebook lacks video input, you need to use an application to emulate the effect of having a second monitor. There are no such apps on your default Chromebook or other Operating Systems.
So you can only use third-party apps. Users consider Duet Display, a paid app, to have the best performance for this purpose. But many free programs are also available, such as Spacedesk and Deskreen.
Use Duet Display to Set Up Chromebook As A Second Monitor
Duet Display is the most popular software users use to set up Chromebook as a second monitor. They claim that it provides the least lag and many options for user convenience. So this application has many users despite it being a paid app.
Google used to provide a free Chromebook perk for Duet Display. While it has already stopped doing so, you can still check the Chromebook Perks website in case Google starts offering the perk again.
Duet Display allows wired or wireless connection with iPads or Android, but you can only use wireless mode for Chromebook. Here are the necessary steps to use this program to set up Chromebook as a second monitor:
- Download and install Duet Display for both Chromebook and your main PC. You can find the app for Chromebook on the Google Play Store.
- For Mac or Windows, find the installer on the official website.
- Connect both Chromebook and your PC to the same WiFi network.
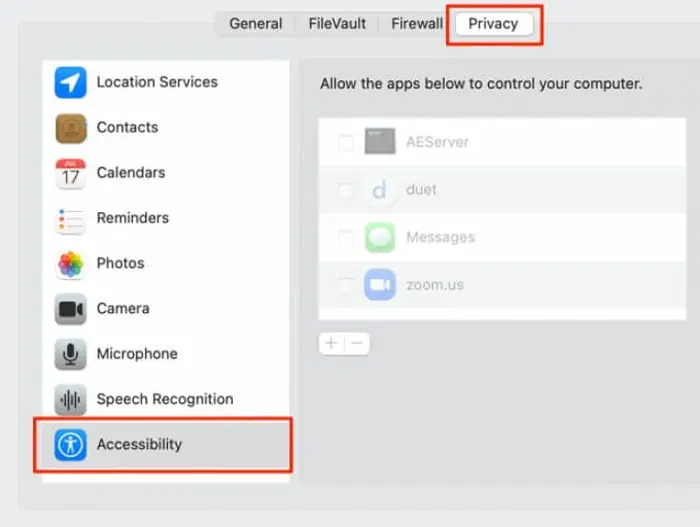
- On Mac, you also need to give access to the Duet Display app. To do so,
- Click on Apple icon and go to System Preferences > Security & Privacy > Privacy > Accessibility.

- Click on the Lock icon and enter your credentials.
- Tick duet from the app list.
- Now, select Screen Recording from the sidebar and tick duet.
- Click on Apple icon and go to System Preferences > Security & Privacy > Privacy > Accessibility.
- Open the Duet Display app on your Chromebook and your main PC.
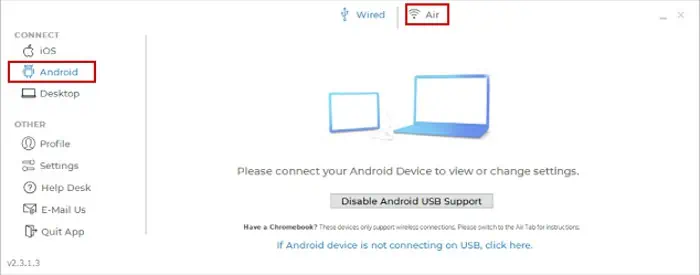
- On your Windows or Mac’s app, select Android and then Air.

- Wait for your Chromebook to show up. If it doesn’t, restart your computer and try again.
- You can also click on Connect to IP Manually and enter your Chromebook’s IP address. To find the IP address,
- Click on your Network icon.
- Select your connected access point and look under the IP Address field.
- Hit the Click to connect wirelessly button to connect the Chromebook as a second monitor.
- You can click on Adjust Display Settings to modify some settings such as:
- Enabling Mirror display (by default, the app extends your monitor)
- Changing Resolution, FPS, Quality, etc.
- You can also sign in to Duet Air on both devices for more security.
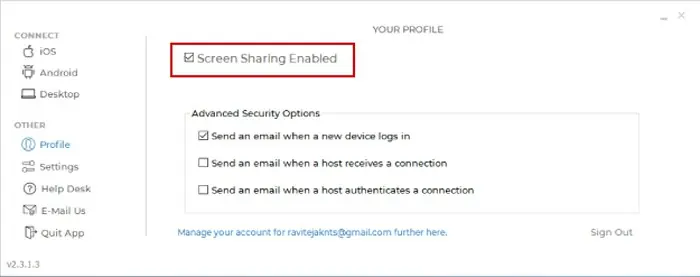
- If you can’t share your screen on the Chromebook, go to the Profile tab on your main computer’s Duet Display app and check Screen Sharing Enabled.

Alternate Apps to Set Up Chromebook as Second Monitor
While users consider Duet Display as the best option to use Chromebook as a second monitor, it’s a paid app. And its free perk for Chromebook is also no longer available (as of this article’s published date).
It does not mean that Google won’t provide such perks in the future. But you might want to use free alternatives. So, here are some open-source apps you can use for this purpose.
Spacedesk
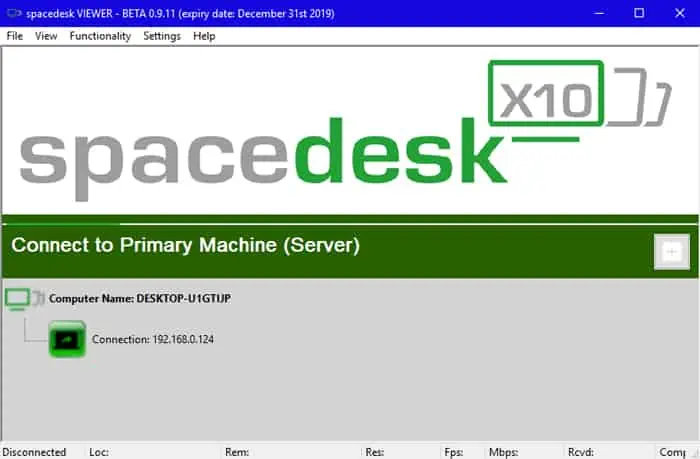
Spacedesk is a free multi-monitor application that supports both wired and wireless modes. While it is somewhat buggy and lags a bit compared to Duet Display, you can use it well on high-spec systems or for less resource-intensive tasks.
Here’s how you can use it to set up Chromebook as a second monitor:
- Download and install the app from its official website for Windows or Mac and the play store for Chromebook.
- Connect both computers to the same network or connect them through a USB or an Ethernet cable.
- Open the app on both computers.
- On Chromebook, click on the main computer below Connect to Primary Machine. If it doesn’t show up, click the + (plus) icon and enter the IP address of your computer.

Splashtop Wired XDisplay
Splashtop Wired XDisplay is another free alternative software. It only supports a wired connection, but you won’t supper form lags or other issues. Follow the steps below to use Chromebook as a second monitor using this application:
- Install the app from the Google play store for Chromebook and the official website for Mac or Windows.
- Connect both devices using a USB or Ethernet cable and open the app.
- Start the projection mode from Windows (Win + P) or Mac (mirroring icon).
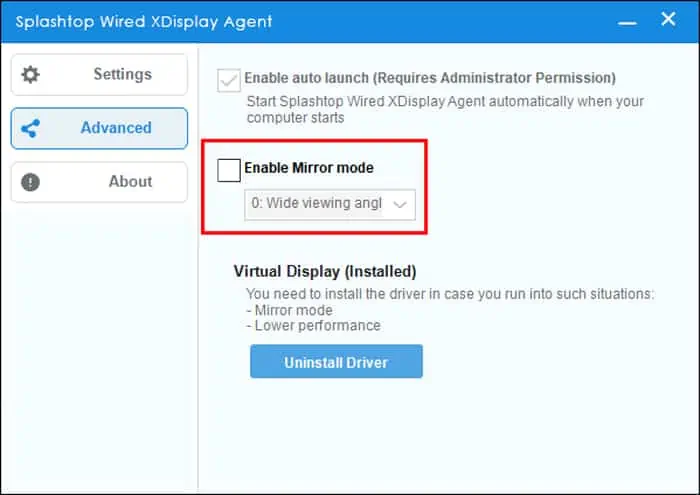
- Only the Mirror display option is available by default. To extend your display, open the app and,
- On Mac: From the menu bar, select Preferences > Arrangement > WiredXDisplay and disable Mirror Displays.
- On Windows: go to the Advanced tab and uncheck Enable Mirror mode.

Deskreen
Duet Display, Spacedesk, and Wired XDisplay all only allow using Chromebook as a second monitor for Windows or Mac computers. So, if you want to extend your display for a Linux PC, a good option is the Deskreen. It also works with Windows and Mac but is somewhat laggy.
To use this program to set up Chromebook as a second monitor,
- Install and open the Deskreen app on your Windows, Mac, or Linux computer.
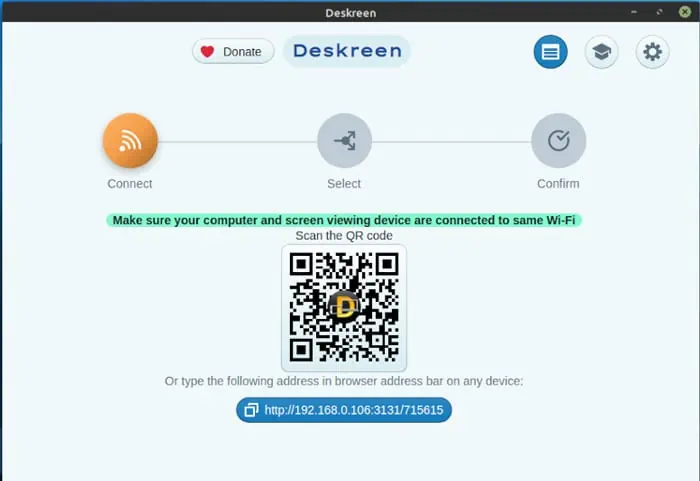
- Open the app. You’ll see a QR code and an address.

- Scan the code using any QR code scanner on Chromebook. Or you can enter the address on Chromebook’s browser.
Change Second Monitor Display Settings
You can adjust the Chromebook’s display from your Multiple Monitor display settings.
First, it’s better to arrange your logical screen positions similar to the physical setup for more convenience. Here’s how you can do so:
- On Windows: Go to Windows Settings > System > Display.
- On Mac: Go to System Preferences > Displays > Arrangement.
- You should see your Primary Monitor and the Chromebook as a secondary monitor on the page. If you can’t find a secondary display,
- On Mac: On the Displays preferences, click Detect Displays.
- On Windows: Click on Multiple displays and select Detect.
- Click and drag your monitors around according to their physical placement.
Then, change the settings for the Chromebook monitor from your display settings. The options you can modify are self-explanatory, such as resolution, orientation, and so on.
You can also change the projection mode from the settings. However, there’s an easier way for this process. On Windows, click Win + P to access the projection options. To do the same on Mac, click on the mirroring icon on the menu bar.
If you choose to extend your display or use Chromebook as a separate display, you need to drag a window to the edge of your primary display to transfer it to Chromebook.
Related Questions
How to Fix Issues While Using Chromebook as Second Monitor?
If you encounter any issues while using Chromebook as a second monitor, you can apply the following troubleshooting methods:
- Update or Reinstall Display drivers.
- Update or Reinstall USB and Network drivers depending on the mode you use.
- Update Operating System.
- Uninstall the Multi-monitor server client and reinstall it.
- Reset Chromebook OS.
