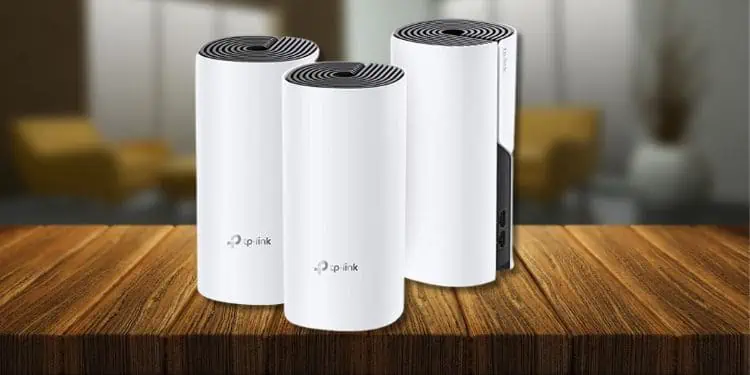
One of the major problems with a standard Wi-Fi router is weak signals and dead spots. While adopting a Wi-Fi extender is beneficial in expanding the wireless coverage, you still require manually switching between the different SSIDs.
To solve this, a Mesh network would be an ideal option. It uses two or more access points. Each node lets you connect to one Wi-Fi network seamlessly (having the same SSID).
However, this big-budget product might not be the best fit for everyone. So, is Mesh Wi-Fi worth it, and when should you use it? Without further delay, let’s get into its technical details.
What is Mesh Wi-Fi?

Unlike regular Wi-Fi having a single router/modem/gateway, a Mesh network utilizes one primary router with multiple points/nodes. After setting them up in appropriate places, you can join your device to a single available SSID. You’ll remain connected to the same network throughout your home/workplace.
Understanding the workflow of Mesh Wi-Fi shouldn’t be a big issue for users with basic networking knowledge. You might have heard or learned about ‘Mesh Topology,’ where all the devices in a network are interconnected. This is exactly what the Mesh Wi-Fi technology is based upon.
Here, each node placed in different areas of your home/workplace can communicate with one another wirelessly. So, no matter where you go, the connectivity remains identical (with full bars of Wi-Fi signal in most cases) as your device will automatically switch to the node that acts as the fastest point.
Moreover, every node can communicate with each other. So, even if one experiences high traffic, it will find an alternative route to get the best signal from the base node.
Let’s understand this with a simple example. You live in a three-story house with five rooms on each floor. Even if you use a high-frequency Wi-Fi router with an extender, you will still have difficulty achieving the highest bandwidth purchased from the ISP.
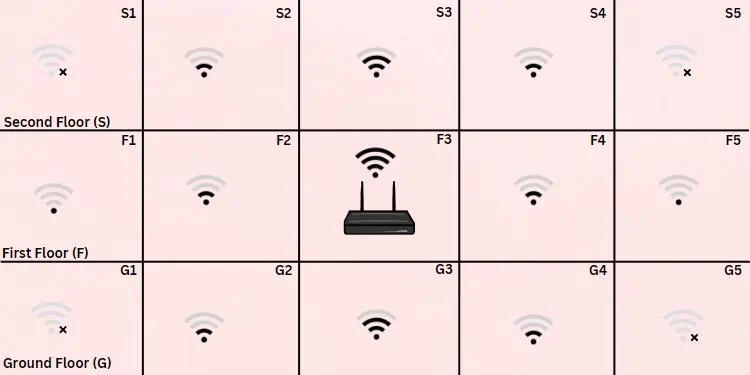
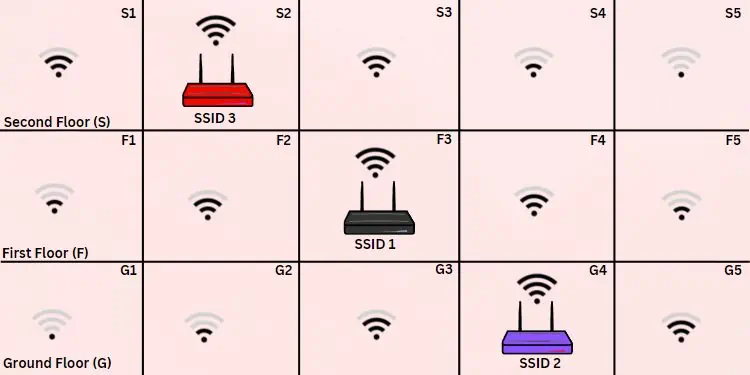
For instance, you set up my primary router somewhere in the middle of the first floor and two extenders, each on the ground and the second. I’ll likely get the best speed when you are in the rooms in the middle, as I’ll be directly connected to the main router. Also, I’ll have a decent connection near the extenders.
But one thing is certain–You require manually switching between the networks when moving around. While those supporting Wireless AC Wave 2 have a feature to automatically switch between the fastest networks, this can also be an issue. You may notice that even when you’re near one router/extender, it remains connected to the previous one despite it having a weak signal.
However, with the same setup (main router in the middle and one node on each floor) using a Mesh router system, you won’t have to worry about weak signals at all. For instance, you move to the first floor, far from the base node but closer to one of the nodes. The Wi-Fi bars won’t drop at all. This is because the same signal is now transmitted by the node that’s nearest to me.
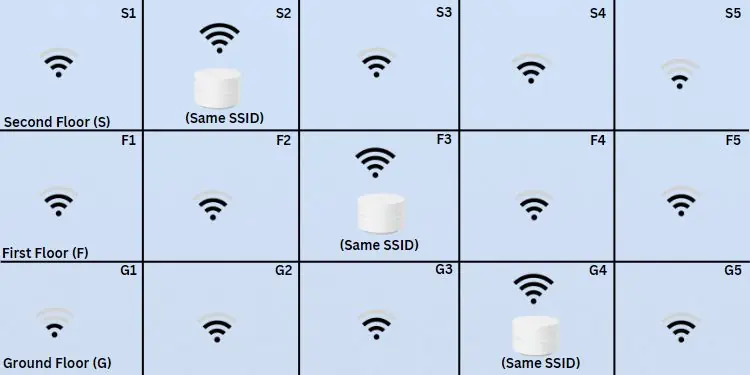
Clearly, Mesh Wi-Fi is much better for large spaces where a single router isn’t enough to provide the best signal. Additionally, they have better Wi-Fi coverage and are best suited for the range of 2,000 to 6,000 square feet, with a further possibility of expansion.
Differences Between Regular Wi-Fi and Mesh Wi-Fi
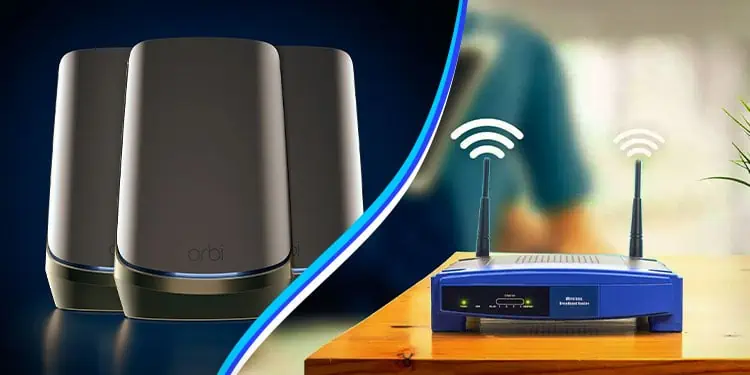
Mesh Wi-Fi systems are best suited for large organizations or homes. This should be your ideal choice if you’re seeking consistency and wish to eliminate dead spots.
If you are trying to connect multiple devices to the same network, bandwidth management becomes more challenging. But with Mesh Wi-Fi, the interconnected nodes will distribute the load and prevent possible network congestion.
Moreover, this system lets you keep the strongest Wi-Fi signal no matter where you go. While an extender also provides the same benefit, you have to keep changing the SSID, which can sometimes become tedious. But with Mesh systems, you keep the same SSID and also get the strongest signal from the least-congested node automatically.
While Mesh Wi-Fi seems to be the best option, it comes at a cost! Since you need to purchase two, three, or even more nodes (based on your needs), the expense keeps adding up. In fact, a high-end Mesh system can even be five to six times the price of a standard router.
Taking this thing into consideration, Mesh Wi-Fi might not be suitable for normal users who have a low budget. Also, purchasing one is not a compulsion if you live in a smaller space, like an apartment. For this, you may instead opt for standard routers with high coverage (usually with multiple antennas) or pick a suitable extender.
Regular Wi-Fi and Mesh Wi-Fi can differ in terms of coverage range, roaming and routing, and performance. Based on different scenarios, one might be more beneficial than the other. You may refer to our other guide on the detailed differences between the two. For your comfort, I have included their summarized points in the table below:
| Factors | Regular Wi-Fi | Mesh Wi-Fi |
| Coverage | 150-300 ft (can drop when 5GHz is used) | Upto 6000 sq. ft |
| Number of Nodes | 1 main router (limited number of access points) | Two or more nodes (problems may arise if you add more than 4 nodes) |
| Signal Strength | Signals may degrade with dead spots on certain locations | Trasmission of strong and consistent signals from multiple nodes |
| Networking & Routing Protocols | Transmission of strong and consistent signals from multiple nodes | 802.11s, 802.11r, Hybrid Wireless Mesh Protocol (HWMP) |
| Roaming and Routing | Requires manual switching between the different SSIDs | Uninterrupted connectivity with a single SSID for every Mesh node |
| Performance | Same performance as a Mesh system when used in small rooms and apartments | Better in terms of signal quality and speed with comparatively less signal attenuation in larger areas |
| Cost | Cost-effective but might set you back when adding a repeater or extender | High-priced due to additional nodes (especially when purchasing a high-end model) |
| Aesthetics | Doesn’t add much aesthetic value to your environment | Each node can blend into your work environment providing a more aesthetic experience |
| Setup | Easy to install and configure | Can be a little tricky as the position of each node should be considered |
Do I Need Mesh Wi-Fi?
Looking at the above chart, Mesh Wi-Fi might seem to be the optimal choice for everyone. Certainly, it’s better for extended coverage, seamless roaming, improved network, high performance, and aesthetics.
However, there are some scenarios when a Mesh system wouldn’t add much value. As mentioned earlier, a normal router can provide the same performance if you’re setting up Wi-Fi in smaller spaces.
Keeping all these things into consideration, the ultimate decision falls in your hand. The main factors to keep in mind are your coverage requirements and budget.
In short, I advise picking Mesh if you’re setting up Wi-Fi in a larger space that requires a better network connection and high signal strength.
But if you’re going to use it in a confined area, it’s best to consider standard Wi-Fi. In case you’re not getting a better signal, you may opt for an extender. This way, you’ll get the best speed without requiring to spend too much on a Mesh system.
The below table features the pros and cons of Mesh Wi-Fi to help you decide whether you should get one:
- Provides extended coverage and eliminates dead spots.
- No need to manually switch between the nodes.
- Provides a smoother networking experience with fewer disruptions and reduced latency.
- With its modern design, it is aesthetically pleasing.
- With the help of user-friendly apps and web interfaces, setting up a Mesh system is an easy task.
- Unnecessary in smaller spaces as a standard Wi-Fi router can provide the same coverage.
- Very expensive and might not fit into normal users’ budgets.
- You can still experience signal attenuation due to physical objects.
- With the addition of multiple nodes, power consumption also increases.
- If the main node fails, the entire network collapses.
- Some gadgets might not be compatible with Mesh.
How to Setup a Mesh Wi-Fi System?
When it comes to setting up a Mesh Wi-Fi system, it’s all about placement. It’s extremely important to consider the distance between the nodes and the proper height so that the signal properly spreads downwards.
The idea is quite simple. You connect the primary/base node to the modem and start placing the additional nodes in different locations. Experts advise keeping the nodes at least two rooms away. The bigger your home/workplace, the more satellites are required.
If you haven’t already purchased one, I suggest getting one from a trusted brand. Some popular options include TP-Link Deco, Google Nest, Asus ZenWiFi, NETGEAR RBW30, etc.
When setting up Mesh Wi-Fi System, it’s always recommended to follow the instructions in the respective user manual. This is because the process of setting up a Mesh Wi-Fi system varies for different models. For your ease, here are the basic steps that you need to follow:
- First, plug the power adapter into the primary node (you can make anyone the base node) and turn it on.
- In most models, you should see a light blinking. In case you don’t notice anything, reset the node using the dedicated button first.
- Next, establish an ethernet connection. Connect one end to your modem/router and the other end to the primary node.
- Then, connect your device to the network via Wi-Fi.
- Since we have already established the internet using an ethernet cable, the internet should work. Connect your smartphone to this network and download the dedicated application provided by your manufacturer.
- After its installation, launch the application and complete the setup process.
- Now, move to a different location and start checking where the Wi-Fi signal starts to drop.
- Place the second node at an elevated height. Don’t forget to connect the power adapter. While the two nodes can communicate wirelessly, it’s a good idea to use a wired connection (ethernet cable) for better speed.
- Repeat the step for other nodes.
- Once all the nodes are appropriately positioned, test the connection in each location.
- Finally, you can configure other network settings, like setting up a suitable SSID, Wi-Fi password, enabling/disabling dual band settings, and more.

