Recycle Bin has always been a Hail Mary when we accidentally delete any files. Just pop into Recycle bin and restore the files, and everything is spiffy again, Right?
Recycle Bin is a wonderful windows feature, but what if the deleted files don’t end up in the Bin. It can be disastrous to find out that we can never recover these files.
Don’t worry. We have compiled a list of ways to tackle this situation with some preventive ways to never face the issue again in the future.
Why is My Deleted File not in Recycle Bin?
There are many reasons why the deleted files don’t end up in the Recycle bin. Stated below are some common causes that create this issue.
- We used Shift+ Delete to delete the file. This combination of keys deleted the files without sending it to the Recycle Bin.
- We deleted files from a USB Flash Drive. The files do not go to the Recycle Bin of the PC and get permanently deleted.
- Improper Recycle Bin Properties Settings.
- We emptied the Recycle Bin, or the Bin is full.
- Corrupted Recycle Bin doesn’t hold deleted files.
- Files deleted through Command Prompt. The files deleted by this method do not go to Recycle Bin.
How to Recover Deleted Files That Don’t Show Up in Recycle Bin?
When there is any accidental deletion of files and folders, we recommend stopping the PC from any further use till recovery is made. The longer we wait to recover these files, the smaller the chance of recovery. Hence, we recommend prioritizing the recovery process with the methods stated below.
Restore to Previous Versions of Folder
This method will only work if a previous version has been backed up using Create Restore Point in windows. Suppose you have not created a restore point. This step will not work for you.
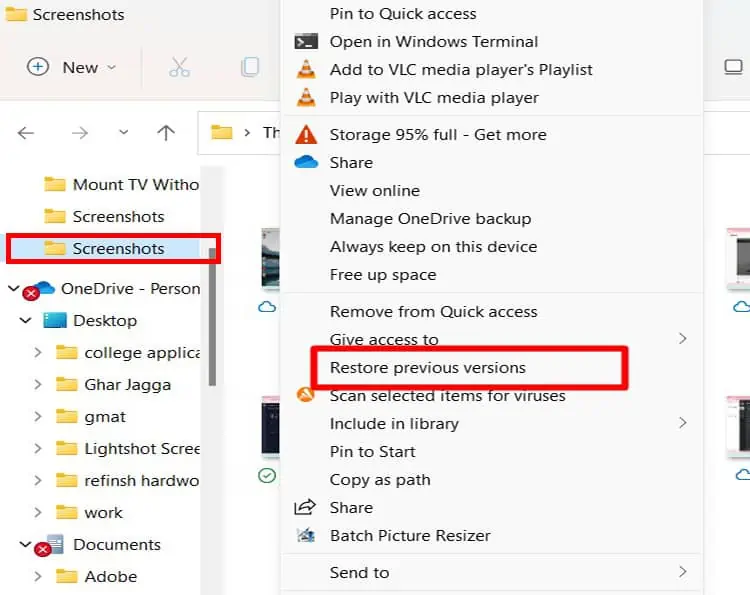
- Go to the folder where you deleted the file From.
- Right Click on the folder and select Restore previous versions.

- A Pop-up box will open, and you will be able to see a previous folder version listed in the box.
- Click on Restore at the bottom right corner.

- A final permission Message will open; select Restore.
Restore Files From File History
This step only works if you had file history backed up in the first place. We need to create a backup file history on external drives. This is also possible if we have HDD and SSD in one PC.
Remember, we need to back up the file in a backup drive instead of the primary one. If you had done a backup before the deletion process, follow the procedure below:
- Make sure your external drive is connected to the PC. If files are backed up in an internal backup HDD drive, move directly to the next step.
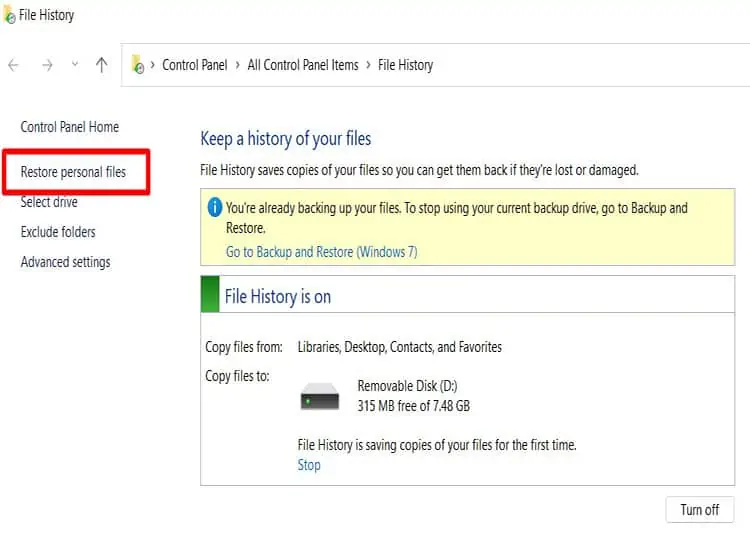
- In Windows 11, Press Windows Key, Search and select file history.
For Windows 10, Go to Control Panel. On the left panel, select backup. A New control panel page will open. Find Back up using files history and select more options>advanced settings. - On the left panel, Select Restore Personal Files.

- A new pop-up will open; go to the folder where the file was previously saved. Once you find the File, Select the File and click on the green button at the bottom of the pop-up box.
Check Synced Folders in One Drive
One Drive Syncs the contents from the desktop, Pictures, and Documents folder from the PC to its cloud storage. When we delete files from PC folders, the files in one drive get deleted too.
However, we have experienced OneDrive does retain some of those PC files even after their deletion in PC. This is an issue Microsoft will probably fix in the future but for now, use it to its advantage.
Another great thing about one drive is when you delete files in PC Folders, if the file has been synced in OneDrive, you will find a copy of it in OneDrive’s Recycle Bin. Follow the procedure below to check those files in OneDrive.
- Go to the following URL:
https://www.microsoft.com/en-ww/microsoft-365/onedrive/online-cloud-storage - Click on the Sign-in option and enter your Microsoft account details used for your windows account. One drive will open.
- Check if the deleted files are present here. If found, Right Click on it to Download the File to the PC once more.
- We can also see previous versions of these files by right-clicking on the file and selecting Versions History. If there are previous versions, the versions will be listed on the left panel. Click on the versions to get a preview and select restore if that version is needed.
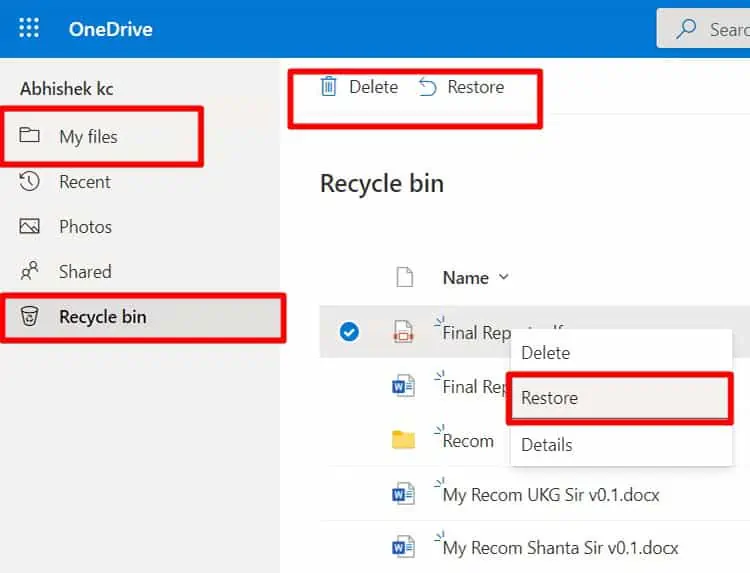
- If you cannot still find the files, go straight to Recycle Bin of OneDrive. Check to see the deleted file, right-click on it and restore.

- Go back to My files in one drive and download the deleted file.
Restore Files from Windows Backup
This only works if previous backups have been made before the deletion of the file.
- Connect the external drive where the backup is present.
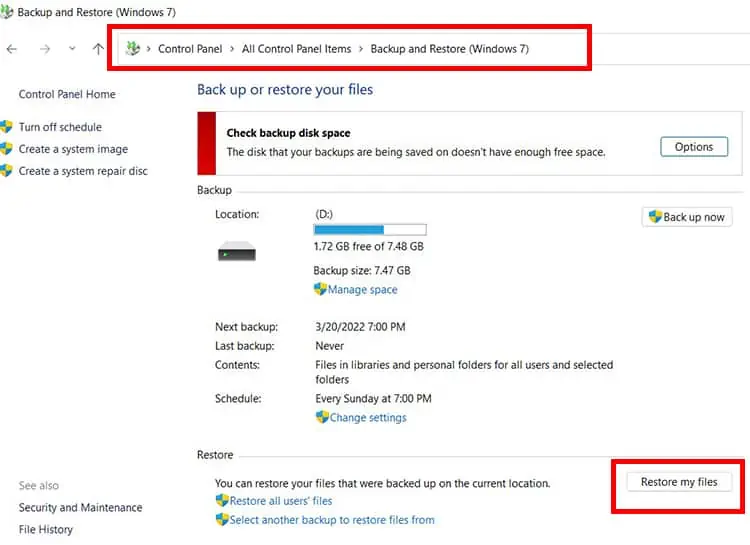
- Press Windows Key and search Control Panel
- Click on the option Backup & Restore (Windows 7)
- Click on select Restore my Files on the bottom of the window.

- Follow instructions in the pop-up box.
Use Recovery Software to Recover Files
There is plenty of Recovery Software centered on recovering deleted files in Windows. There are free versions and paid versions available. These types of software use algorithms to target the location of the deleted files and attempt to recover as much as possible.
Remember, it is not guaranteed to recover all the files and folders. Some files often are recovered only partially. The number of file types that the software can recover will depend on the software’s capabilities.
Recovery Software generally comes with its own list of instructions to follow. We also recommend exporting the recovered file to a new folder destination instead of the old file location.
Some of the reputed software currently in the market are Hetman Partition Recovery, Any Recover, Tenorshare 4DDIG, Auslogics, Stellar Phoenix Windows Data Recovery, EaseUS, Disk Drill.
My Recycle Bin Still Doesn’t Save My Deleted Files
Even after following the above solutions, if your recycle bin still does not store files, you can follow these procedures:
Create Restore Points
We recommend creating restore points for folders having important files. This will allow users to restore files accidentally deleted in the future. Follow the procedure below to execute it.
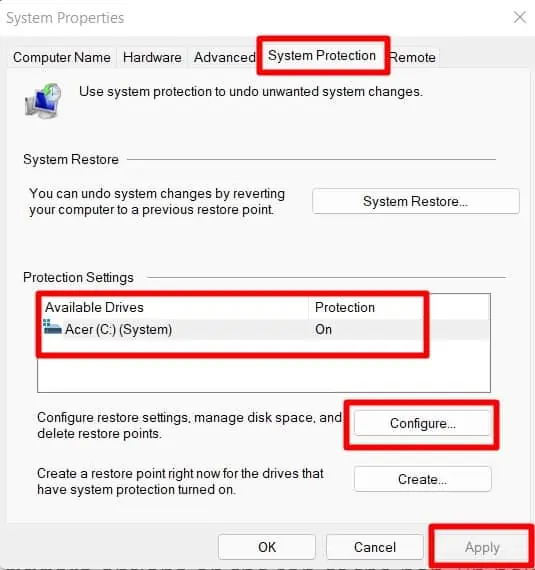
- Press Windows Key, Search Create a Restore Point and click on it.
- Go to the System Protection section from the top.
- There is a middle section titled Protection Settings where we can see drives listed. Make sure the Protection status is ON.
- If it’s Off, Press Configure on the Bottom of the Protection Settings and Choose Turn on System Protection. Click on Apply if changes are made.

- There is also a Disk Space Usage slider at the bottom to adjust how much space you want to allocate for restore points. Once the space is filled, Windows will delete older restore points to make room for new restore points.
- Once it is done, press Ok to close the Pop-up Box.
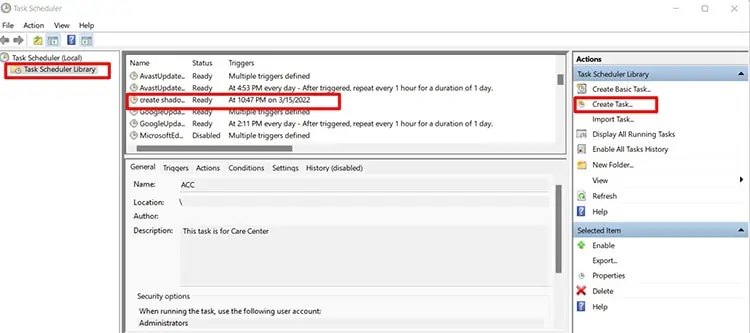
- Press Windows Key again, search Task Scheduler, and click on it.
- On the right panel of the Task Scheduler, click on Create Task.
- A new Pop-up Box will open. Name the task (any name easy to remember will do). Also, Tick the Run with highest Privilege option on the bottom of the pop-up box.
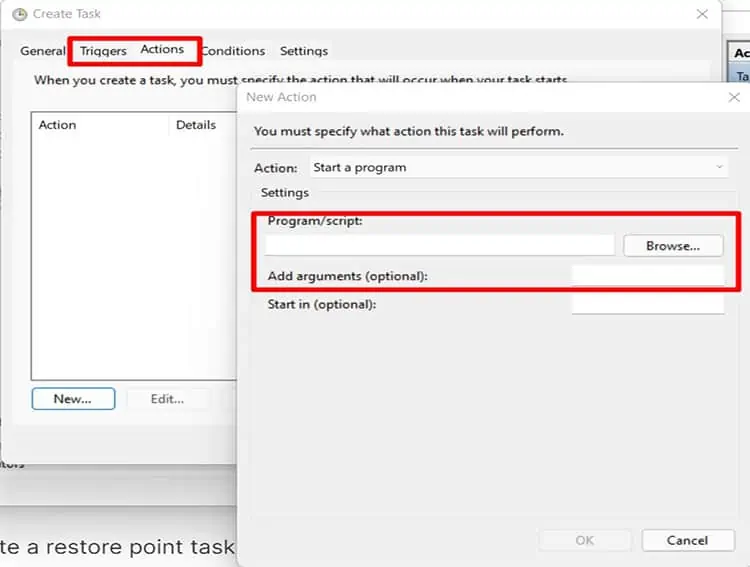
- Once named, Select the Triggers options on the top of the pop-up box and select New.
- Chose the interval for the task to occur. You have options creating a restore point task of one time, daily, weekly, and monthly. Once selected, click on Ok.
- Now select action, Under Program/Script type wmic. Under Add Argument (optional) section, Type the file path you want to create the restore point for. You can do it for the whole drive with the following argument.
E.g., For c drive, use the argument:shadowcopy call create Volume=C:\(Change Volume info to create a restore point tasks for other drives)
To create a restore point task for individual folders, Select the Browse option and select the intended folder. Once it is done, Select Ok.
- Select Ok again to close out the scheduler task.
- On the left panel, select Task Scheduler Library. A list of tasks will show in the middle of the box.

- Find the task you just created, right-click on it, and select Run. You have now created a restore point and a restore point task.
Check Recycle Bin Properties
To Prevent Files from disappearing from Recycle Bin, follow the procedure below to check specific properties of Recycle Bin.
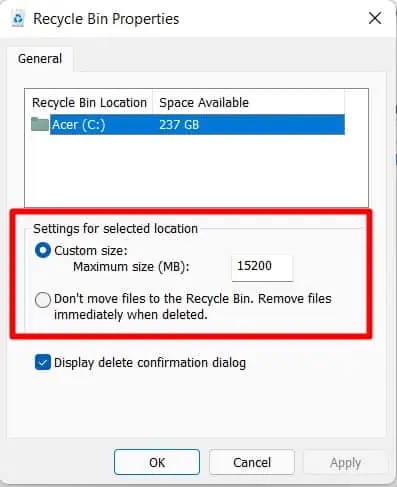
- Right-click on Recycle Bin and select Properties.
- Check if the “don’t move files to the Recycle Bin. Remove files immediately when deleted” option is selected. If this option is selected, files will not be stored in Recycle bin when you delete them.
- Check Custom Size as it shows the maximum storage capacity of the recycle Bin. Recycle Bin will not store the files if the space is filled or the deleted file exceeds the space capacity.
- There is a box to change the capacity of storage for Recycle Bin. Change according to your needs.

Create a New Recycle Bin via Command Prompt
If you faced Access Denied message, corrupt Recycle Bin error message which did not allow you to access deleted filed stored in Bin. It’s best just to delete it and create a new recycle bin so that the issue doesn’t reoccur in the future.
This command will not recover the lost folders but will give you a clean uncorrupted bin to prevent the same problem from occurring in the future. Any folder currently in Recycle Bin will also get deleted.
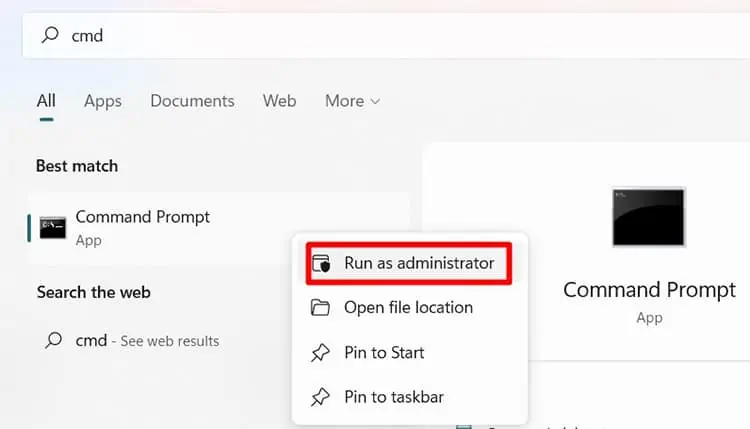
- Press Windows Key, search cmd and right-click to select run as administrator.

- Copy/Paste the following command:
rd /s /q C:\$Recycle.bin - Press Enter. Restart the computer.

Start Using One Drive
One drive provided 5 GB of free storage space for anyone using a Windows operating system. Microsoft also provides paid plans for more storage up to 2TB.
We recommend moving important folders in either desktop, Documents, Pictures, or any folder listed under OneDrive on your PC.
As stated above in the fixes section, if one drive synced files are deleted, we can find a copy in the recycle Bin of one drive.
Make File History & Windows Backup
Create Backups at regular intervals like weeks, months to never fear an accidental deletion of files again.
Create File History
- Connect an external drive (recommended) to the PC (not compulsory if you have both SSD and HDD in the computer)
- Press Windows Key, search and select file history.
- On the bottom left corner, choose to Turn on and follow the instructions given by windows.

Create a Windows Backup
- Connect an external drive (recommended) to the PC (not compulsory if you have both SSD and HDD in the computer).
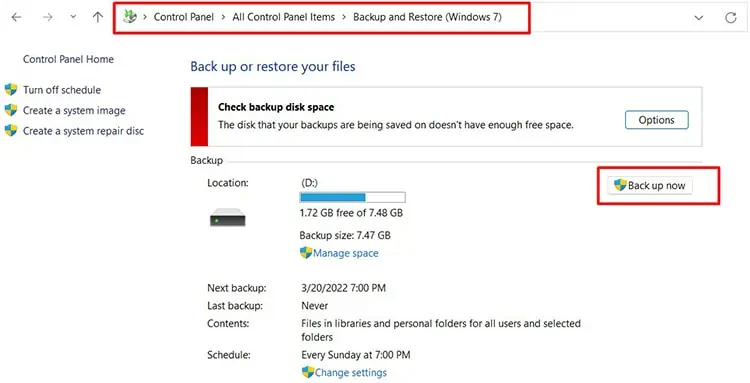
- Open Control Panel and select Backup and Restore (Windows 7).

- Select the Set-up Backup (for the first time) or Back up now (After the first time). We can find this option on the right side of the window.
- A Pop up will open asking you to choose the drive to store the backup file in. Select the external drive.
- The pop-up will also allow us to either let the windows choose files to back up or let us choose. Choose according to your needs.
- The rest of the process is easy; just follow instructions given by windows.
