Windows Boot Manager is the built-in Microsoft application that provides the boot environment for your system. On a multi-OS system, it helps the user decide which OS to boot into.
Users may encounter issues such as their computer booting into an OS without loading the Boot Manager or not displaying all available OS. It usually happens if you have a non-Windows OS or there are some issues with the boot files.
In this article, we have mentioned how you can troubleshoot such issues in detail.
Why is Windows Boot Manager Not Working
Here are the potential reasons for Windows Boot Manager not working on your PC:
- Windows Boot Manager not enabled.
- Having a multi-OS system with non-Windows OS.
- Fast startup enabled on your System.
- Disk connection issues.
- Corrupt boot files.
How to Fix Windows Boot Manager Not Working
First, restart your PC and check if Windows Boot Manager still doesn’t work or shows other issues. In such cases, apply the possible solutions we have provided below.
Enable Boot Manager
You can’t use Windows Boot Manager without enabling it. So, first, follow the steps below to make sure you have enabled the Boot Manager and check its settings:
- Press Win + R to open Run.
- Type
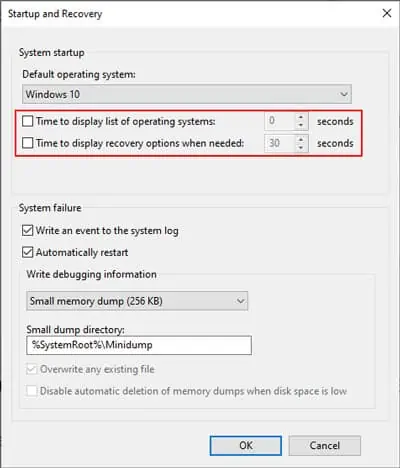
systempropertiesadvancedand press Enter. - Under Startup and Recovery, click Settings.
- Check Time to display list of operating systems.
- The default time is 30 seconds, but you can change it if you wish.

- Click Ok.
You can also use the Command-line Interface to enable Boot Manager and change the timeout interval. To do so,
- Open Run, type
cmd, and press Ctrl + Shift + Enter to open the Elevated Command Prompt. - Enter the following commands:
bcdedit /set {bootmgr} displaybootmenu yesbcdedit /set {bootmgr} timeout 30
Configure Windows Boot Manager to Show Other OS
Windows Boot Manager does not display other Operating Systems, such as Linux, by default. You have to configure such a setting manually. To so so,
- Open the Elevated Command Prompt.
- Type
bcdedit /set "{bootmgr}" path \EFI\ubuntu\grubx64.efiand press Enter.
You can also use third-party BCD tools to enable this setting.
However, most users prefer using the GRUB Bootloader, which displays all OS without having to configure any settings. You can also use this Bootloader as an alternative.
Disable Fast Startup
Fast startup shows many issues with a multi-OS system. While this feature decreases the time it takes to boot your system, it may bypass the Boot Manager and directly load your default OS. It mainly happens when dual-booting Linux and Windows.
Here’s how you can disable fast startup from Windows OS:
- Enter
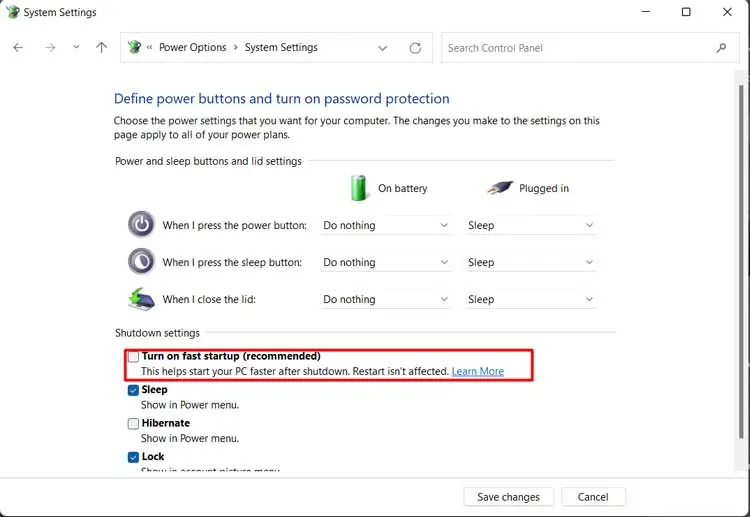
powercfg.cplon Run. - Select Choose what power buttons do > Change settings that are currently unavailable.
- Uncheck Turn on fast startup and click Save changes.

There are also other methods of disabling this feature, and some may overwrite the method we specified. You can find all the possible methods in our article, How to Enable or Disable Fast Startup on Windows. Check it out if there are any issues or if you simply want to learn more about the process.
Check Connection with Disk
You may experience the Boot Manager is Missing error if you try to boot from a Windows installation device and there are some issues with the USB connection. In such a scenario, first, check the device on another computer to account for issues with the boot files. You should also check by changing any replaceable cable if necessary.
Then, reinsert the media to the earlier PC while ensuring no loose connection. There may also be issues with your USB port. So, troubleshoot them using the methods from our article, How to Fix USB Ports Not Working.
You can also try reconnecting your hard drive’s SATA or IDE cables if your system’s Boot Manager or boot device is inaccessible.
Perform Startup Repair
Windows Boot Manager won’t work properly if there are any errors on the boot files. You can perform Startup Repair to repair most boot or startup errors. To run this feature:
- Get to the Advanced Startup or Windows Recovery environment. You can adopt any of the methods below to do so:
- Press and hold the Shift key and click Restart from the Power menu options.
- Hard reset your PC three consecutive times. On the third boot, select Advanced options or See advanced repair options.
- Boot your PC with a Windows Installation or Recovery Drive and access its WinRE (see steps from the next method)
- Go to Troubleshoot > Advanced options and select Startup Repair / Automatic Repair.

Rebuild BCD
Rebuilding your Boot Configuration Data is the most common solution to most Boot or Startup errors. If Startup Repair fails to resolve your issue, you must rebuild your BCD and try again. Here are the necessary steps for the process:
- Get to the Windows Recovery Environment from bootable media. To do so:
- Insert a Windows installation or recovery media into your PC and boot using this device. Change the boot load order if you need to.
- Set your language and other preferences and click Next.
- Pick Repair your computer on the Install screen.
- Go to Troubleshoot > Advanced options > Command Prompt and enter the following commands:
bootrec /ScanOSbootrec /RebuildBcdexit
Restart your PC and check if your Boot Manager starts working. If not, recreate the Boot Configuration Data.
Open the Recovery disk WinRE’s Command Prompt and enter one of these commands below to change to the Boot directory:
cd /d R:\EFI\Microsoft\Boot\cd /d R:\ESD\Windows\EFI\Microsoft\Boot\cd /d R:\Boot\
If you enter the incorrect path for the Boot directory, you’ll receive the “The system cannot find the path specified” error message. So, use the command where you don’t encounter this error.
After that, enter these commands to recreate BCD:
bcdboot C:\Windows /s R: /f UEFIren BCD BCD.bakbcdboot C:\Windows /s x: /f ALLexit
We also recommend running the DISM, and SFC commands after rebuilding your BCD to account for other issues with your system files. The commands are:
DISM /Online /Cleanup-Image /RestoreHealth /Source:I:\Sources\install.wim /LimitAccess(Replace I: with your Recovery drive letter. Also, for some systems, the source file isinstall.esd)SFC /Scannow
If you have a dual boot system with Linux and Windows, you may have set the default bootloader to GRUB instead of Windows Boot Manager. If there are any issues with this Bootloader, use the Boot-Repair tool to repair GRUB.
Reset Windows Boot Manager
You can also try refreshing the boot manager by setting the default boot entry. It resets the default OS the system boots into when the bootloader timer runs out. The Command Prompt syntax to do so is BCDEdit /default <ID>.
Use the command BCDEdit /? Default to get more information and BCDEdit /? ID to learn all possible IDs.
This command will also reset the default boot option with other Bootloaders, like GRUB.
Restore, Reset or Reinstall Windows
If none of the previous methods helped solve the issue, your need to Restore, Reset or Reinstall Windows.
If you have a recent restore point, you can restore your system using the steps below:
- Get to the WinRE using the Windows recovery or installation media.
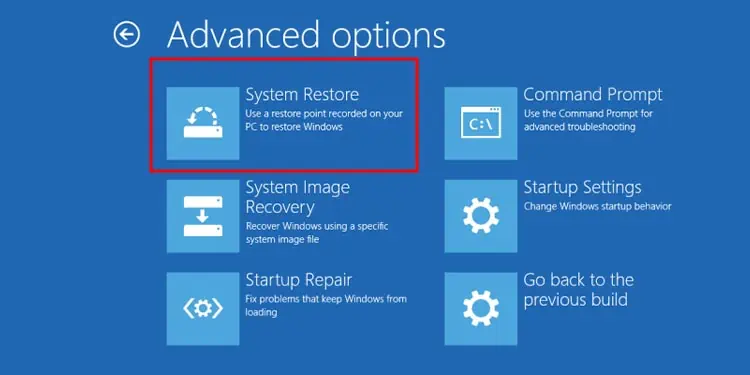
- Go to Troubleshoot > Advanced options > System Restore.

- Select a restore point and follow the on-screen instructions.
You need to reset your system if you don’t have appropriate restore points. Access WinRE and go to Troubleshoot > Reset your PC to initiate the process.
You can also delete the old boot partition and clean install Windows using the installation media.
If Windows Boot Manager still shows issues, it indicates HDD or SSD faults. In such a scenario, take your computer to a hardware expert for repair or replacement.


