Getting abnormally high CPU usage for a single vaguely named process like a WMI provider host can be a frustrating experience. This service should never use more than a few percent of your CPUs power.
This article will show you why this issue occurs, how to fix it, and how to prevent it from draining your CPU resources in the future.
What Is a WMI Provider?
WMI is an abbreviation for Windows Management Instrumentation. Its task within windows is to distribute and control internal information and data. It’s a process run at a kernel level, meaning it’s on the same level as any other essential windows function.
Kernel-level Windows operations are usually tough to manipulate or change since they are not accessible for regular use and remain hidden. So, the troubleshooting for this process can get a bit technical.
So, you might ask: can’t I simply disable it if it’s causing so much trouble? The short answer is that you could close from the task manager, but it’s not advised, as it’s a part of the critical Windows processes. A necessary windows process refers to any processes crucial to running Windows smoothly or is paramount to security.
In short, if you close this process, your PC might crash at any time or start to malfunction until the function is turned on again.
Is the WMI Provider Host Malware?
WMI Provider is not malware but a legitimate app. Don’t worry if you see this process in your task manager; it’s also part of any other windows in one form or another.
Unless the name is slightly different and an impostor virus is trying to bypass the safety of the window by using a similar name, then it’s a 100% safe and malware-free essential windows service process.
How to Fix High CPU Usage for WMI Provider?
The reasons for this update can be numerous. The most common ones are either due to corrupt registry files, improper updates, or outdated drivers. While the fixes for this issue are relatively easy to perform, it remains unclear, mainly what triggers it. Some of the fixes are discussed below:
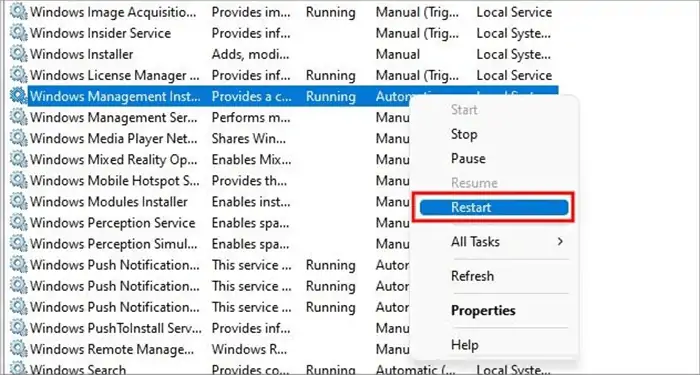
Restart Your Windows Management Instrumentation
You can easily restart the WMI provider from the task manager. This should fix your problem until you restart your computer, but you might have to do it every time your PC turns on, which is bothersome, to say the least.
Here are the steps to restart the WMI provider from the task manager.
- Press CTRL + ALT + Delete to open Task manager
- On the Services tab, select Open services
- Scroll all the way down & search for Windows management instrumentation.
- Right-click on it and click on “Restart.”

Locate the ClientProcessID in the Taskbar
This method includes two steps: first, we need to locate the ClientProcessid from the Event viewer, and then we need to stop that particular process in the task manager.
Here’re the steps to locate the PID:
- Press Windows Key + X.
- Click on Event Viewer.
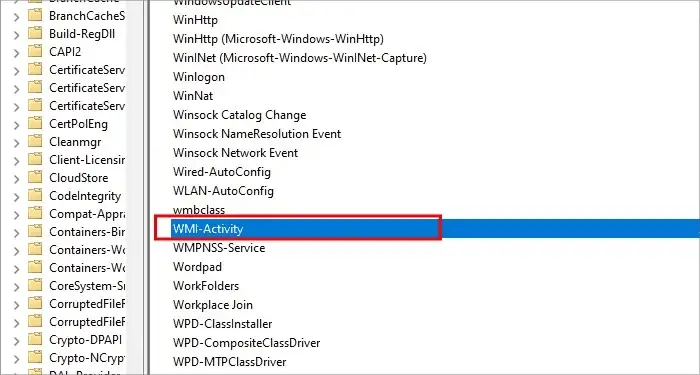
- Click on Applications and Services Log > Microsoft > Windows.
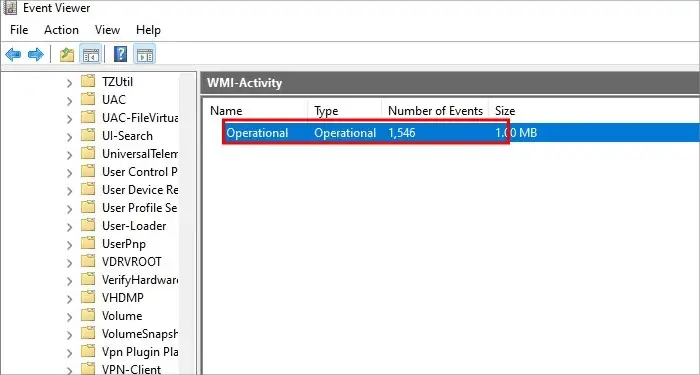
- Look for “WMI activity” in the list and click on the down facing arrow next to its name.

- You will see the option “Operational”; simply click on it .

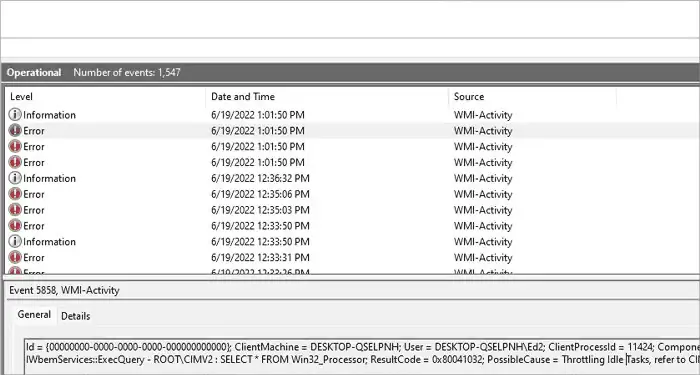
- You will see many errors listed within the log

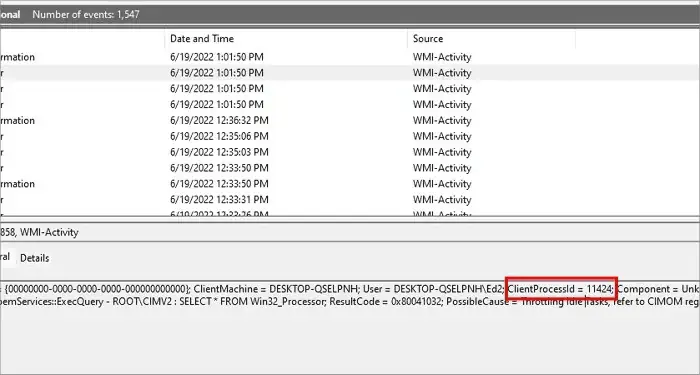
- Click on the error that says WMI-ACtivity under the “Source” tab in the panel.
- Right below the panel you will see a tab Called General.
- Look for the text saying: ClientProcessId = xxxx; like in the picture below.

- Copy the exact number of your specific ClientProcessId.
Once you have the exact number saved or written down somewhere, you need to stop the process that gives the error from the Task Manager Service panel. Here is how to do so:
- Open your task manager by pressing CTRL + ALT + DELETE.
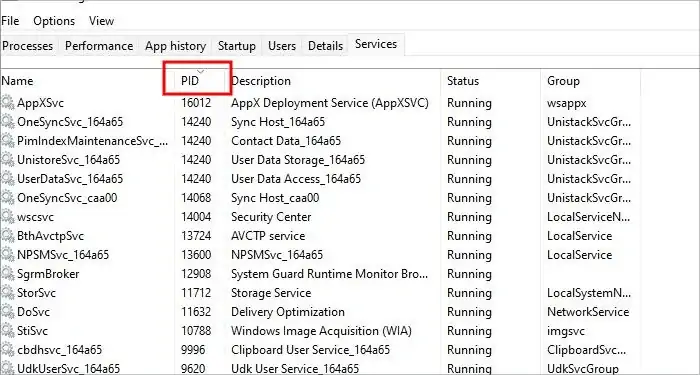
- Click on the Services tab and look for the tab called “PID” that holds different numbers.
- Click on the row where it says “PID” once to sort the IDs from lowest to highest numbers.

- Look for the number you previously copied from the ClientProcessId .
- Once you find the exact row that matches the PID number to the ClientProcessId number, right-click on it and click on stop.
After this is done, restart your PC and see if your CPU still gets very high usage from the WMI process. By going to the task manager and looking for the highest CPU usage applications in the “Processes” section.
Restart Your Windows in Safe Mode
Running windows in safe mode forces your operating system to run in complete default settings, with just the bare minimum requirements. Compatibility mode can be used to remedy any potential issues that arise with your WMI provider. To do this, follow these steps:
- Open your Windows Menu.
- Hover over Shutdown on the side of the panel.
- Hold the Shift key down and click Restart.
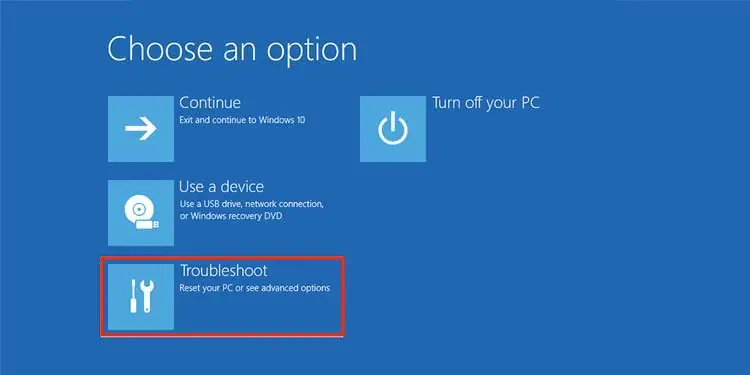
- Your PC will restart, and you will see a blue interface screen appear.
- Click on the big tab called Troubleshoot and then click on Advanced Options.

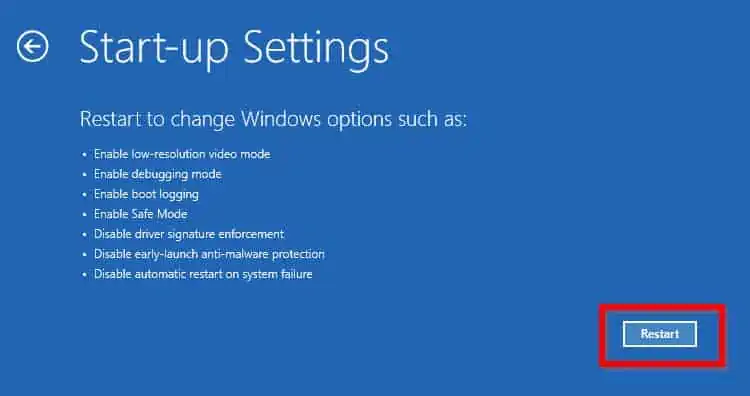
- Click on Startup Settings and click on Restart.

- After this, your PC will restart again; this time, you will see a different blue screen appear.
- To run Windows in safe mode, press number 4 or the F4 key.
Perform a Clean Boot to Identify Faulty Applications
Performing a clean boot can help you identify the faulty applications. To perform a clean boot follow these steps:
- Click on the Windows Start Menu.
- Open the Search bar and type in “
msconfig” and press Enter.
- Click on Services and then click the “Hide all Microsoft Services” checkbox.

- Select “Disable all” and click on Startup.
- Click on Open Task Manager.
- You will see a list of services that automatically startup every time you boot your PC.
- Disable any of those applications that you suspect might be interfering with your CPU draw by right clicking their name and choosing “Disable”.
Restart your PC and see if the issue persists. Since you are running windows without any interference from third-party apps or software, this might remove the high CPU draw from the WMI manager.


